


Card making Die cutting How to Papercraft Papercrafter Stamping Techniques
Learn to colour paper scraps with Distress Oxide inks in preparation for perfect colourful backgrounds
Francesca Vignoli’s project turns scraps into star quality with bold backdrops of coloured card strips. Don’t be fooled though – they’re completely tailored with ink pads, bringing up the ink smooshing vs ink blending debate. At the forefront are stamped elephants (so cute!) and heartfelt sentiments, proving how important it is to take your time in choosing the perfect words. P.S. Distress Micro Glaze might just be your new best friend.
Create your card strips
Colour up white cardstock scraps with all the Distress Oxide Inks. Smooshing the ink pad directly to the card will provide rich, bold colours. After a softer look? Sponge the ink with blending brushes instead. Also bear in mind the texture. These inks have a chalky finish, so if you’d like to make the colours look brighter and seal them permanently, apply a tiny amount of Distress Micro Glaze on top. You’re welcome! Once transformed, let them dry and cut into strips of different sizes.
Never waste a thing
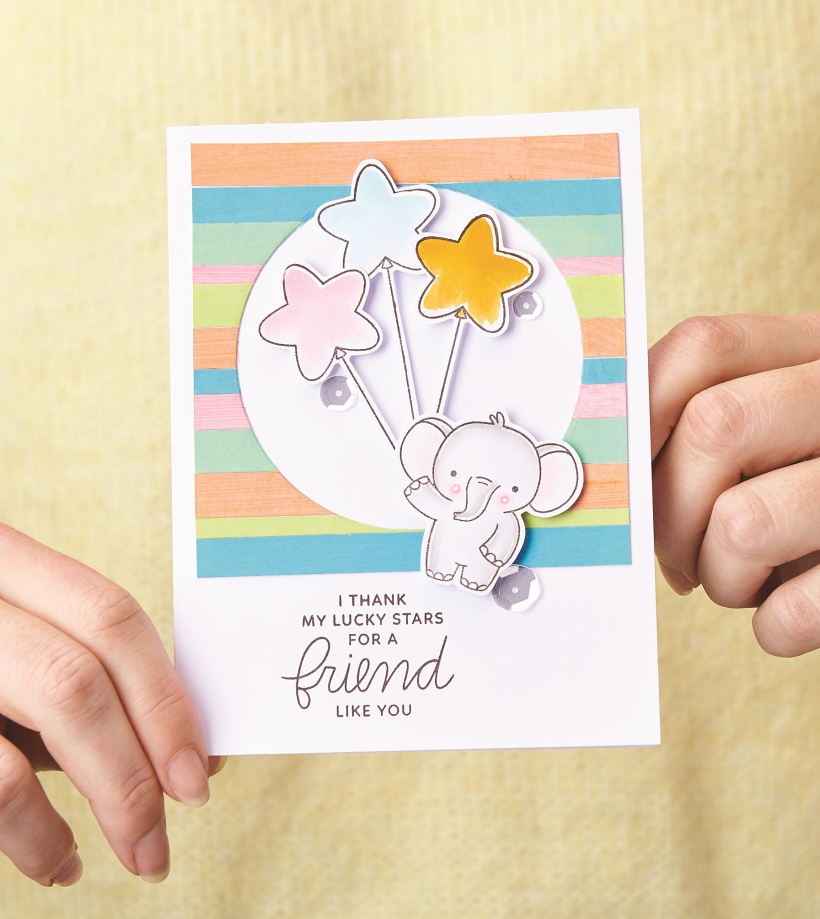
Don’t you dare dispose of one strip – you’re sure to find a home for it! For the balloons card on the previous page, you’ll cover a square of cardstock with colourful stripes, before die cutting a circle from it. Use that very circle as the backdrop for the ‘Thinking of you today and every day’ greeting. The other cards share the same coloured strip background too.
Get your stamps and sequins fix
Stamp a sentiment with Memento ink (Espresso Truffle’s the hero here) and a trusty stamping platform for precise placement. Get one now if you don’t have one, trust us! Use the same tools to stamp your elephant scenes, then colour them in with Copic markers before cutting them out and adding to the greeting with 3D foam pads. Finish with some sparkle using clear sequins, a glitter pen and white gel pen.
You Will Need:
Stamps: Pretty Pink Posh Elephant Friends, Thoughtful Greetings
Dies, Lawn Fawn Stackables
Pens: Copic W3, W2, W1, RV13, RV10, BG10, Y17, RV02, YG23, G14; Lawn Fawn Glitter Pen; white gel pen
Ink pads: Ranger Distress Oxide Worn Lipstick, Twisted Citron, Cracked Pistachio, Spiced Marmalade, Broken China; Memento Espresso Truffle
Cardstock, white
Sequins, Pretty Pink Posh Sparkling Clear Sequins Mix
Adhesives: liquid glue, 3D foam pads
Die-cutting machine
Striped Aperture Elephant Card
1. Create a side-folding 10.5cm x 14cm white blank. Ink different pieces of white cardstock with all the Distress Oxide Inks, let them dry, then cut into strips of different sizes.
2. Cut a 9.5cm square from white cardstock and cover it in strips, using liquid glue to secure them down. Die cut a circle from the centre and set aside. Glue the square frame onto the blank, then stamp a sentiment at the bottom.
3. Stamp an elephant and three balloons, then colour them in with Copic pens. Cut out and fix to the greeting with 3D foam pads. Add details with glitter and white gel pens, then finish with clear sequins.
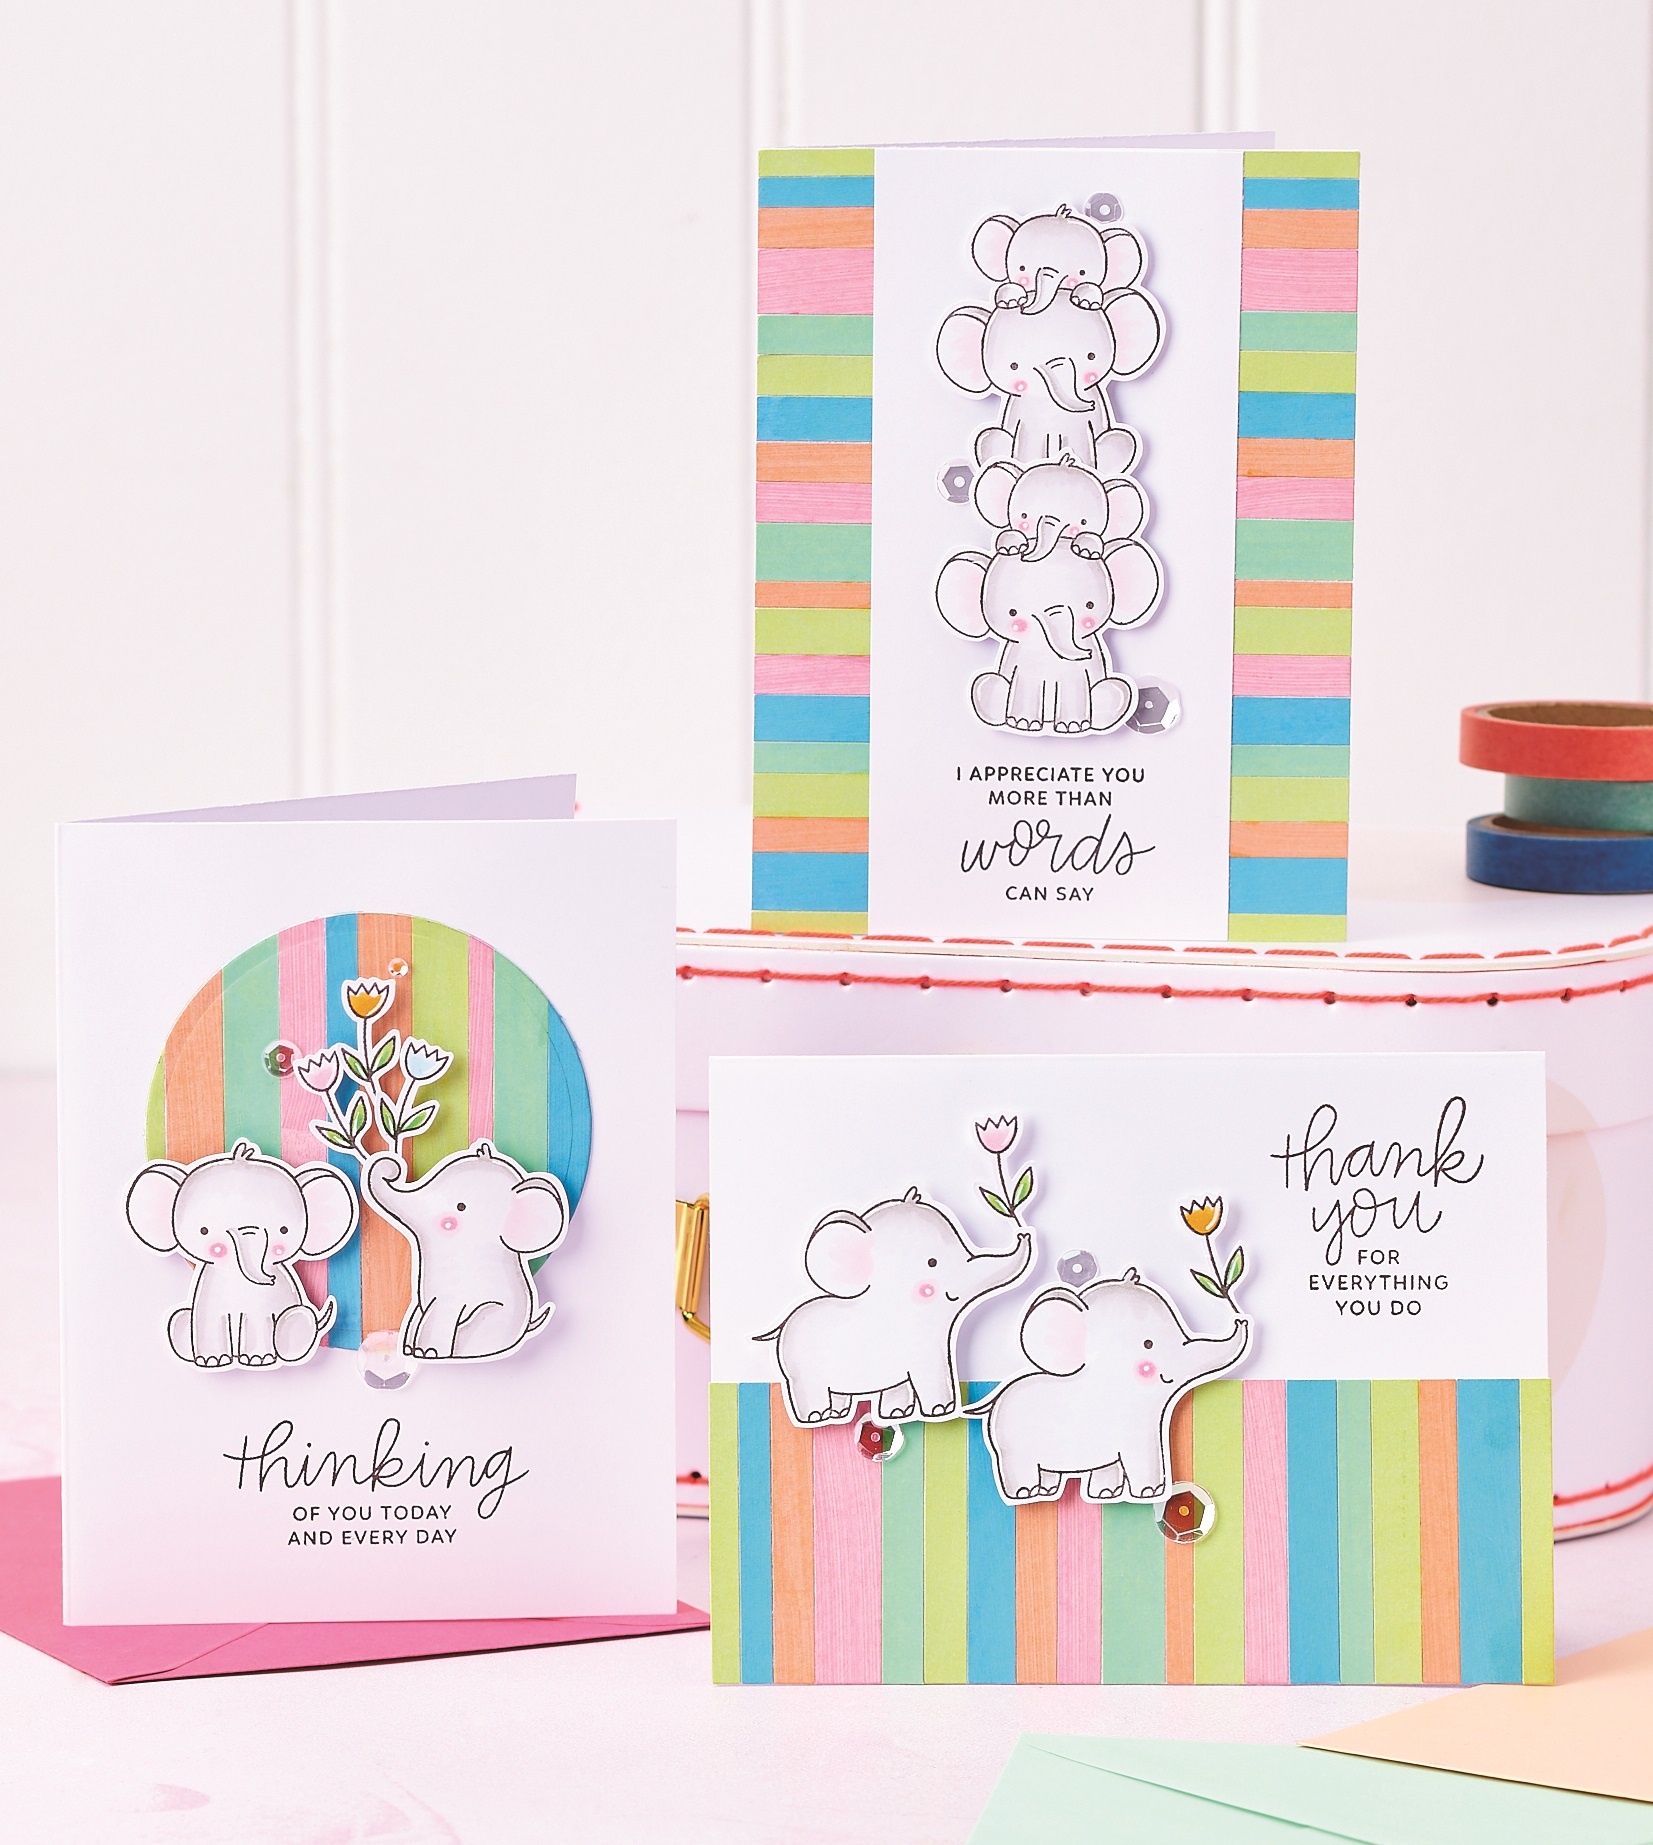
Striped Circle Elephant Card
1. Make a side-folding 10.5cm x 14cm white blank. Position the negative striped circle from creating the previous greeting onto the front of the card and glue it down.
2. Stamp a sentiment at the bottom, then two elephants and some flowers. Colour in, cut out and secure to the greeting with 3D foam pads. Apply highlights with a white gel pen, then add sparkle to the flowers with a glitter pen. Adhere clear sequins to finish.
Striped Border Elephant Card
1. Create a side-folding 10.5cm x 14cm white blank. Cut a matching panel of white cardstock and cover with colourful strips, securing them down with liquid glue.
2. Trim a 6.5cm x 14cm panel from white cardstock, then two 2.5cm x 14cm panels from the striped panel just created. Glue to the greeting, so the striped panels are down each side.
3. Stamp two elephant stacks, colour in, cut out and adhere with 3D foam pads. Stamp a sentiment at the bottom and add details to the elephants with a white gel pen. Complete the card with clear sequins.
Half Striped Elephant Card
1. Create a top-folding 10.5cm x 14cm white blank. Resize the striped panel left from creating the previous card to 5cm x 14cm and glue to the bottom of the greeting. Stamp a sentiment top-right.
2. Stamp two elephants and two flowers. Colour in. Cut out and add to the greeting with 3D foam pads. Add clear sequins and details with a glitter pen and white gel pen.
TOP TIPS
- Double-stack your stamped scenes to create unique arrangements
- Don’t go OTT on the sequins, however tempting it may be
- Play around with the layout before committing with adhesives

Busy lives often involve a lot of memos and reminders, and it can sometimes be hard to keep track. Luckily, we’ve got a sophisticated solution to keep your desk tidy and…

If you’re having a quiet Valentine’s with your beloved at home this year, make the place look a little more special with a speedy-to-make hearts frieze. Papercrafting doesn’t get much easier than…
Home decor Home decorations How to Papercraft Papercrafter Techniques Projects

1. Using a 3.5cm circle die, cut eight discs from chipboard and sixteen circles from patterned paper. Glue the patterned circles to either side of the discs and punch a…

Craft essentials
1. Cut a 5cm x 15cm strip of double-sided patterned paper and fold in half lengthways. Draw parallel pencil lines at 1.5cm and 2cm from the…


