


How to Papercraft Papercrafter Techniques Projects
Both cute and convenient, die cut these nifty reading essentials with Corinne Bradd
Please login to download. Sign in here
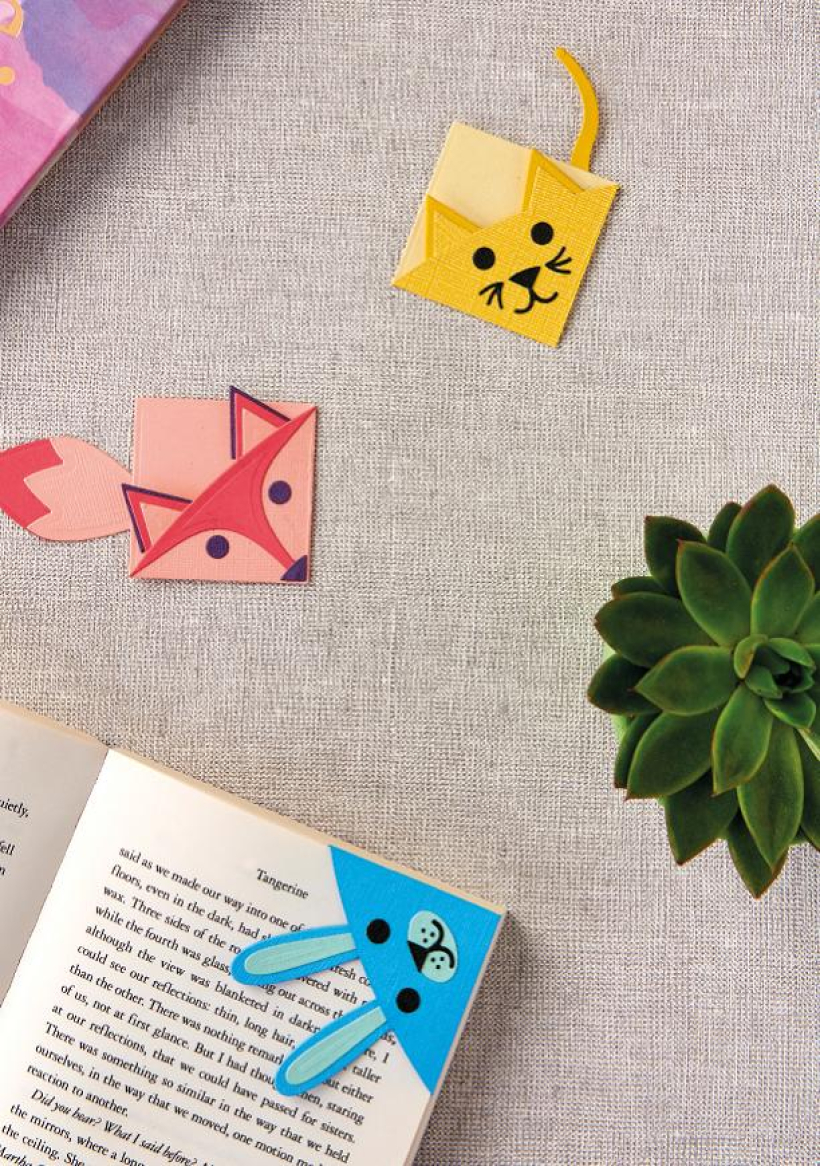
Designed to easily slip over the corner of a page, never lose track in your novel again with these adorable animal bookmarks. Simply round up some coloured cardstock and your trusty diecutting machine, then consult Corinne Bradd’s easy how-tos for super speedy stash-busting projects. Available in a rabbit, cat and fox face, choose your favourite character or go wild and make all three!
Dies, Sizzix Thinlits Animal Bookmark
Die-cutting machine
Cardstock, assorted colours
Adhesive, PVA
1. Die cut the main bookmark shape from yellow and cream doublesided card and fold along the score lines so that the darker shade forms the face. Cut two small triangular ears from the same card and two larger triangles and a long tail from a darker shade.
2. Layer the ears together and fix behind the front of the face, before folding the main body over and securing with a glued tab. Fix the base of the tail to the back of the bookmark so that it extends at the side.
3. From black card, cut two eyes, two sets of whiskers, a mouth and rounded nose shape. Arrange the features so that they are symmetrically placed below the ears, then secure when happy with the positioning.
1. From pale pink card, die cut a main bookmark piece and fold along the score lines. Cut an overlay tail piece and two small triangular ears from the same colour.
2. Select a deeper shade of pink and cut a tail, large triangular ears and a face mask section. Use a deep purple for the eyes, nose and another set of large ears.
3. Glue the small ears onto the larger ones and layer the darker large ears behind, slightly offsetting them. Fix to the reverse of the front bookmark section before folding over and glueing the tab to make the corner pocket.
4. Layer the tail pieces together and secure to the back of the bookmark so that it extends at an angle. Adhere the mask to the centre of the face, then add the eyes and nose symmetrically below it.
1. Die cut a main bookmark shape and a pair of elongated ears from blue. Choose a paler shade for the muzzle, tail and smaller ears. Layer the ears together and fix behind the face before folding and glueing the tab.
2. Secure the tail to the back so that it peeks over the edge and attach the muzzle to the face. From black card, cut two eyes, a pointed nose, mouth and freckles. Fix to the face and use PVA glue to adhere the freckles.
Tiny die-cuts are easy to lose. Pieces like freckles, whiskers andnoses are best placed onto a strip of low-tack tape until you are readyto fix them onto your project.
Keep your cutting plates clean and dust-free by giving them a scrub with soapy water now and again. Your plates can be used time and time again with a little TLC, so no matter how scruffy they look, they are still perfectly usable.
It may be worth running your sandwich through the machine more than once, especially for intricate dies. Rotate by 180° so that the pressure reaches other areas.

YOU WILL NEED:
Old books
Die, circle
Wooden skewer
Binder clips
Alcohol marker, orange
Adhesives: PVA glue, glue stick
Die-cutting machine

METHOD:
1. Use a circle die to cut lots of discs from book pages. Fold each circle in…
Halloween crafts Home decor Home decorations How to Papercraft Papercrafter Revamping Techniques Projects

Whilst this may look like a paper cutting that took hours to create, it really couldn’t be any easier. Our talented designer Corinne Bradd has created 15 templates for you to…
Die cutting Home decor Home decorations How to Papercraft Papercrafter Projects

You Will Need:
Templates or SVG files
Brother ScanNCut SDX1200 (optional)
Strong card
Cardstock, various colours
Jute yarn
PVA glue
Autumnal Display
1. Draw a 25cm wide circle on strong card, then draw a concentric 17cm wide circle…
Home decor Home decorations Papercraft Papercrafter Techniques

Shadow box cards, otherwise known as tunnel greetings or diorama cards, are designed to transport the recipient to picture-perfect backdrops in an instant. In this case, PaperCrafter designer Francesca Vignoli…
Birthday crafting Card making Die cutting How to Stamping Techniques Card Making


