


Die cutting How to Papercraft Papercrafter Techniques Die cutting Projects
Both cute and convenient, die cut these nifty reading essentials with Corinne Bradd
Please login to download. Sign in here
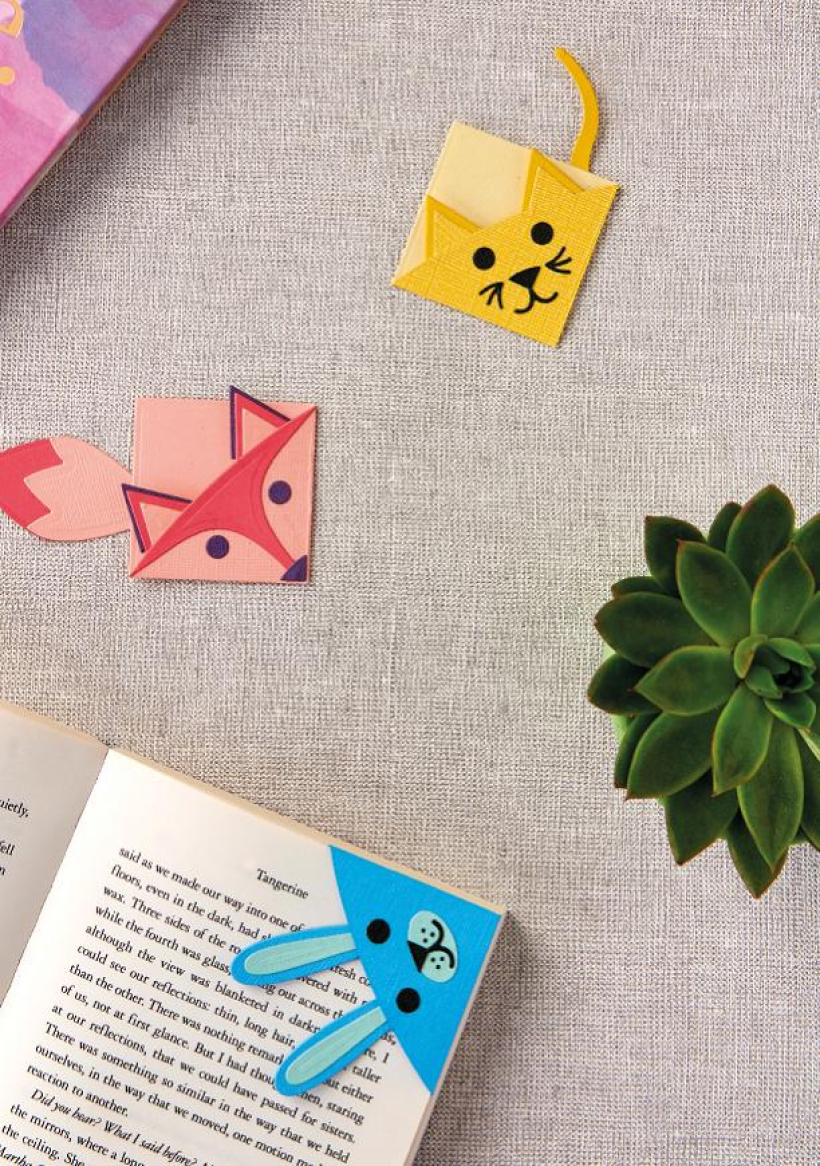
Designed to easily slip over the corner of a page, never lose track in your novel again with these adorable animal bookmarks. Simply round up some coloured cardstock and your trusty diecutting machine, then consult Corinne Bradd’s easy how-tos for super speedy stash-busting projects. Available in a rabbit, cat and fox face, choose your favourite character or go wild and make all three!
Dies, Sizzix Thinlits Animal Bookmark
Die-cutting machine
Cardstock, assorted colours
Adhesive, PVA
1. Die cut the main bookmark shape from yellow and cream doublesided card and fold along the score lines so that the darker shade forms the face. Cut two small triangular ears from the same card and two larger triangles and a long tail from a darker shade.
2. Layer the ears together and fix behind the front of the face, before folding the main body over and securing with a glued tab. Fix the base of the tail to the back of the bookmark so that it extends at the side.
3. From black card, cut two eyes, two sets of whiskers, a mouth and rounded nose shape. Arrange the features so that they are symmetrically placed below the ears, then secure when happy with the positioning.
1. From pale pink card, die cut a main bookmark piece and fold along the score lines. Cut an overlay tail piece and two small triangular ears from the same colour.
2. Select a deeper shade of pink and cut a tail, large triangular ears and a face mask section. Use a deep purple for the eyes, nose and another set of large ears.
3. Glue the small ears onto the larger ones and layer the darker large ears behind, slightly offsetting them. Fix to the reverse of the front bookmark section before folding over and glueing the tab to make the corner pocket.
4. Layer the tail pieces together and secure to the back of the bookmark so that it extends at an angle. Adhere the mask to the centre of the face, then add the eyes and nose symmetrically below it.
1. Die cut a main bookmark shape and a pair of elongated ears from blue. Choose a paler shade for the muzzle, tail and smaller ears. Layer the ears together and fix behind the face before folding and glueing the tab.
2. Secure the tail to the back so that it peeks over the edge and attach the muzzle to the face. From black card, cut two eyes, a pointed nose, mouth and freckles. Fix to the face and use PVA glue to adhere the freckles.

You will need:
Templates or SVG files
Stencil, Inkylicious Sunbeam 6”
Ink pad, Ranger Distress Oxide Salvaged Patina
Cardstock, various colours
Gems, clear
Faber Castell Polychromos coloured pencils
Pens: shimmer pen, black fineliner, white gel pen
Hampton Art Action…
Card making How to Papercraft Papercrafter Techniques Projects

YOU WILL NEED:
Craft essentials
FREE PaperCrafter patterned papers
Dies: circle, scalloped circle
METHOD
1 Create a 13cm x 17cm white blank then cover the front with orange card. Cut tennis racket paper, 12cm…
Card making Decoupage Die cutting How to Papercraft Papercrafter Card Making

You will need:
Templates
Coloured paper or thin cardstock, various colours
Wooden skewers or thin garden canes
Tools: scoring board, scoring tool, clips, small hole punch
Glue
Concertina Fold & Bind Method
1. Take a sheet of landscape…
Home decor Home decorations How to Papercraft Papercrafter Techniques Video tutorial Projects Make it Today

Stencils: Altenew Doily Frame, Watercolor Bouquet; My Favorite Things Basic Shapes Triangles
Stamps: Avery Elle Simple Sentiments, Simply Said Hugs
Die, Altenew Mega You
Ink pads: Ranger Distress…
Card making Die cutting How to Papercraft Papercrafter Techniques Card Making Die cutting Projects


