


How to Papercraft Papercrafter Techniques
Sachiyo Ishii shows you how with her easy step-by-step
Please login to download. Sign in here
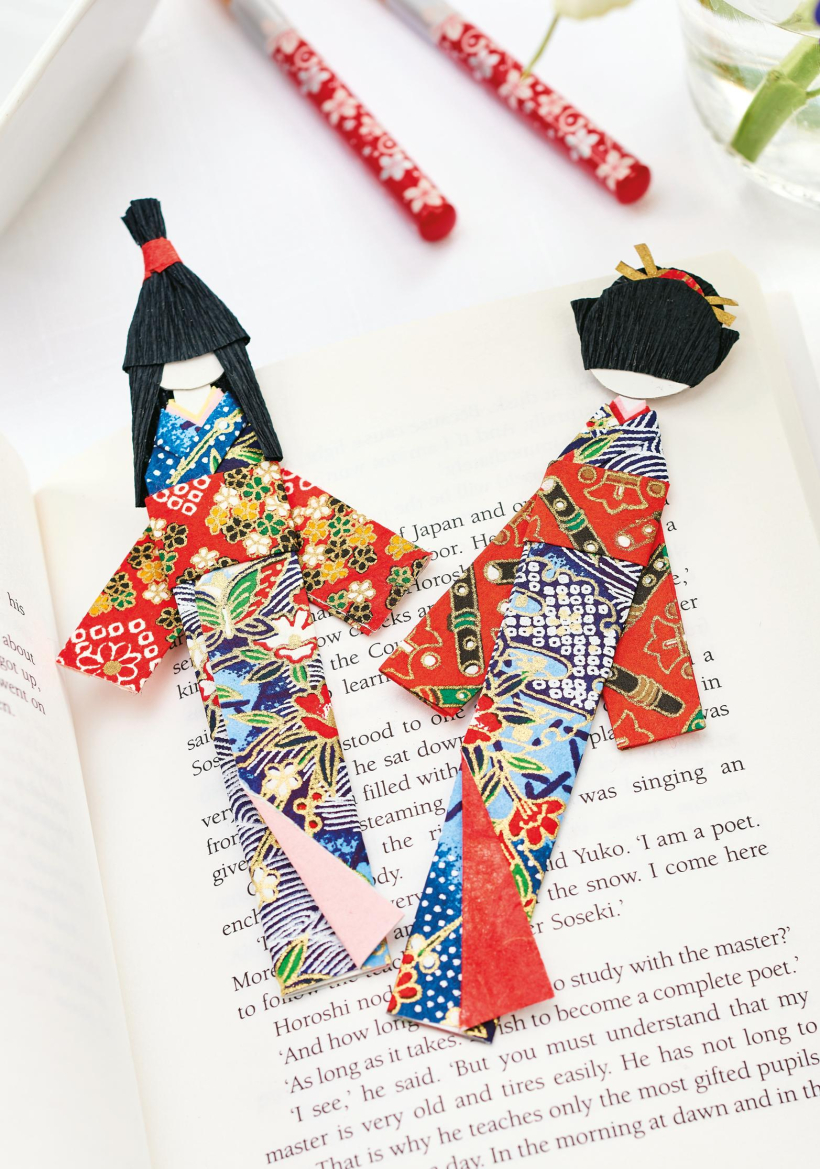
Combine the Japanese art of folding, decorative washi papers and the traditional kimono to create these beautiful book accessories. Our templates and simple step-by-step make them easy to create when you’re in need of a unique gift idea. You can get creative with your bookmark by choosing a different pattern for each one and altering the hairstyles. You could even stick a trio to the front of a blank to create a birthday card.
Craft essentials
Template from paper craftermagazine.co.uk
Washi paper, assorted patterns
Crepe paper: black, yellow
1. Download and print the templates from our website, then use them as a guide to cut the pieces from washi paper and card. Fold the collar (A) in half horizontally, then wrap around the neck, folded side up. Take care that the collar meets at the centre. Position the right side first, then the left side over the right; this is the traditional way of wearing a kimono. Glue the ends of the collar to the body.
2. Place the collar (B) the same way, showing a little of the first one. Fold the top end of the kimono twice towards you, folding 5mm each time. Turn the paper over and fold backwards once to create the collar. Glue the inner lining to the right at the base. Place the body on top of the kimono.
3. Cover the girl’s right shoulder first: the left goes over the right in the centre. Glue the kimono’s top corners to the body. Fold right, then left over the body. Fold 5mm from the edge of the belt horizontally and fold the rest in half. Wrap around the body and glue the edges together at the back.
4. Make up the belt (B) and glue the inner sides. Fold in the centre, and fix to the back of the body. Attach the back of the head to the hair (A), fold the sides inwards and glue to the cheek.
5. Position the hair (B) to the front of the head and fold the sides backwards. Glue the side edges to the back of the head. Gather the top of the hair (B) and wrap it with a yellow hair band. Fold the kimono end outwards to show the inner lining.

You will need:
Templates or SVG files
Stencil, Inkylicious Sunbeam 6”
Ink pad, Ranger Distress Oxide Salvaged Patina
Cardstock, various colours
Gems, clear
Faber Castell Polychromos coloured pencils
Pens: shimmer pen, black fineliner, white gel pen
Hampton Art Action…
Card making How to Papercraft Papercrafter Techniques Projects

YOU WILL NEED:
Craft essentials
FREE PaperCrafter patterned papers
Dies: circle, scalloped circle
METHOD
1 Create a 13cm x 17cm white blank then cover the front with orange card. Cut tennis racket paper, 12cm…
Card making Decoupage Die cutting How to Papercraft Papercrafter Card Making

You will need:
Templates
Coloured paper or thin cardstock, various colours
Wooden skewers or thin garden canes
Tools: scoring board, scoring tool, clips, small hole punch
Glue
Concertina Fold & Bind Method
1. Take a sheet of landscape…
Home decor Home decorations How to Papercraft Papercrafter Techniques Video tutorial Projects Make it Today

Stencils: Altenew Doily Frame, Watercolor Bouquet; My Favorite Things Basic Shapes Triangles
Stamps: Avery Elle Simple Sentiments, Simply Said Hugs
Die, Altenew Mega You
Ink pads: Ranger Distress…
Card making Die cutting How to Papercraft Papercrafter Techniques Card Making Die cutting Projects


