


Easter crafts Papercraft Papercrafter Projects
The secret to a stand-out springtime decoration? 3D flower dies and a whole lot of coloured cardstock
Please login to download. Sign in here
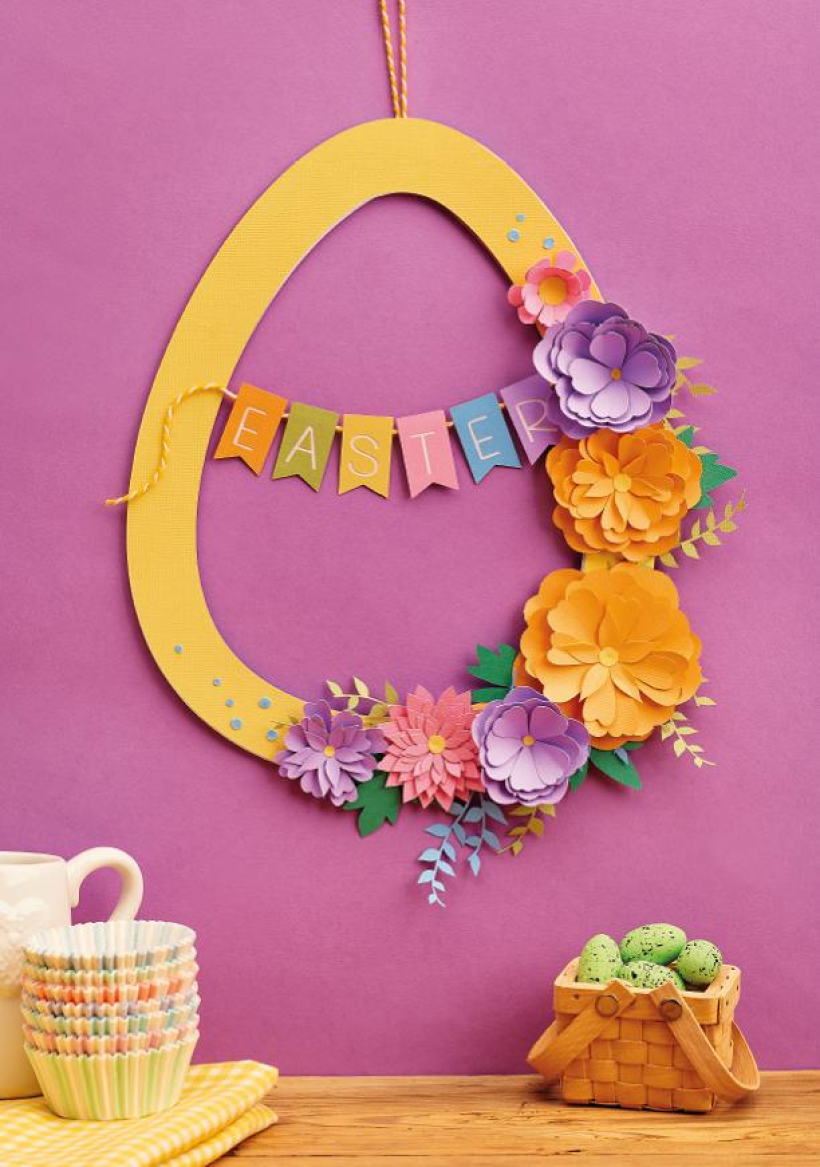
A wreath isn’t just for Christmas. There, we said it! More and more of us are embracing the trend at Easter, so why not get involved and craft this floral sensation alongside Keren Baker? Utilising minimal supplies, you can either use your stash of flower dies with your manual die-cutting machine or cut out the motifs digitally using SVGs for speed. If you own one, we also recommend using a glue gun to adhere the die-cuts to the wreath.
Template from papercraftermagazine.co.uk
Dies: 3D flowers, leaves, letters
Cardstock, various colours
Baker’s twine, yellow
Punch, small circles
Glue
Die-cutting machine
1. Using the template, cut out several egg-shaped frames from strong card and yellow cardstock. Adhere together, ensuring the yellow frame is the top layer. Die cut different sized flowers from multiple coloured cardstock.
2. Die cut leaves from green, yellow and blue. Add yellow centres to the flowers using a circle punch. Arrange some of the flowers and leaves onto the frame, adding the larger flowers in the centre of your arrangement – we’ve focused ours on the right-hand side.
3. Trim banner shapes from orange, green, yellow, pink, blue and purple card. Die cut letters from the banner shapes to spell out ‘Easter’. Add white cardstock behind each one, then glue along a length of yellow baker’s twine. Secure across the wreath.
4. Glue the remaining flowers to the wreath. Add small blue punched circles around the edges of the flowers and a loop of yellow baker’s twine to the top, securing on the reverse.

YOU WILL NEED:
Old books
Die, circle
Wooden skewer
Binder clips
Alcohol marker, orange
Adhesives: PVA glue, glue stick
Die-cutting machine

METHOD:
1. Use a circle die to cut lots of discs from book pages. Fold each circle in…
Halloween crafts Home decor Home decorations How to Papercraft Papercrafter Revamping Techniques Projects

Whilst this may look like a paper cutting that took hours to create, it really couldn’t be any easier. Our talented designer Corinne Bradd has created 15 templates for you to…
Die cutting Home decor Home decorations How to Papercraft Papercrafter Projects

You Will Need:
Templates or SVG files
Brother ScanNCut SDX1200 (optional)
Strong card
Cardstock, various colours
Jute yarn
PVA glue
Autumnal Display
1. Draw a 25cm wide circle on strong card, then draw a concentric 17cm wide circle…
Home decor Home decorations Papercraft Papercrafter Techniques

Shadow box cards, otherwise known as tunnel greetings or diorama cards, are designed to transport the recipient to picture-perfect backdrops in an instant. In this case, PaperCrafter designer Francesca Vignoli…
Birthday crafting Card making Die cutting How to Stamping Techniques Card Making


