


Card making Die cutting How to Techniques
Tracey Daykin-Jones shows you how to make your sentiments pop with the stacked die-cutting technique!
YOU WILL NEED:
Craft essentials
Dies: Xcut Best Wishes, Stampin’ Up! Quilted Christmas
METHOD:
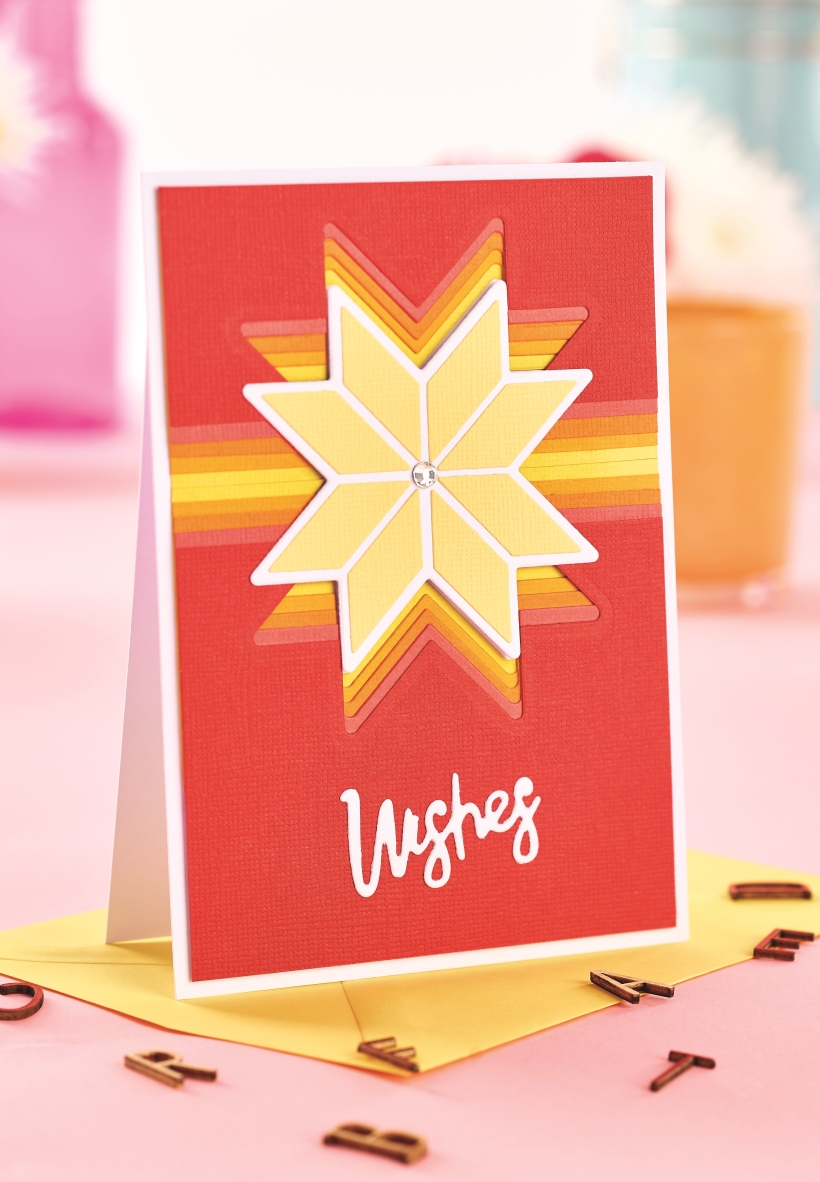
1. Trim five 10cm x 14.5cm panels of card in varying colours from yellow through to dark red. Die cut the star shadow from the yellow card. Using the yellow piece as a template, place orange card behind it, then die cut again. Repeat this until all five card panels have star apertures.
2. Layer the card together, then cut through the centre to create ten pieces. Take the yellow card and adhere the light orange card on top of it, leaving a strip of yellow visible. Repeat this until all of the card pieces are layered top and bottom.
3. Trim the edges of the card panels so that they align, then fix it to a 10cm x 15cm top-folding blank. Die cut a star shadow from white and yellow, then piece together to create the main star.
4. Fix a silver gem in the centre of the star, then attach it to the greeting with 3D foam pads. Die cut a ‘Wishes’ sentiment from white card and fix it to the bottom of the card.
Need more coloured card? You can find a fantastic selection at Create and Craft, the UK’s best shopping channel for crafts.

Busy lives often involve a lot of memos and reminders, and it can sometimes be hard to keep track. Luckily, we’ve got a sophisticated solution to keep your desk tidy and…

If you’re having a quiet Valentine’s with your beloved at home this year, make the place look a little more special with a speedy-to-make hearts frieze. Papercrafting doesn’t get much easier than…
Home decor Home decorations How to Papercraft Papercrafter Techniques Projects

1. Using a 3.5cm circle die, cut eight discs from chipboard and sixteen circles from patterned paper. Glue the patterned circles to either side of the discs and punch a…

Craft essentials
1. Cut a 5cm x 15cm strip of double-sided patterned paper and fold in half lengthways. Draw parallel pencil lines at 1.5cm and 2cm from the…


