


Make a sparkly snowflake greeting that’s sure to wow, with the help of this bonus project from 3L®.
Scrapbook Adhesives by 3L®: 3D Foam Snowflakes, 3D Foam Squares, Creative Photo Corners, silver and Dodz™ Small, E-Z Squares®, white, Card, kraft, teal, white, Clearsnap Craft Foil, silver, Jillian Vance Snowflake Sentiment stamp set, Simple Stories patterned paper, Memento Tuxedo Black Ink from Imagine Crafts/Tsukineko, Twine, Button, Paper trimmer and scissors
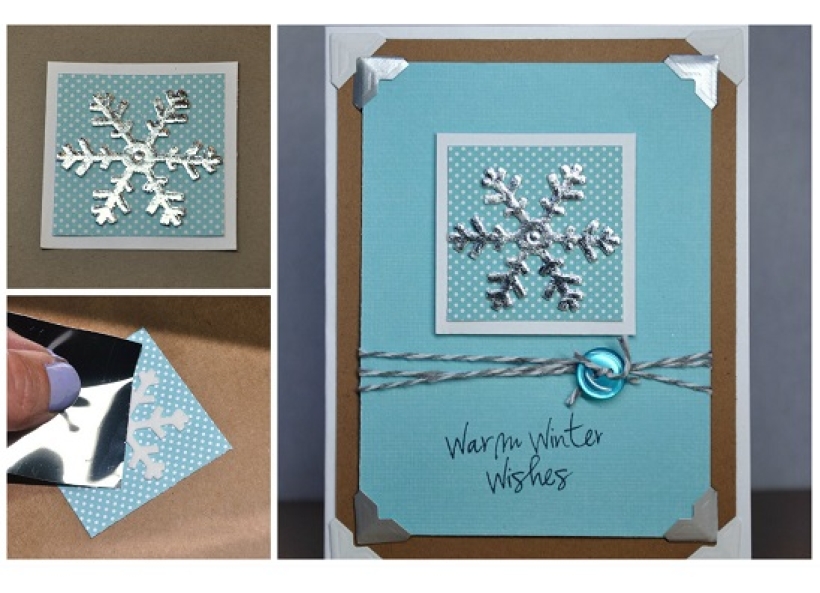
If you thought adhesives were simply for sticking, then think again - they also add a wonderful creative dimension to cardmaking and scrapbook projects. This Warm Winter Wishes Card, designed by Beth Pingry for Scrapbook Adhesives by 3L®, looks utterly charming and will be a firm favourite to make and give. You’ll have real fun exploring the creative possibilities that 3L® has to offer.
For more great ideas and top products visit scrapbook-adhesives.com
• Create a 4¼ x 5½" card base with side fold from white card. Cut kraft card to 4 x 5¼" and adhere to the base with E-Z Squares and White Creative Photo Corners.
• Trim teal card to 3½ x 4¾". Wrap with twine and tie at the front. Stamp sentiment below the twine. Adhere to the kraft panel with E-Z Squares and Silver Creative Photo Corners.
• Pull twine through the button and tie in a knot. Fix to the card front with Dodz™ Small. Trim excess twine with scissors.
• Cut patterned paper to 1¾" square. Mount with E-Z Squares to white cardstock cut to 2" square. 5. Remove 3D Foam Snowflake from sheet and secure centrally onto the patterned paper square. 6. Remove top liner from snowflake. Lightly tap silver craft foil (shiny side up) onto the exposed adhesive of the snowflake. Continue until all the adhesive is covered with foil.
• Adhere the square with the snowflake onto the card front with 3D Foam Squares.

Busy lives often involve a lot of memos and reminders, and it can sometimes be hard to keep track. Luckily, we’ve got a sophisticated solution to keep your desk tidy and…

If you’re having a quiet Valentine’s with your beloved at home this year, make the place look a little more special with a speedy-to-make hearts frieze. Papercrafting doesn’t get much easier than…
Home decor Home decorations How to Papercraft Papercrafter Techniques Projects

1. Using a 3.5cm circle die, cut eight discs from chipboard and sixteen circles from patterned paper. Glue the patterned circles to either side of the discs and punch a…

Craft essentials
1. Cut a 5cm x 15cm strip of double-sided patterned paper and fold in half lengthways. Draw parallel pencil lines at 1.5cm and 2cm from the…


