


Card making Die cutting How to Papercraft Papercrafter Techniques Card Making
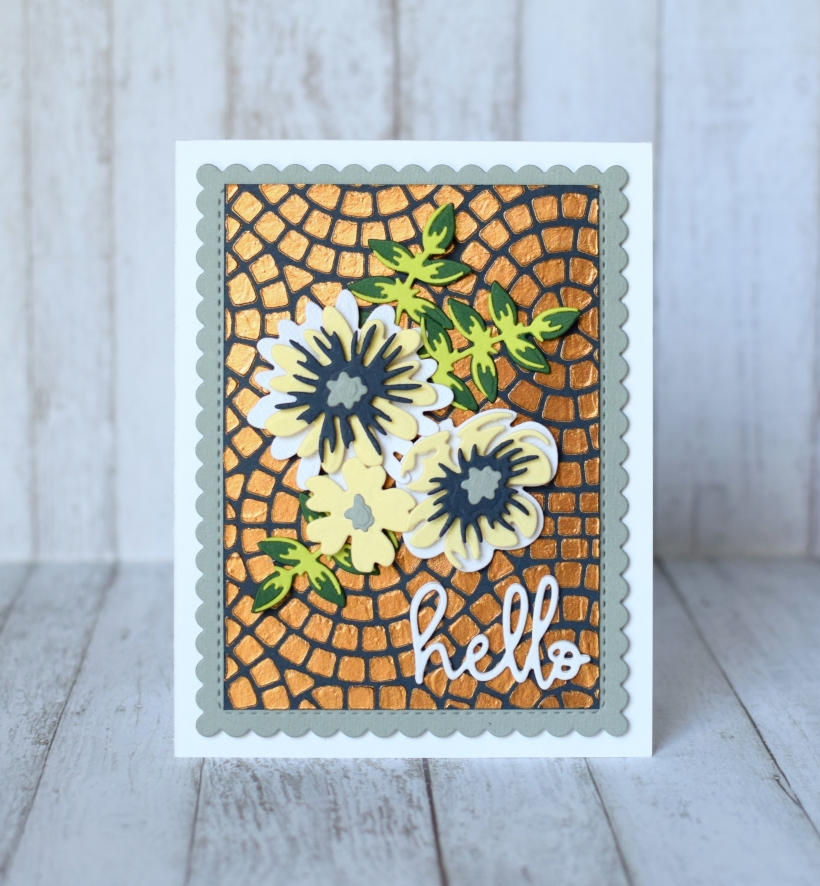
Brand new to Therm O Web, the buttery smooth Deco Foil Metallix Gel is a go-to medium if you’re after the luxe look. Pair with your favourite stencils to create beautifully reflective backgrounds for your greetings without the need for specialist tools or adhesives. As Therm O Web designer Shemaine Smith demonstrates, simply apply and leave to dry for stunning metallic results – easy!
YOU WILL NEED:
Craft essentials
Cardstock: Gina K. Designs Layering Weight White, Moonlit Fog, Blue Denim, Lemon Drop, Key Lime, Christmas Pine
Therm O Web Deco Foil Metallix Gel, Aged Copper
Therm O Web Deco Foil Stencil Pal Wide-Width Applicator
Stencil, Stampers Anonymous Tim Holtz Layering Mosaic
Dies: Spellbinders Layered Colorful Blooms, Newton’s Nook Frames & Flags
Adhesives: Therm O Web iCraft Mixed Media adhesive, 3D White Foam Squares, XL Tape Runner, Purple Tape
METHOD:
1. Secure the mosaic stencil to a strip of navy card with tape. Using a palette knife, apply a small amount of Metallix Gel along the top edge of the stencil.
2. Use the Stencil Pal to gently spread the gel down and across the stencil, filling all open areas with an even coat. Carefully remove the stencil and let the gel dry for 1-2 hours.
3. Die cut layered flowers and leaves from various coloured card, a sentiment three times from white, then a scalloped rectangle from grey. Adhere the larger flower layers together with 3D foam pads.
4. Trim the stencilled design to fit in the centre of a scalloped rectangle. Attach with tape runner. Add the panel to a 10.5cm x 14cm white blank. Secure the die-cuts to the front, adhering some with 3D foam pads.
Head to thermowebonline.com for more mixed media saviours and cardmaking essentials.

Busy lives often involve a lot of memos and reminders, and it can sometimes be hard to keep track. Luckily, we’ve got a sophisticated solution to keep your desk tidy and…

If you’re having a quiet Valentine’s with your beloved at home this year, make the place look a little more special with a speedy-to-make hearts frieze. Papercrafting doesn’t get much easier than…
Home decor Home decorations How to Papercraft Papercrafter Techniques Projects

1. Using a 3.5cm circle die, cut eight discs from chipboard and sixteen circles from patterned paper. Glue the patterned circles to either side of the discs and punch a…

Craft essentials
1. Cut a 5cm x 15cm strip of double-sided patterned paper and fold in half lengthways. Draw parallel pencil lines at 1.5cm and 2cm from the…


