


Card making Christmas cards Papercrafter Card Making
Make a Nordic Christmas card with the new Nordic Christmas range by Crafter’s Companion. It’s ideal for contemporary festive projects !
Craft Essentials, Crafter's Companion Nordic Christmas range, Computer and colour printer, Distress ink: brown, Ink pad: black, Circle punch: 4cm, Hole punch
Pop the Nordic Christmas CD-Rom into your PC and print beautiful colour Christmas images by Karen Tye Bentley, along with frames, elements, papers, toppers, borders, backing papers and more in a lovely Scandinavian style. Choose from house, Santa, reindeer, snowman and sleigh motifs, then select matching rubber stamps and embossing folders featuring lovely images and Christmas sentiments.
Like this? Check out more Nordic Christmas cards by Jenny Pearce in issue 88 of PaperCrafter
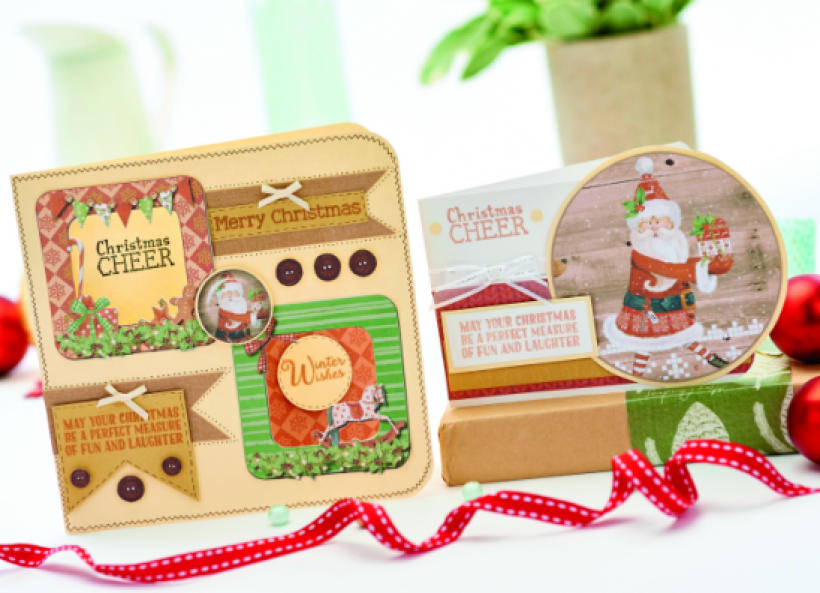
• Score and fold a large piece of cream card in half to create a 17.5cm x 18.5cm blank. Print the Christmas frames from the CD (3D frames, design 5) and cut around the outer edge of the two frames shown. Stick the red frame to the top left of the card and the green one to the bottom right. Open the card and using a craft knife and cutting mat, carefully cut out the aperture around the decorative items.
• Close the card and stamp ‘Christmas cheer’ in black ink through the top aperture. Print out the red patterned paper for the green frame background from the CD (found under co-ordinating papers, design 11, colour 1). Cut to the same shape as a frame (without the aperture) and stick to the back inside of the card, so it is visible through the green frame aperture when the card is closed. Stamp ‘Winter wishes’ in brown ink onto spare cream card. Cut into a 4cm circle and layer with foam pads in the centre of the green aperture as shown.
• Emboss the reindeer parade into natural card and cut into long rectangles with a ‘V’ shape cut in the right ends. Stick where shown. Stamp the remaining sentiments in brown ink onto dark cream card. Cut one to a rectangle and stick to the top embossed section. Cut the other to the shown shape and stick with foam pads on the lower embossed section. Add bows to the top of each.
• Draw a doodled zig-zag line in brown pen around the edge of the card. Add a dotted line around the edges of the embossed pieces. Draw dashed brown lines around the ‘Winter wishes’ circle and its patterned background inside the card.
• Finish with a Santa image punched from the print-out from the CD (found under Card Companions, Design 3). Matt this onto a cream card circle and stick with foam pads between the frames. Stick the printed-out buttons onto card to strengthen and cut out four large buttons and two small. Stick where shown with foam pads to complete the card.
• Create a 10.5cm x 15cm blank from white card. Print the Christmas Santa image from the CD (found under Card Companions, Design 3) and layer onto cream card. Cut to a circle, leaving a narrow cream edge showing.
• Print out the knitted pattern background from the CD (Coordinating Papers, design 2 Colour 1) and stick a strip horizontally across the white card. Round the outer two corners of the card. Emboss the reindeer parade onto dark cream card and add a narrow strip to the printed knitted paper strip.
• Stick the matted Santa image to the right of the card, overlapping the top and opening edge. Stamp ‘Christmas cheer’ in brown ink in the remaining white space at the top left. Add cream hole punched card circles each side to decorate.
• Stick a piece of white sheer ribbon along the top of the red strip and add a bow to its centre. To complete, stamp the remaining sentiment in brown ink onto white card. Cut to a rectangle and matt onto cream card. Layer with sticky pads where shown.

Busy lives often involve a lot of memos and reminders, and it can sometimes be hard to keep track. Luckily, we’ve got a sophisticated solution to keep your desk tidy and…

If you’re having a quiet Valentine’s with your beloved at home this year, make the place look a little more special with a speedy-to-make hearts frieze. Papercrafting doesn’t get much easier than…
Home decor Home decorations How to Papercraft Papercrafter Techniques Projects

1. Using a 3.5cm circle die, cut eight discs from chipboard and sixteen circles from patterned paper. Glue the patterned circles to either side of the discs and punch a…

Craft essentials
1. Cut a 5cm x 15cm strip of double-sided patterned paper and fold in half lengthways. Draw parallel pencil lines at 1.5cm and 2cm from the…


