


Card making Die cutting How to Techniques
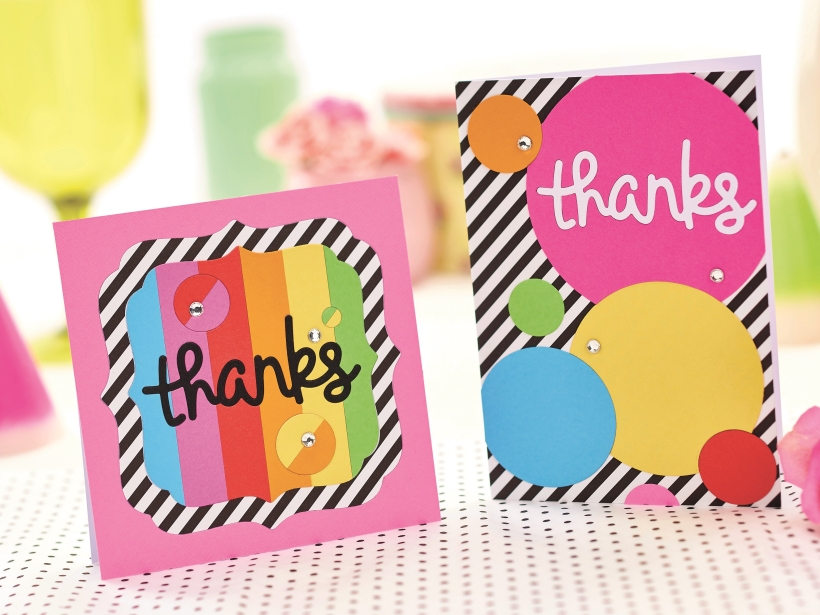
Tracey Daykin-Jones turns trash into treasure with this savvy approach to die cutting! If you can’t stand waste and always keep offcuts to use in other projects, inlaid die-cuts are the perfect solution and can be done with basic die shapes everyone has in their stash. Simply slot a die-cut motif into a matching aperture in a contrasting colour – talk about simple!
The result is a fresh 2D design where everything is level. Choosing this technique over standard layering makes a huge difference, especially when your design involves a lot of elements or overlapping motifs. As an added bonus, your cards are more post-friendly! There won’t be any natural shadows from layering, so it works best with bright and distinct shades – black and white can highlight sentiments well. We also recommend using a pen-tip glue applicator to make sure that everything is stuck down well; little bits sticking up can spoil the effect.
YOU WILL NEED:
Craft essentials
Dies: circles, nesting decorative-edged squares, Lawn Fawn Scripty Thanks
FRAME CARD:
1. Use a 10.5cm decorative square die on the centre of a 12cm square piece of pink card. Use the same die, plus one 2cm smaller, on black and white striped paper to create a border.
2. Secure six 1.5cm wide strips of card in rainbow colours onto a piece of paper. Die cut this using the smaller decorative square.
3. Die cut ‘Thanks’ across the centre, plus three small circles from the join of coloured strips. Inlay wording cut from black card into the aperture.
4. Turn the circular pieces to the same direction as the diagonal stripes, then glue all the elements onto a tent-fold blank and finish with three gems.
SPEECH BUBBLE CARD:
1 Layer monochrome striped paper diagonally onto a 10.5cm x 15cm blank. Die cut seven circles between 2cm and 8.5cm in diameter from several bright colours of card.
2. Cut ‘Thanks’ from the largest circle and set aside. Use the same die on white card, then insert the letters into the remaining aperture.
3. Arrange the shapes on the front of the greeting, then lightly trace where they overlap each other and the card edges. Trim away these sections then glue all elements in place.
4. Replace the pieces of card that fill the letters and decorate the front with gems.
Want to refresh your die collection? Shop Create and Craft’s die-cutting range. Their customer service is second to none!

Busy lives often involve a lot of memos and reminders, and it can sometimes be hard to keep track. Luckily, we’ve got a sophisticated solution to keep your desk tidy and…

If you’re having a quiet Valentine’s with your beloved at home this year, make the place look a little more special with a speedy-to-make hearts frieze. Papercrafting doesn’t get much easier than…
Home decor Home decorations How to Papercraft Papercrafter Techniques Projects

1. Using a 3.5cm circle die, cut eight discs from chipboard and sixteen circles from patterned paper. Glue the patterned circles to either side of the discs and punch a…

Craft essentials
1. Cut a 5cm x 15cm strip of double-sided patterned paper and fold in half lengthways. Draw parallel pencil lines at 1.5cm and 2cm from the…


