


Card making Christmas cards Christmas crafts How to Papercraft Papercrafter Stamping Techniques Card Making
Not sure how to use your coordinating stamp and die sets? Francesca Vignoli has the answers
These traditional Christmas cards by Francesca Vignoli are traditionally delightful. She’s adopted clever techniques using coordinating stamp and die sets to help bring some of our favourite Christmas motifs to life. This is helped even further by using distress oxide inks to colour them in. That’s right, there’s not an alcohol marker in sight. Plus, Francesca’s finished off her designs with some lovely glitter highlights – what a joy!
Stamp-die coordination
You might believe that coordinating stamp and die sets are only useful for getting a clean-cut image, but believe us, you’re mistaken. On one card, Francesca’s used her Heffy Doodle Santa’s Village dies to create frames for her stamped motifs, introducing a clever layered effect to her design. On another, the coordinating die provides the perfect excuse for an aperture card. With the card shut, you can show off one seasonal scene, then another one entirely once the greeting is opened up.
Go easy on the glitter
The key with adding some sparkle to your cards is to recognise that sometimes less is more. Francesca shows that by adding only a touch of glitter to her greetings. Firstly, those little stars of gold glitter card atop her trees are a stroke of genius. Adding a little flourish like this actually makes the glitter stand out more, without being too overwhelming. Follow Francesca’s lead and add white glitter to your snow hills too.
Inks aren’t just for stamping
Us crafters all know the joys of blending some distress oxide inks. But did you know you can use them to colour your motifs too? That’s exactly what Francesca has done here, bringing that sought-after distress look to her shops and Santas. To do this, smoosh your ink pads onto a clear block, then add a touch of water and apply the ink to your stamped motifs. Be careful to add only a very small amount of water, however, as distress oxides are not water resistant.
YOU WILL NEED:
Dies: Heffy Doodle Santa’s Village, Lovely Little Borders
Stamps: Heffy Doodle Santa’s Village, Elfing Christmas Words
Stencil, Heffy Doodle First Snow
Heffy Doodle Memo Tape
Ink pads: Ranger Distress Oxide Abandoned Coral, Tea Dye, Twisted Citron, Speckled Egg
Cardstock, white
Paper, gold glitter
Gel pen, white
Paint brush, fine tip
Nuvo White Blizzard Glitter Drops
Acrylic block
Stamping platform
Adhesives: 3D foam pads, foam tape, Heffy Doodle Memo Tape, liquid glue
Die-cutting machine
Mrs. Claus’ Bakery Card
1. Stamp two trees and a bakery onto the front of a white blank, 12cm square, with distress oxide inks. Allow to dry, then use their coordinating dies to cut masks for the motifs from memo tape. Put the masks in place, then add a snowy stencil on top and apply ink to the top half of the card. Remove everything and accentuate the snow with white gel pen dots.
2. Smoosh the same ink pads as before onto an acrylic block, add just a little water, and use to colour in the motifs. Stamp additional images and colour in the same way, then die cut out. Adhere to the scene using 3D foam pads. Stamp a sentiment towards the bottom, then cut out a gold star and fix to the top of the tree. Finish with white glitter drops on the snow hill.
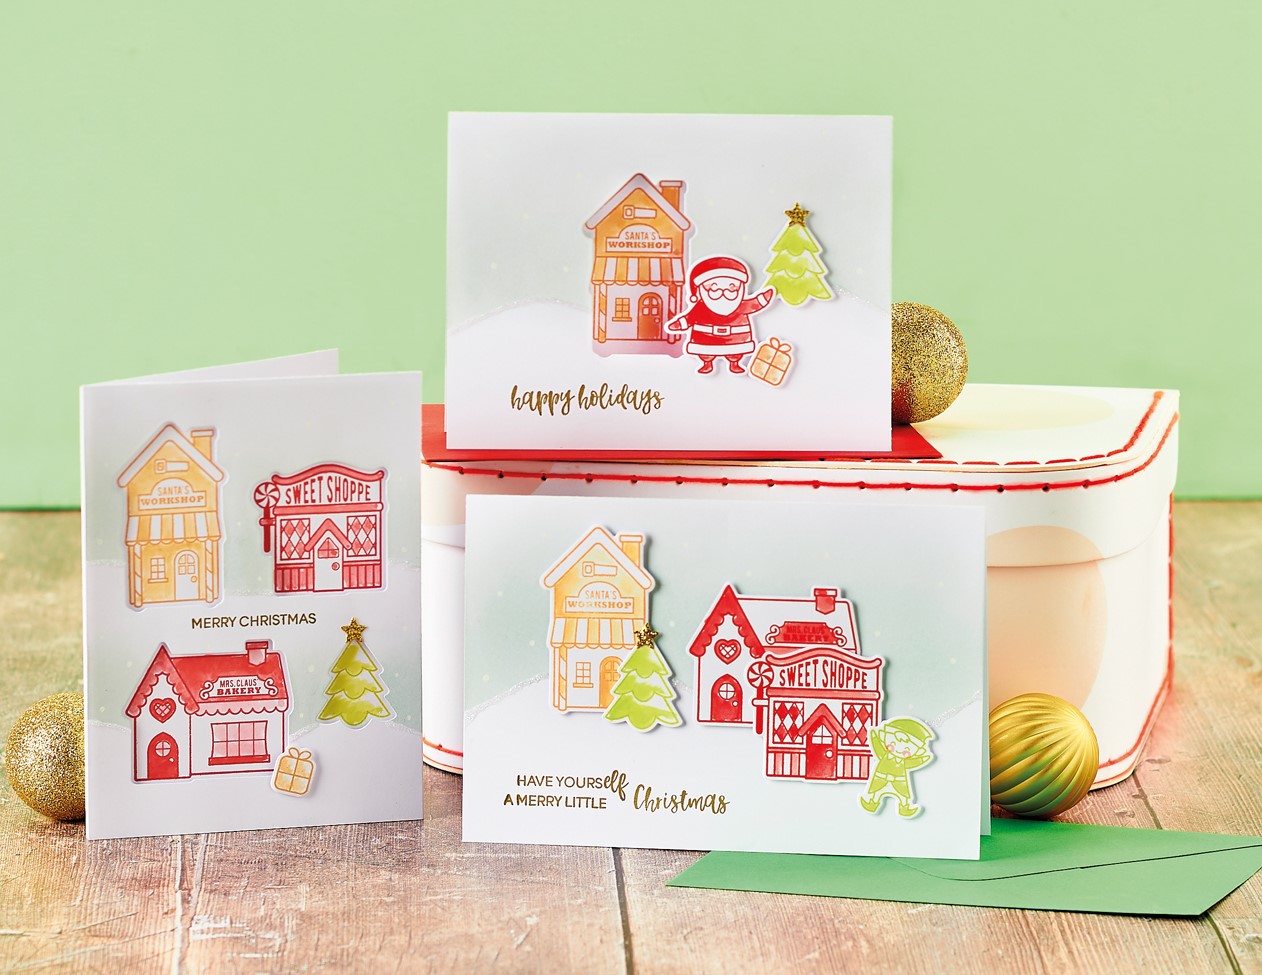
Christmas High Street Scene Card
1. Create a 10.5cm x 16cm top-folding white blank. Position a snowy stencil over the top half of the blank and secure with memo tape. Apply Speckled Egg distress oxide ink through the stencil, then remove and leave to dry. Add some white gel pen dots to accentuate the snow.
2. Stamp a sentiment in the bottom-left corner. Stamp your motifs onto white cardstock with distress oxide inks and allow to dry. Smoosh the same ink pads onto the corners of an acrylic block, then add a little water and use to colour in the motifs. Cut out with the coordinating dies.
3. Glue some of the motifs to the front and attach others with 3D foam pads. Add white glitter drops to the top of the snow hill. Finish by cutting out a star from gold paper and adhering to the top of the tree.
Framed Motifs Card
1. Take a 10.5cm x 14cm white blank, then snip a white panel to the same size. Using a stamping platform as a guide, stamp three shops and a tree onto the same place on the blank and the separate panel.
2. Leave to dry, then smoosh the same distress oxide inks onto an acrylic block and add a touch of water. Use this to colour the shops on the card front. Die cut the motifs from the separate panel using their coordinating dies. Stamp a sentiment in the centre.
3. Apply Speckled Egg ink through a snowy stencil onto the panel, leaving a white section at the bottom. Add white gel pen to the snow dots. Adhere this panel to the card front with foam tape. Add white glitter drops to the snow hill, then cut and attach a gold star for the tree. Stamp and colour a small present motif. Trim and fix to the greeting.
Christmas Aperture Card
1. Make a 10.5cm x 14cm tent-fold white blank, then apply Speckled Egg distress oxide ink to the top half through a snowy stencil. Add white gel pen to the snow dots. Stamp a sentiment in the bottom-left.
2. Using a stamping platform, stamp a building onto the card front, then stamp again on the inside in the same position. Stamp other motifs inside with distress oxide ink. On white card, stamp more motifs. Let all the ink dry, then die cut the building from the front panel.
3. Smoosh the ink pads onto an acrylic block, then add a little water. Use this ink to colour all the motifs. Die cut masks for all the motifs inside from memo tape. Put in place, then add the stencil on top and lightly ink the sky. Remove the stencil and masks. Accentuate the snow with white gel pen.
4. Cut out the motifs from the separate panel using their coordinating dies. Adhere to the front with 3D foam pads. Add white glitter drops to the snow hill, then snip a gold glitter star. Fix to the top of the tree.

Busy lives often involve a lot of memos and reminders, and it can sometimes be hard to keep track. Luckily, we’ve got a sophisticated solution to keep your desk tidy and…

If you’re having a quiet Valentine’s with your beloved at home this year, make the place look a little more special with a speedy-to-make hearts frieze. Papercrafting doesn’t get much easier than…
Home decor Home decorations How to Papercraft Papercrafter Techniques Projects

1. Using a 3.5cm circle die, cut eight discs from chipboard and sixteen circles from patterned paper. Glue the patterned circles to either side of the discs and punch a…

Craft essentials
1. Cut a 5cm x 15cm strip of double-sided patterned paper and fold in half lengthways. Draw parallel pencil lines at 1.5cm and 2cm from the…


