


Birthday crafting Card making How to Papercraft Papercrafter Stamping Techniques Card Making
Jazz up your cards with Ingrid Vichova’s mixed media methods
Glam Factor
We’re not sure about you, but glitzy cards of all shapes and sizes hold a special place in our hearts. There’s something about a bit of glitter and pizzazz that seems to meld so well with greetings. The ones Ingrid has crafted here utilise glitz in different ways. She has incorporated gels, sequins, stencils and even thread to achieve the look. It just goes to show that there are endless ways to make your cards as glamorous as you are.
Blending In
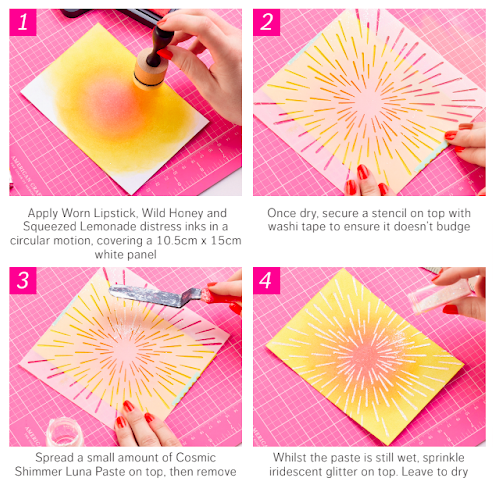
When blending distress inks, a blending tool is crucial – but so too is patience and a steady hand. Unless you’re highly experienced, it’s always wise to apply as little pressure as possible in order to build up the colour slowly. This way you won’t accidentally commit to a colour scheme you’re not happy with and can make changes or even reverse colouration with some added dabbing. As exciting as whipping up a card front can be, it pays to take it slowly.
YOU WILL NEED:
Stamps: Mama Elephant Mini Messages; Altenew Gradient Stripes, Floral Frame
Stencils: Altenew Molded Lines, Warped Speed, Frilly Frame; Avery Elle Simply Said Hugs
Ink pads: Ranger Distress Squeezed Lemonade, Wild Honey, Worn Lipstick; Tsukineko VersaFine Onyx Black
Cardstock: white, pink, yellow
Liquitex Gloss Gel Medium
Cosmic Shimmer Luna Paste: Moonlight Pearl, Stellar Flamingo
Embellishments: glitter, sequins, beads
Thread, gold
Punch, corner
Needle
Tools: ink blending, palette knife
Adhesives: washi tape, glue, 3D foam pads
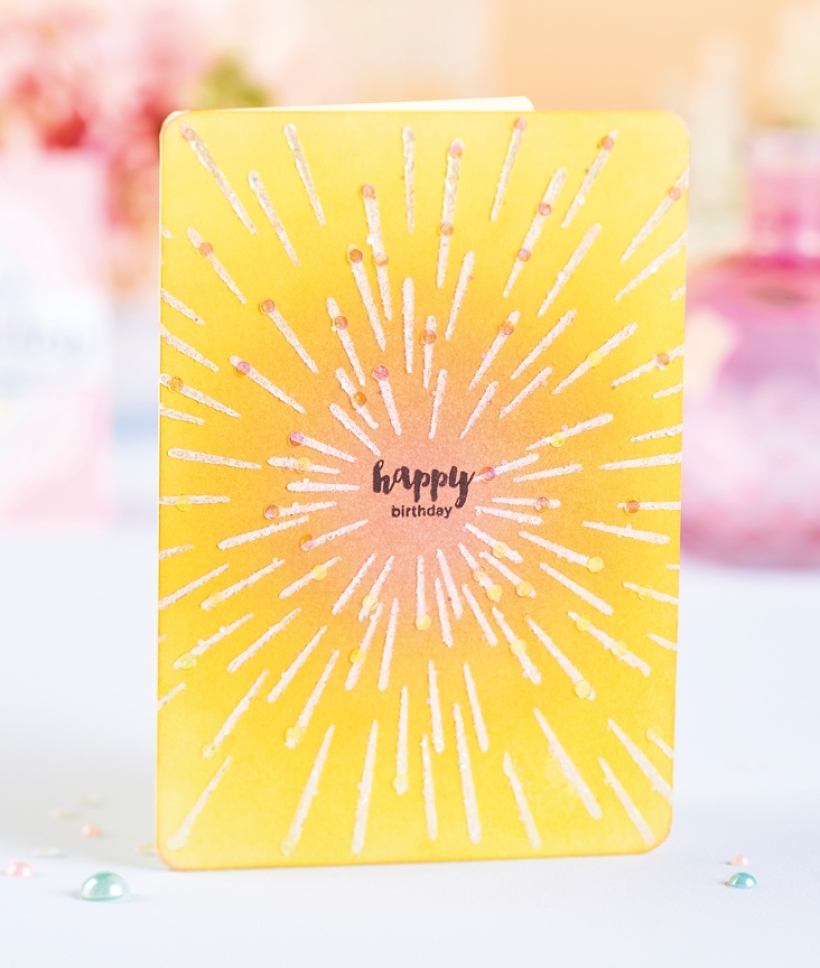
SUNBURST PATTERN
Create a background panel by following the step-by-step below. Stamp ‘Happy birthday’ in the centre in black ink. Matt onto a yellow blank and round off the corners. Embellish with clear sequins to complete.
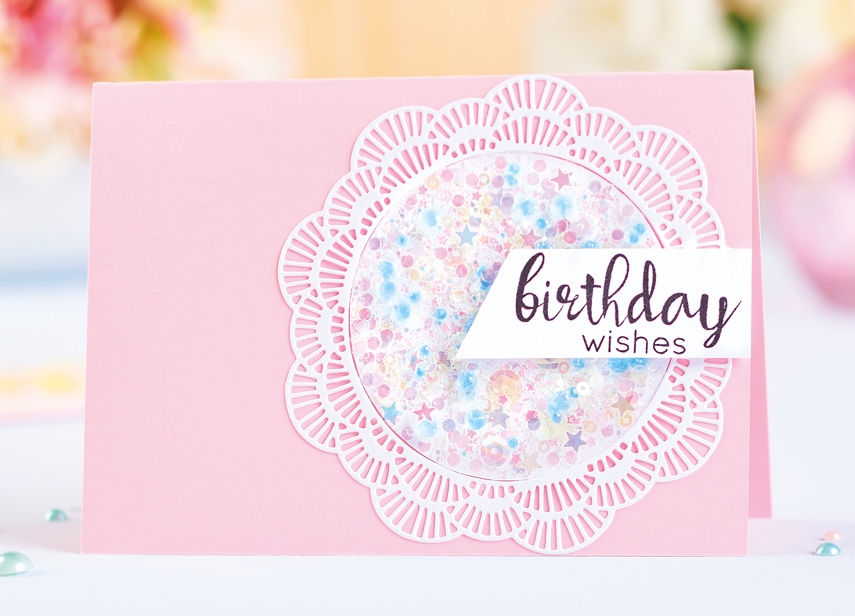
GLITTER GOALS
1. Die cut a frilly circular frame from white and set aside. Place the leftover negative circular die-cut onto a craft mat. Take a palette knife, scoop Liquitex Gloss Gel Medium onto the mat, then sprinkle glitter, sequins and beads on top. Mix together well. Apply onto the negative die-cut and spread evenly.
2. Whilst the medium is still wet, sprinkle more glitter on top, then leave to dry. Fix the circle towards the right-hand side of the greeting, then add the frame die-cut on top. Stamp a sentiment onto white, cut a diagonal edge from the left-hand side, then glue to the card front with 3D foam pads to finish.
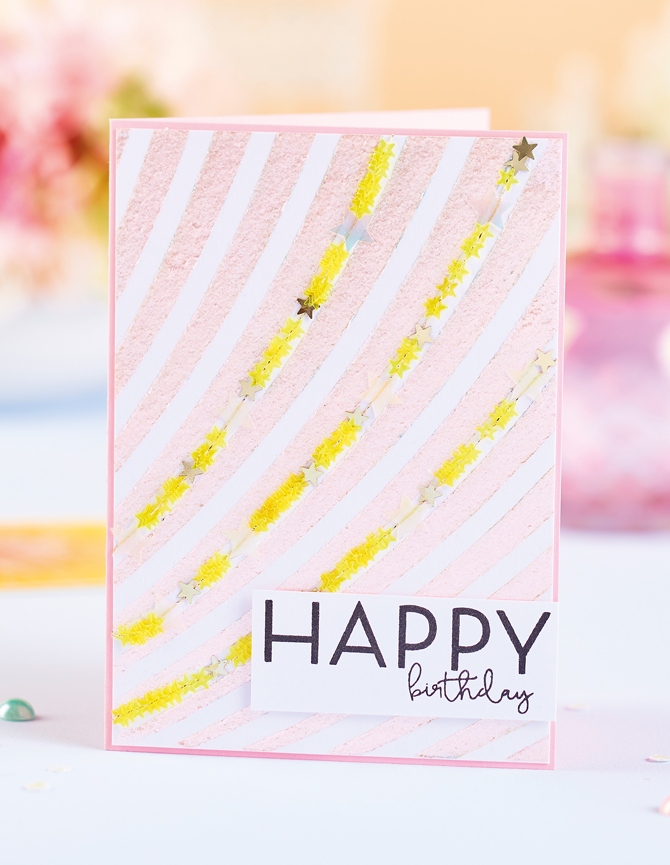
UPON A STAR
1. Cut white card to 10.5cm x 15cm. Place Altenew’s Molded Lines stencil on top and apply Luna Paste in Stellar Flamingo. Remove the stencil, leave to dry, then trim the edges. Thread yellow star sequins onto gold thread.
2. Attach the end of the thread to the reverse of the card at the top with washi tape, then wrap around the panel, following the stencil lines. Spread the sequins out evenly along the thread and secure by glueing larger stars in place. Stick the remaining end of the thread on the back with washi tape.
3. Repeat the process twice more to create additional strands, then layer the panel onto a pink blank. Stamp ‘Happy birthday’ onto white card in black ink, then fix to the bottom-right corner of the greeting to complete.

Busy lives often involve a lot of memos and reminders, and it can sometimes be hard to keep track. Luckily, we’ve got a sophisticated solution to keep your desk tidy and…

If you’re having a quiet Valentine’s with your beloved at home this year, make the place look a little more special with a speedy-to-make hearts frieze. Papercrafting doesn’t get much easier than…
Home decor Home decorations How to Papercraft Papercrafter Techniques Projects

1. Using a 3.5cm circle die, cut eight discs from chipboard and sixteen circles from patterned paper. Glue the patterned circles to either side of the discs and punch a…

Craft essentials
1. Cut a 5cm x 15cm strip of double-sided patterned paper and fold in half lengthways. Draw parallel pencil lines at 1.5cm and 2cm from the…


