


Add a fun twist to your festive projects with mini pom-poms
If your craft room looks anything like ours, there’s always the odd pom-pom floating around. There’s no need to splash out on expensive materials with these four easy makes – simply dive into your stash! Not only are these mini pom-poms super cute, they are certainly on-trend! Corinne Bradd demonstrates how to add a touch of whimsicality to your designs and embellish traditional festive motifs, including mistletoe and stockings.
Craft essentials
Dies: circle, frame, numbers
Mini pom-poms
Baker’s twine
Glitter tape
1. Cut an 8.5cm wide scalloped circle from pink card and a 5cm disc from the centre to make a ring.
2. Use a die or hand cut several holly leaves from a mix of green cardstock. Glue concentric circles of leaves around the ring and allow the larger shapes to extend to the edges.
3. Fix a small red pom-pom to the centre of each bunch of leaves. Tie a bow from a length of baker’s twine and fix the loose ends to the back of the wreath to hang.
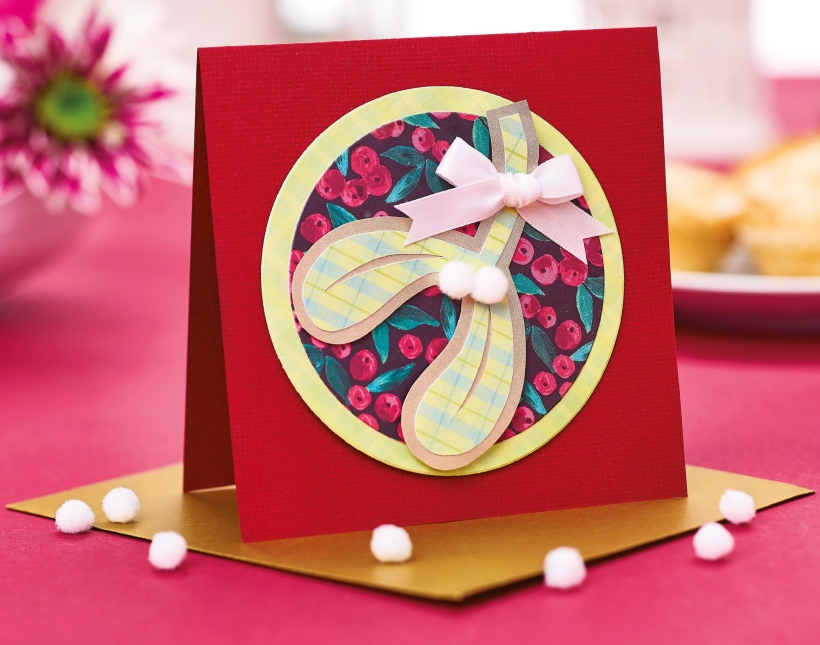
1. Die cut concentric circles of red and green patterned paper and fix to the centre of a 10.5cm deep red blank with 3D foam pads.
2. Cut a simple mistletoe leaf shape from pale green patterned paper and mount onto gold paper. Leaving a 3mm border, trim the gold and position in the centre of the circular panels.
3. Tie a neat bow from a length of white ribbon and trim the ends into a ‘V’ shape. Adhere the bow to the stalk of the mistletoe and add two small white pom-poms for the berries.
1. Create a decorative 10.5cm square blank. Layer together die-cut frame shapes from assorted patterned papers and fix to the centre.
2. Fix a narrow band of paper across the top half of the card and mark out 1.5cm intervals with a pencil.
3. Die cut the number ‘25’ from green and stick to a small pink tag. Attach the tag to the third mark along and add a bow tied from twine. Glue green pom-poms to the remaining pencil marks.
1. Trim and fold a panel of green spotted cardstock to make an 8.5cm x 12cm blank. Add gold die-cut stars to the background.
2. Cut a stocking shape from red patterned paper and fix to the centre of the card with 3D foam pads. Die cut small present shapes such as a candy cane and gingerbread man, then tuck into the top of the stocking.
3. Adhere a line of small pink pom-poms along the top of the stocking. Finish with a neat bow tied from baker’s twine.

Busy lives often involve a lot of memos and reminders, and it can sometimes be hard to keep track. Luckily, we’ve got a sophisticated solution to keep your desk tidy and…

If you’re having a quiet Valentine’s with your beloved at home this year, make the place look a little more special with a speedy-to-make hearts frieze. Papercrafting doesn’t get much easier than…
Home decor Home decorations How to Papercraft Papercrafter Techniques Projects

1. Using a 3.5cm circle die, cut eight discs from chipboard and sixteen circles from patterned paper. Glue the patterned circles to either side of the discs and punch a…

Craft essentials
1. Cut a 5cm x 15cm strip of double-sided patterned paper and fold in half lengthways. Draw parallel pencil lines at 1.5cm and 2cm from the…


