


Christmas crafts Home decor Home decorations Papercraft Papercrafter Party makes
Master a different style of Christmas tree decoration with Corinne Bradd’s gorgeously embellished creations
You Will Need:
Templates or SVG files
Brother ScanNCut SDX1200 (optional)
Cardstock, various colours
Metallic thread
Crepe paper
Opaque or metallic markers
Embellishments: flat-backed gems, flat-backed pearls, beads
Adhesives: double-sided tape, glue, PVA glue
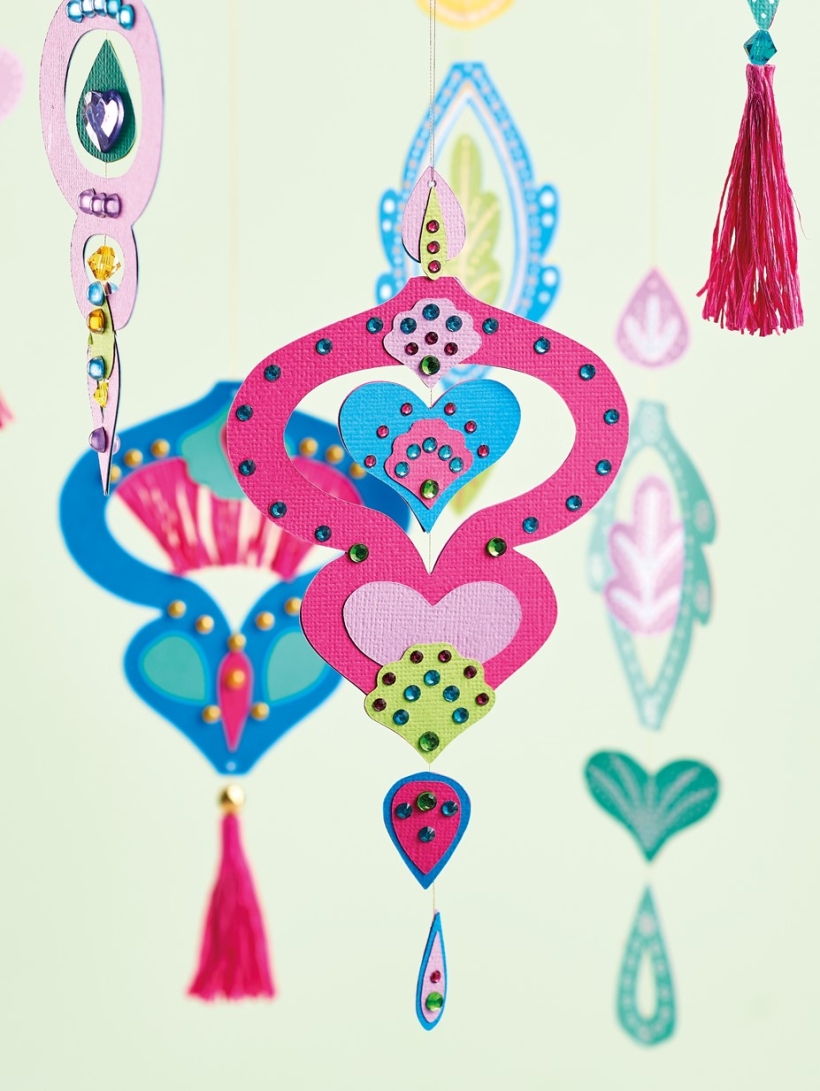
Hanging Decoration
1. Download the templates from our website and scan into the Brother ScanNCut, grouping the cut-outs inside the main shapes so they do not move out of place when resizing or rearranging. Cut the shapes from several coordinating colours of cardstock. Alternatively, use the templates overleaf and cut by hand.
2. Choose a main shape and select two or three smaller pieces to place above and below it. Gather the same shapes in different colours to back the first set with. Place one set face down on your work surface and fix double-sided tape down the centre of each piece. Lay a length of taut metallic thread onto the tape to join the pieces before glueing the other set of shapes and securing over the top.
3. Working on one side at a time, adhere smaller, coordinating shapes, then add lines and dots with opaque or metallic markers. Finish embellishing with flat-backed gems. Allow this side to dry before flipping over and working on the other side. If necessary, place the piece on a folded towel to counteract the unevenness of the raised embellishment on the back.
4. Pierce a small hole at the top of each decoration and feed through a long loop of metallic thread to hang. Add another hole at the bottom to attach a crepe paper tassel if desired.
Crepe Tassel
1. Cut crepe paper 5cm wide across the grain, and 10cm deep. Fold in half and gently stretch out across the width. Use sharp scissors to clip a fringe, stopping 5mm from the fold. Open out the fold and roll each piece of fringe between your fingers to twist it.
2. Refold and apply PVA glue along one side of the fold. Roll up the crepe tightly and leave to dry, before passing metallic thread through the neck of the tassel with a needle, adding a crystal bead, and tying to the bottom of the decoration.
“When using your ScanNCut, place the shapes in a small section of the layout mat to get the most from your sheet of card”
Corinne Bradd, designer

Busy lives often involve a lot of memos and reminders, and it can sometimes be hard to keep track. Luckily, we’ve got a sophisticated solution to keep your desk tidy and…

If you’re having a quiet Valentine’s with your beloved at home this year, make the place look a little more special with a speedy-to-make hearts frieze. Papercrafting doesn’t get much easier than…
Home decor Home decorations How to Papercraft Papercrafter Techniques Projects

1. Using a 3.5cm circle die, cut eight discs from chipboard and sixteen circles from patterned paper. Glue the patterned circles to either side of the discs and punch a…

Craft essentials
1. Cut a 5cm x 15cm strip of double-sided patterned paper and fold in half lengthways. Draw parallel pencil lines at 1.5cm and 2cm from the…


