


Christmas crafts Die cutting How to Techniques Projects
Kick off the celebrations with Corinne Bradd’s custom-made Christmas Eve boxes.
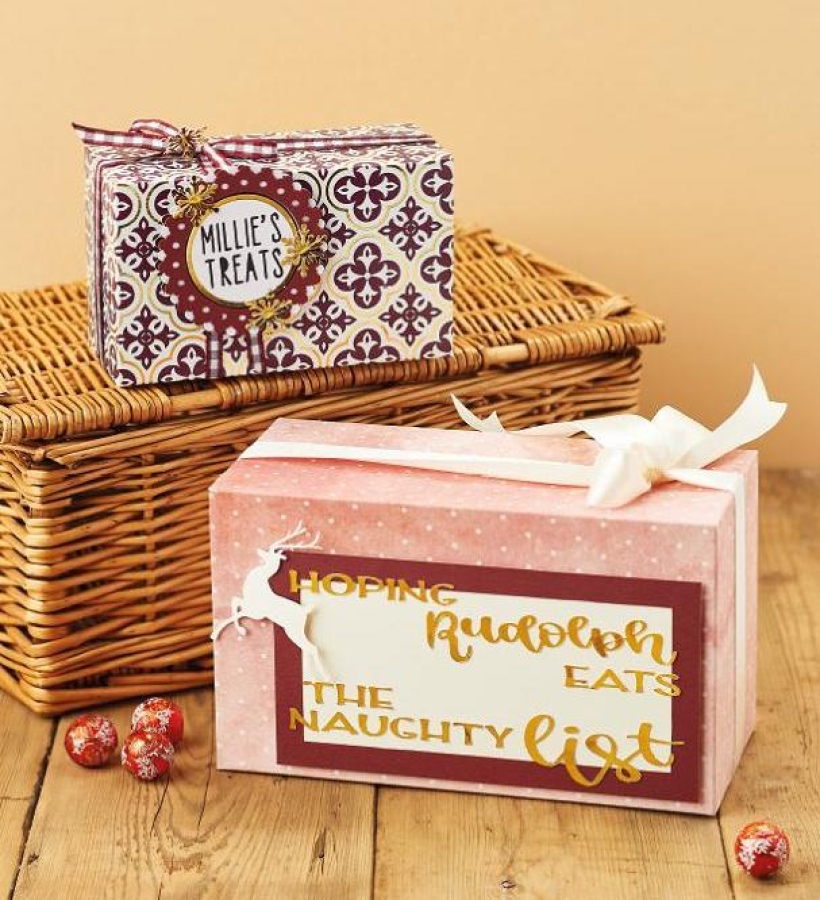
The festive season is filled with all sorts of special traditions and in recent years, Christmas Eve boxes have become entrenched into many family routines before the big day arrives. Now’s the time to make it a yearly tradition of your own with our trio of personalised hampers. For the scripty typography, Corinne has used her Cricut machine – a go-to gadget for custom designs like these.
Please login to download. Sign in here
Cardstock: patterned, mirri
Punch, hole
Ribbon
Adhesives: 3D foam pads, double-sided tape, glue
Digital or standard die-cutting machine
1. Take two sheets of patterned card, 21cm x 30cm, and fix together along the long edge using double-sided tape, leaving a 1cm overlap. Score a 5cm-wide gutter down the landscape orientation. Score at 3cm in from each edge and cut from both short edges down to the intersection points of the score lines to make flaps. Crease well along the score lines.
2. Score at 45° from the central gutter’s intersection points towards the centre of the long edges to make an ‘x’ shape at the ends of the gutter. Fold in one long side, bring up the front of the box and crease along the diagonal so that half a side is formed. Do the same by bringing up the back of the box, then secure the 1cm overlap on the side with double-sided tape. Repeat on the other side.
3. Fold in the flaps at the top of the box. Use a punch to make pairs of holes, 10cm apart, in the front and back of the box, piercing both the outers and the flaps as you do so. Thread ribbon in and out of the holes to make handles, knotting on the inside of the box and pulling taut so that the flaps stay closed.
4. Die cut a sentiment, ornate frame and snowflakes from red card using a die-cutting machine. Mount the frame onto white and glue the lettering in place. Fix the snowflakes to the top-left and bottom-right of the box front to finish.
1. Take a 21cm x 30cm sheet of patterned card and score a 6cm wide gutter down the landscape orientation. Score at 3.5cm in from each edge and cut from both short edges down to the intersection points of the score lines to make flaps. Crease the score lines.
2. Score at 45° from the central gutter’s intersection points towards the centre of the long edges to make an ‘x’ shape at the ends of the gutter. Fold in one long side, bring up the front of the box and crease along the diagonal so half a side is formed.
Do the same by bringing up the back of the box and secure the 1cm overlap on the side with double-sided tape. Repeat for the other side.
3. Fold in the side and top tabs and secure with double-sided tape. Wrap with ribbon and tie a knot at the top. Use your digital die-cutting machine to create a rosette design with a personalised message in the centre and cut from coordinating cardstock. Layer up the rosette pieces together and secure to the box. Embellish with gold die-cut snowflakes.
1. Score a 9cm wide gutter down the landscape orientation from a sheet of patterned card, 30cm x 42cm. Score at 5cm in from each edge and cut from both short edges down to the intersection points of the score lines to make flaps. Crease well along the score lines. Score at 45° from the central gutter’s intersection points towards the centre of the long edges to make an ‘x’ shape at the ends of the gutter.
2. Fold in one long side, bring up the front of the box and crease along the diagonal so half a side is formed. Do the same by bringing up the back of the box and secure the 1cm overlap on the side with double-sided tape. Repeat on the other side.
3. Fold in the side and top tabs, then secure with double-sided tape. Wrap a length of ribbon around the box and tie into a bow. Die cut a sentiment from gold mirri card and a reindeer from white. Matt a 6.5cm x 14.5cm panel of cream card onto red, leaving a 1cm border all around. Fix the lettering and reindeer onto the panel with 3D foam pads.

Busy lives often involve a lot of memos and reminders, and it can sometimes be hard to keep track. Luckily, we’ve got a sophisticated solution to keep your desk tidy and…

If you’re having a quiet Valentine’s with your beloved at home this year, make the place look a little more special with a speedy-to-make hearts frieze. Papercrafting doesn’t get much easier than…
Home decor Home decorations How to Papercraft Papercrafter Techniques Projects

1. Using a 3.5cm circle die, cut eight discs from chipboard and sixteen circles from patterned paper. Glue the patterned circles to either side of the discs and punch a…

Craft essentials
1. Cut a 5cm x 15cm strip of double-sided patterned paper and fold in half lengthways. Draw parallel pencil lines at 1.5cm and 2cm from the…


