


Papercrafter Wedding crafts Paper Flowers
With summer on its way and wedding crafts on the up, we thought we’d bring you a simply stylish decoration that you can hang to add a touch of class to your room set. We’re also previewing a little of what’s to come in our next issue 72 kit (on sale Friday 6 June!), which has a fabulously folky theme and comes with these delectable tissue papers!
Solid Polystyrene Balls, from £1.10 for ten, 0161 484 5888, craftmill.co.uk , PaperCrafter issue 72 tissue papers (on sale Friday 6 June), Scallop die and die-cutting machine or Scallop-edged Circle Template, Hot glue gun, Vintage lace
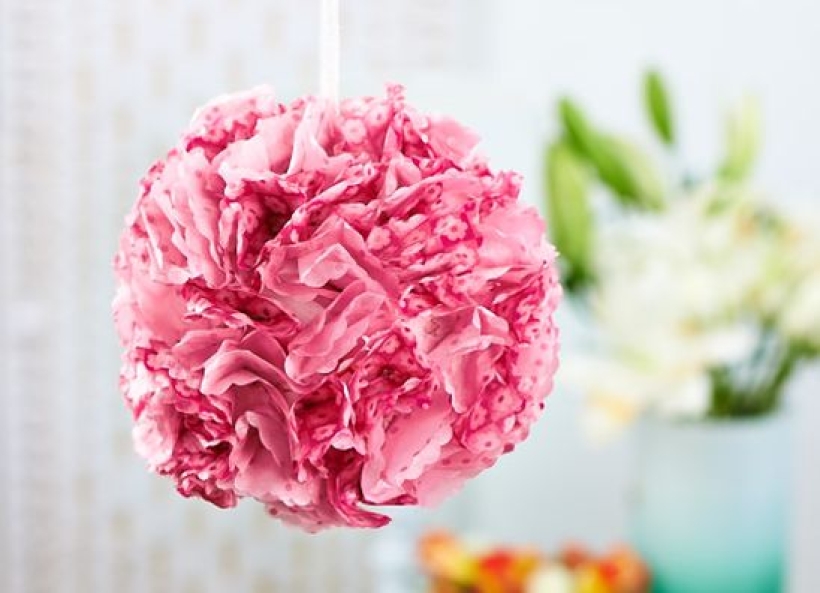
• Firstly, select two patterns of tissue paper from the PaperCrafter issue 72 kit or your stash. Decide upon your pattern and style, considering whether each tissue paper 'carnation' will be the same size or different.
• Use either the PaperCrafter template or a nest of scallop dies and die-cutting machine to achieve your desired shape. Either create all of the same size scallop-edged circles or shrink/enlarge the template to create a variety.
• With your scallop-edged circles, fold them in half and then quarters, making sure the correct size of the design is 'inside' when you fold the circles. This way, the design will show when the paper sections are secured onto the polystyrene ball.
• Take the folded circle and staple it at the base (where it's folded at the centre). With your polystyrene ball in hand, take a stapled circle and with your thumb and index finger, shape the paper into an open bloom shape and add a dollop of glue below the staple. To prevent the paper flowers from standing too tall, press down inside the flower to spread the glue across the base.
• Repeat this process with other stapled scallop-edged circles, alternating between your different patterns of tissue paper. Ensure that there are no gaps between the paper carnations so no white space is showing.
• Take a length of vintage lace or ribbon and fold over double so that it creates a loop. Pick where it has folded at the centre and glue securely to the polystyrene ball. Now it's ready to hang!

Busy lives often involve a lot of memos and reminders, and it can sometimes be hard to keep track. Luckily, we’ve got a sophisticated solution to keep your desk tidy and…

If you’re having a quiet Valentine’s with your beloved at home this year, make the place look a little more special with a speedy-to-make hearts frieze. Papercrafting doesn’t get much easier than…
Home decor Home decorations How to Papercraft Papercrafter Techniques Projects

1. Using a 3.5cm circle die, cut eight discs from chipboard and sixteen circles from patterned paper. Glue the patterned circles to either side of the discs and punch a…

Craft essentials
1. Cut a 5cm x 15cm strip of double-sided patterned paper and fold in half lengthways. Draw parallel pencil lines at 1.5cm and 2cm from the…


