


Card making Die cutting How to Techniques Card Making
What do you call a card and an envelope in one? A cardvelope, of course. Don’t worry, the technique is easier to achieve than it is to pronounce.
The envelope is essentially a simple pocket to conceal a card inside. Keren Baker pairs this genius concept with a beautiful paper collection, including cross-stitched toppers which are perfect for the pull tab elements. Have a go!
Pick a shape, any shape
You can easily mix up the shape of the pocket tab element – this is where your basic-shaped dies come into good use. We’ve opted for a triangle, curved v-shape and semicircle, but feel free to try different shapes. Why not opt for half a square or chevron? Whichever shape you decide on, just be sure that your cross-stitch topper will be able to easily fit inside the space above. To get the positioning right, make sure the card insert is fully down, then fix the cross-stitch topper within the gap.
Beginner cross-stitch
Keren has used Paige Evans’ Splendid Cross Stitch Kit to make the toppers for these cards. The pack contains 12 pre-punched die-cuts, coordinating embroidery thread, a spool card and needle… everything you need to have a go at the technique. Sew the entire topper or opt for subtle accents by partially stitching the motif. To ensure your stitches stay put, secure the ends by weaving them in and out of other nearby stitches. It’s a good opportunity to try another craft whilst adding texture to your cards.
Two-in-one surprise
If you want to send a gift card to a loved one, the cardvelope concept is a great solution. The pocket is perfect for concealing a surprise card inside, as well as money or a gift card. You could also make these as invitations with the details of your event on the insert. If you wish to decorate the card inside, be sure to use flat embellishments and sentiments to prevent it from jamming.
YOU WILL NEED:
Paige Evans Splendid collection: 12” x 12” pad, embellishment pack, cross stitch kit, stickers, swatch books
Dies: The Greetery Birthday Blooms; circle, oval, square
Stamps, The Greetery Birthday Blooms
Ink pad, black
Punch, hole
Embellishments: puffy stickers, ribbon, baker’s twine
Adhesives: 3D foam pads, glue
Die-cutting machine
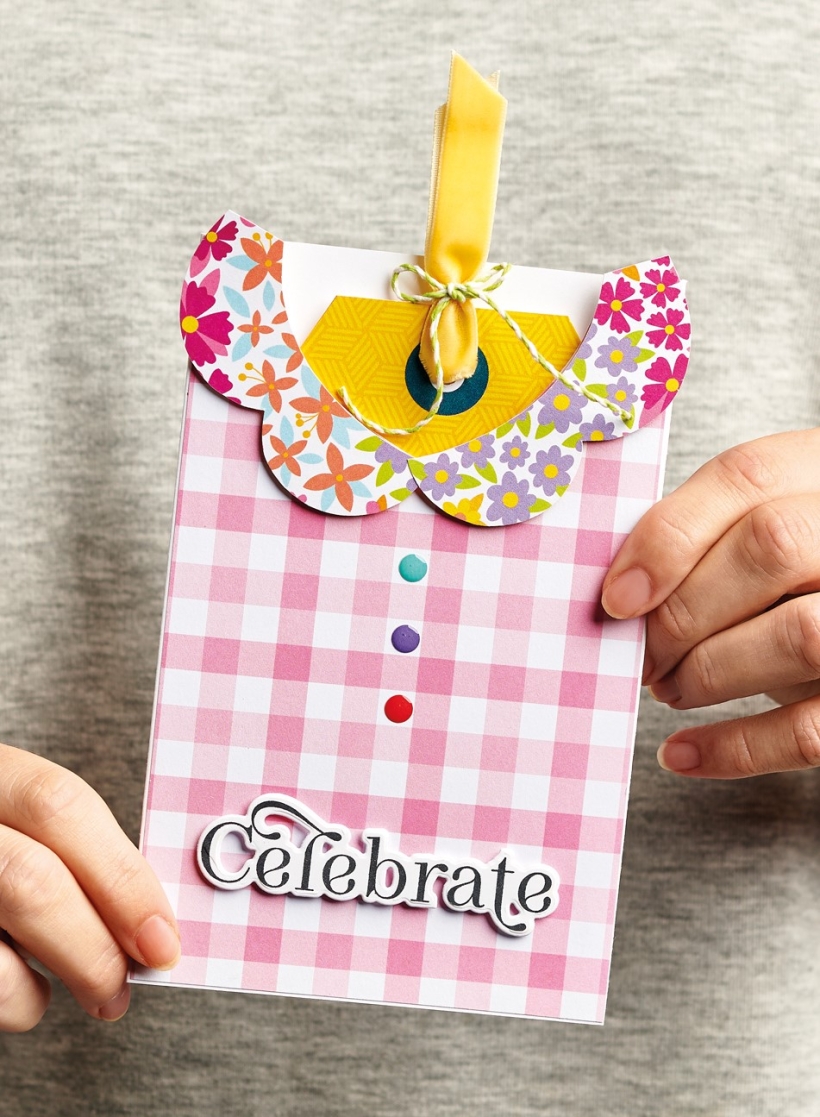
Celebrate Tag Card
1. Take a white 17cm x 22.5cm piece of cardstock, then score at 1cm and 11.5cm. Fold along the scored lines. Add adhesive along the tabs and bottom edge, then press together.
2. Mount pink patterned paper onto the front. Snip a curved ‘v’ shape from the top of the front panel. Draw two collars freehand, trace onto floral paper and cut out. Fix to the cardvelope using 3D foam pads.
3. Trim a tag shape from yellow patterned paper and punch a hole through the top. Add ribbon and secure with baker’s twine. Slip inside the cardvelope. Add three dot stickers to the front. Stamp a sentiment onto white and die cut using the coordinating die. Secure to the front with 3D foam pads.
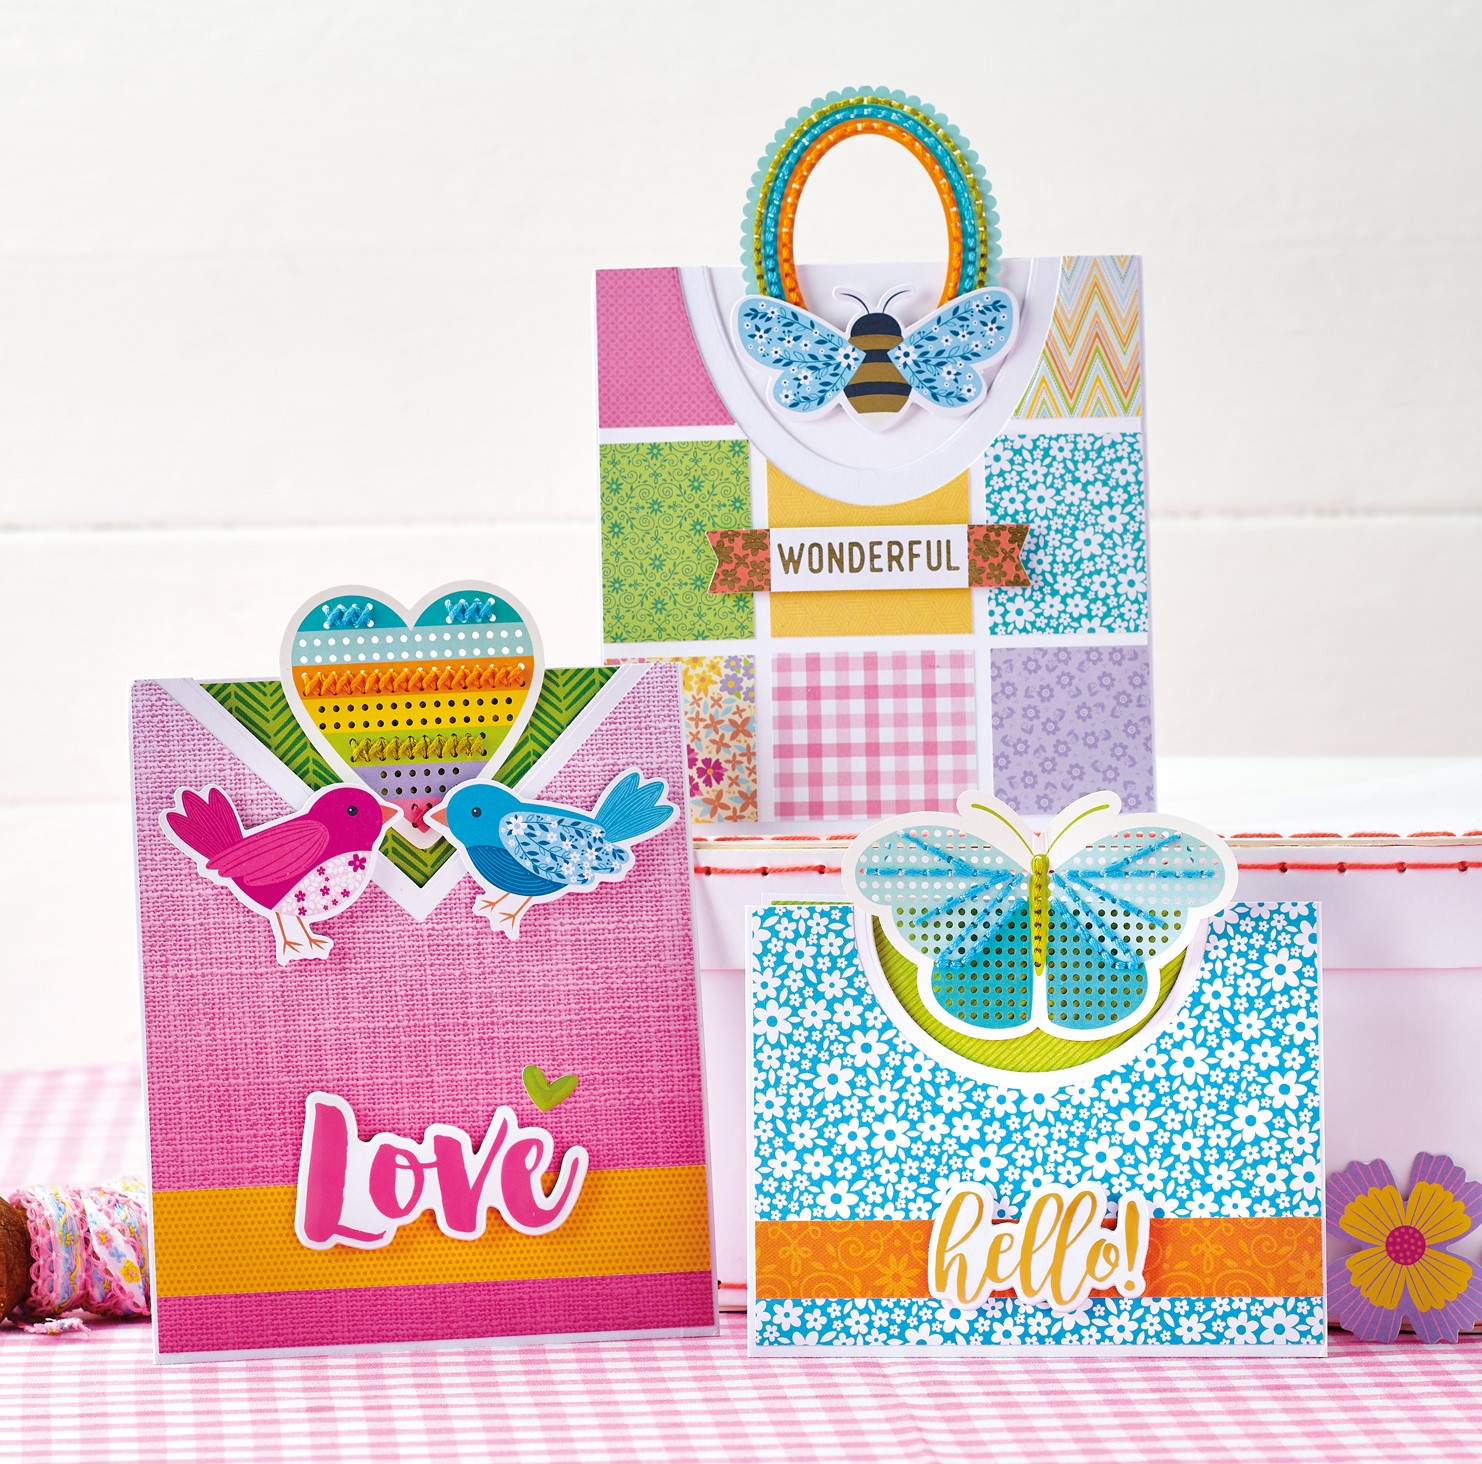
Patchwork Pocket Card
1. Snip white card to 14.5cm x 16cm and another piece to 14cm square. Score along the 16cm line at 1cm from both ends and fold inwards.
2. Die cut the top edge of the smaller piece using an oval die so you have half an oval shape. Using a slightly smaller piece of white card, add swatch book pieces, then die cut another half oval from the top using a larger oval die.
3. Using the oval shape in the cross stitch kit, backstitch different colours along the lines and secure at the back. Trim white cardstock to 13cm square and run a strip of orange paper along the bottom.
4. Add the stitched oval onto the square panel using 3D foam pads, followed by a bee topper. Slip inside the cardvelope. Add a sentiment with 3D foam pads.
Cross-stitch Heart Card
1. Trim white card to 16cm x 16.5cm and another piece to 14cm x 16.5cm. Score the 16cm length at 1cm at either end, fold inwards and add glue along the tabs and bottom edge.
2. Using a square die, die cut at an angle to create a ‘v’ shape from the top edge of the smaller panel. Take a slightly smaller piece of pink patterned paper and die cut a ‘v’ shape from the top using a larger square die. Layer onto the smaller white panel. Adhere the front to the back tabbed piece.
3. Trim green patterned paper to 12.5cm x 15cm. Cross stitch a heart in three different colours and adhere to the top of the green panel. Slip inside the cardvelope and add two birds to the front using 3D foam pads. Fix a sentiment with 3D foam pads and finish with a heart sticker above.
Butterfly Cardvelope
1. Trim white card to 11cm x 16cm and another piece to 11cm x 14cm. Score the 16cm length at 1cm at both ends, then fold the tabs inward.
2. Take the smaller piece of cardstock and die cut a semi-circle from the top. Trim blue floral paper slightly smaller and die cut a larger semi-circle from the top. Layer onto the white panel and run a strip of orange paper towards the bottom. Add a sentiment sticker on top with 3D foam pads. Layer onto the tabbed panel to create a cardvelope.
3. Stitch backstitches on a cross-stitch butterfly topper using blue and green threads. Trim green patterned paper to 9.5cm x 12.5cm and secure the butterfly to the top. Slot inside the cardvelope.
TOP TIPS
- Create a patchwork effect by cutting patterned papers into individual squares and adhering them in a grid format
- Match the shape of your cross-stitched topper to the shape of the envelope
- Write your message on the card insert inside the pocket

Busy lives often involve a lot of memos and reminders, and it can sometimes be hard to keep track. Luckily, we’ve got a sophisticated solution to keep your desk tidy and…

If you’re having a quiet Valentine’s with your beloved at home this year, make the place look a little more special with a speedy-to-make hearts frieze. Papercrafting doesn’t get much easier than…
Home decor Home decorations How to Papercraft Papercrafter Techniques Projects

1. Using a 3.5cm circle die, cut eight discs from chipboard and sixteen circles from patterned paper. Glue the patterned circles to either side of the discs and punch a…

Craft essentials
1. Cut a 5cm x 15cm strip of double-sided patterned paper and fold in half lengthways. Draw parallel pencil lines at 1.5cm and 2cm from the…


