


Card making Papercrafter Card Making
Wish a merry stitch-mas with festive fabric cards
Please login to download. Sign in here
Why not pick up your needle and thread, and treat your recipients to a seasonal homemade surprise, featuring elegant prints and traditonal hues? Christmas is all about embracing those cosy winter comforts and Carolyn Letten’s designs ooze warmth and joy. Be sure to add a twist to your cardmaking and use the oddments from your haberdashery stash to craft a collection of adorable mixed media greetings.
Craft essentials
Template from paper craftermagazine.co.uk
Fabric: Christmas prints,
coloured
Thread, assorted
Glitter glue
Ricrac
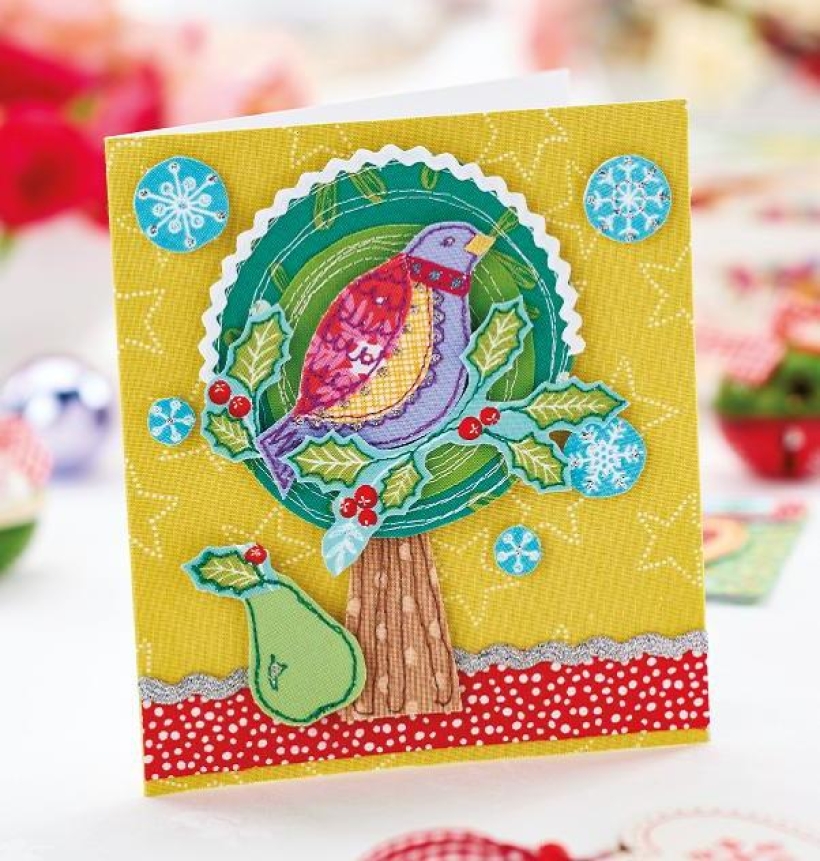
1. Glue decorative fabric to a 13cm x 15cm blank. Stick a strip of 2cm x 13cm spotty fabric onto thin card and glue it to the bottom of the blank. Attach a length of silver ricrac across the top.
2. Trim the tree tops and trunk from fabric using the templates, then stick them onto scrap card. Leave to dry, then machine stitch white circles around the tops and brown detail on the trunk. Cut away any excess and stick ricrac around the trees.
3. Use the template to make a pear in the same way, then add a holly leaf. Glue five fabric snowflakes onto thin card and cut out. Mount the shapes onto the greeting using 3D foam pads.
4. Cut one complete bird from purple fabric, then a yellow and pink wing. Assemble onto scrap card, then glue in place. Add a beak and collar, allow them to dry, then machine stitch details.
5. Create holly with the same technique. Trim around the shapes and mount onto the card. Add glitter highlights to the snowflakes, bird, holly and pear.
1. Adhere patterned fabric onto a 10cm x 15cm side-folding card blank. Snip a strip of card, 2cm x 15cm, and cover one side of it with spotty fabric.
2. Cover a second strip, 1.5cm x 13.5cm, with coloured fabric. Trace the template words onto white tissue, place on the fabric strip, then machine or hand stitch over the letters twice, then tear the tissue away.
3. Glue the stitched fabric to the spotty strip and mount onto the card. Stick a length of ricrac across the top and set aside. Trim two sprigs of mistletoe from fabric, stick to thin card, machine stitch around the details, then cut them out.
4. Attach mistletoe to the greeting using 3D foam pads. Cut two more birds and wings. Stick them to scrap card, stitch the details, then cut out and mount them onto the greeting. Add glitter to the berries, birds and wings.
1. Cover a 13cm x 15cm card blank with patterned fabric across the top and bottom. Allow for a 1cm overlap, glue in place and leave to dry. Hide the join with a length of ricrac.
2. Using the three tree templates, cut each one from thin card and glue to patterned fabric. Trim around each shape and use white thread to machine stitch around the ovals. Glue white ricrac around the edge of the biggest oval and set aside.
3. Use the template to cut three hens from fabric. Stick them onto scrap card, leave to dry and sew around the details. Cut around the shapes and set aside. Cover 2cm x 13cm of thin card with red fabric and allow to dry.
4. Use the tissue paper method from the previous project to stitch the template words onto fabric. Cut a tree trunk from brown and stitch it in place. Cut three fabric snowflakes and glue them to thin card.
5. Fix 3D foam pads to the back of the shapes, then mount them in place. Add glitter glue and embellishments to the tree, snowflakes, hens and words.

YOU WILL NEED:
Old books
Die, circle
Wooden skewer
Binder clips
Alcohol marker, orange
Adhesives: PVA glue, glue stick
Die-cutting machine

METHOD:
1. Use a circle die to cut lots of discs from book pages. Fold each circle in…
Halloween crafts Home decor Home decorations How to Papercraft Papercrafter Revamping Techniques Projects

Whilst this may look like a paper cutting that took hours to create, it really couldn’t be any easier. Our talented designer Corinne Bradd has created 15 templates for you to…
Die cutting Home decor Home decorations How to Papercraft Papercrafter Projects

You Will Need:
Templates or SVG files
Brother ScanNCut SDX1200 (optional)
Strong card
Cardstock, various colours
Jute yarn
PVA glue
Autumnal Display
1. Draw a 25cm wide circle on strong card, then draw a concentric 17cm wide circle…
Home decor Home decorations Papercraft Papercrafter Techniques

Shadow box cards, otherwise known as tunnel greetings or diorama cards, are designed to transport the recipient to picture-perfect backdrops in an instant. In this case, PaperCrafter designer Francesca Vignoli…
Birthday crafting Card making Die cutting How to Stamping Techniques Card Making


