


Birthday crafting Card making Die cutting How to Stamping Techniques Card Making
Shadow box cards, tunnel cards, diorama cards… whatever you call them, we show you how!
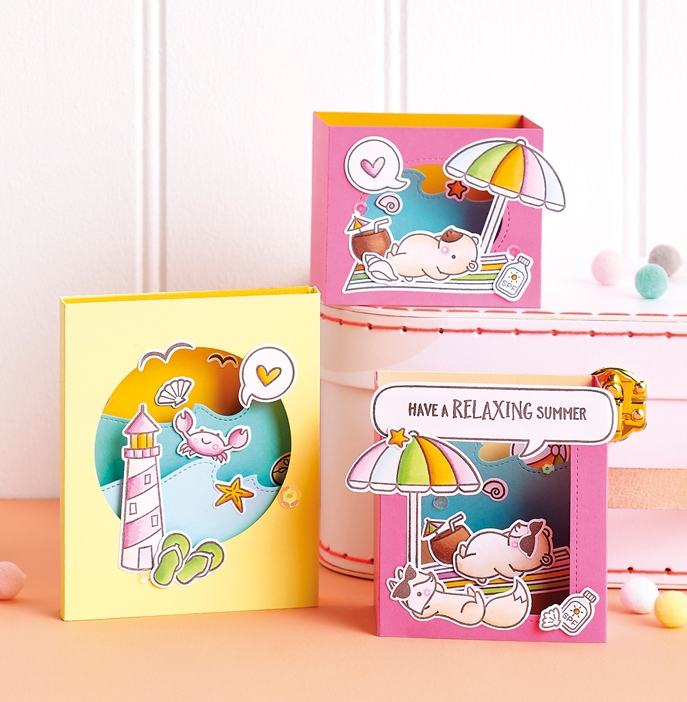
Shadow box cards, otherwise known as tunnel greetings or diorama cards, are designed to transport the recipient to picture-perfect backdrops in an instant. In this case, PaperCrafter designer Francesca Vignoli is sending us to sun-packed seaside scenes… no passport required! Thanks to her excellent use of layered tiers, clever positioning of stamped motifs and expert colour blending, Francesca’s quartet certainly raises the game.
Get ready to go 3D
The secret to shadow box cards? Layers. We recommend two to three to ensure maximum impact but have a play around and see what works best for your scene. One layer alone can still create plenty of depth. The trick is to make sure each tier is in the correct order to achieve the perfect shadow effect. As a general rule, shorter layers should go towards the front and the taller ones at the back – simple!
You’ll thank us for it
You may be tempted to assemble your box card first but hold tight. If you want to copy Francesca’s look and include stamped motifs on the layers inside the card, then we recommend decorating as you go before adhering everything together. That way, it’ll be far less fiddly. Having some motifs in the foreground and others towards the back will give your scene a sense of perspective and dimension.
Something for everyone
Francesca has used Lawn Fawn’s Shadow Box Card die set for a couple of her designs. Taking all the hard work out of the technique, it’s a must-have tool if you’re a beginner cardmaker or just don’t want to deal with the faff of measuring up. For those who fancy a challenge, she also shows you how to make one from scratch so you can really show off your skills –get you!
You Will Need:
Dies: Lawn Fawn On The Beach, Life Is Good, A Birdie Told Me, Shadow Box Card, Stitched Wave Borders, Circle Stackables, Stitched Hillside Borders
Stamps: Lawn Fawn On The Beach, Life Is Good, A Birdie Told Me
Memento ink, Espresso Truffle
Pens: Copic E47, E57, E30, E31, C1, RV06, RV02, RV13, RV10, Y17, YR07, BOO, BG10, G14, YG23; white gel
Cardstock, various colours
Sequins
Adhesives: glue, 3D foam pads, double-sided tape
Die-cutting machine
Shadow Box Sunset Card
1. Take two pieces of yellow cardstock, 10.5cm x 13.5cm, and score both at 1cm and 11.5cm. Cut pink card to 10.5cm square for the background and die cut a circle from orange cardstock to create a sun. Set aside.
2. Snip a 7cm x 11.5cm strip from blue card, die cut with a stitched wave die and score at 5mm from both sides. Assemble and glue the shadow box card together. Secure the pink background panel to the back, followed by the sun with 3D foam pads.
3. Stamp, colour in and die cut several motifs and adhere to the front and inside of the card. Stamp a speech bubble onto white, add a sentiment and die cut. Adhere along the top of the front panel at an angle. Add details with a white gel pen and finish with sequins.
Shadow Box Bear Card
1. Die cut Lawn Fawn’s Shadow Box Card die twice from pink card and fold along the embossed lines. Place an oval die onto the larger section of one of the pink panels and die cut. Snip yellow card to 7cm x 8cm and a strip from blue card, 4cm x 9cm. Cut the blue strip using a stitched wave border die and score at 5mm from both sides. Set aside.
2. Align the main box card panels with the inside facing upwards and run double-sided tape along the two tabs. Connect the two panels together and secure to create one long piece, with the oval aperture on the front. Add double-sided tape to the wave die-cut along the tabs. Line it up with the card along the bottom, then secure one of the tabs to the side of the panel.
3. Secure the second tab to the other side and fold the card to create a box card. Stamp, colour in and die cut multiple motifs, then glue to the inside and front of the card into to create a scene. Stamp a speech bubble and heart onto white. Colour in the heart and die cut the bubble. Fix to the front with 3D foam pads. Glue the yellow panel to the back of the card. Embellish with sequins and add details with a white gel pen.
Shadow Box Sunbathers Card
1. Die cut two piece of pink card to 9cm x 15cm, then score them both at 5mm and 9cm. Place a stitched rectangle die onto the large section of one of the panels and die cut. Snip a strip from kraft card, 4cm x 9.5cm and a strip from blue, 7cm x 9.5cm. Die cut the kraft card strip using a stitched border die and the blue strip with a stitched wave border die. Score them both at 5mm from both sides.
2. Secure the layers and assemble the shadow box card with strong double-sided tape, ensuring the beach layer is in front of the wave layer. Snip pastel yellow card to 8.5cm x 9cm and glue to the back of the shadow box card. Stamp, color in and die cut various motifs.
3. Stamp a speech bubble onto white card, followed by a sentiment and die cut. Adhere the sentiment to the front of the card, then fix the stamped motifs with both glue and 3D foam pads. Add sequins and details with a white gel pen.
Shadow Box Lighthouse Card
1. Snip two pieces of yellow cardstock to 12cm x 13cm and score them both at 1cm and 11cm. Snip two strips from light blue, 4cm x 11cm and 8cm x 11cm. Die cut the strips with stitched wave dies and score each one at 5mm from both sides. Assemble and glue the shadow box card together. Fix orange card, 10cm x 12cm, to the back.
2. Stamp, colour and die cut multiple motifs. Glue them onto each layer of the shadow box scene. Stamp a speech bubble and heart onto white cardstock. Colour in with alcohol markers and trim. Fix to the front with 3D foam pads. Add sequins and details with a white gel pen.
TOP TIPS
- Worried about postage? These cards fold flat
- Mix up the shape of your aperture frames
- Write your message on the back

You will need:
Templates or SVG files
Stencil, Inkylicious Sunbeam 6”
Ink pad, Ranger Distress Oxide Salvaged Patina
Cardstock, various colours
Gems, clear
Faber Castell Polychromos coloured pencils
Pens: shimmer pen, black fineliner, white gel pen
Hampton Art Action…
Card making How to Papercraft Papercrafter Techniques Projects

YOU WILL NEED:
Craft essentials
FREE PaperCrafter patterned papers
Dies: circle, scalloped circle
METHOD
1 Create a 13cm x 17cm white blank then cover the front with orange card. Cut tennis racket paper, 12cm…
Card making Decoupage Die cutting How to Papercraft Papercrafter Card Making

You will need:
Templates
Coloured paper or thin cardstock, various colours
Wooden skewers or thin garden canes
Tools: scoring board, scoring tool, clips, small hole punch
Glue
Concertina Fold & Bind Method
1. Take a sheet of landscape…
Home decor Home decorations How to Papercraft Papercrafter Techniques Video tutorial Projects Make it Today

Stencils: Altenew Doily Frame, Watercolor Bouquet; My Favorite Things Basic Shapes Triangles
Stamps: Avery Elle Simple Sentiments, Simply Said Hugs
Die, Altenew Mega You
Ink pads: Ranger Distress…
Card making Die cutting How to Papercraft Papercrafter Techniques Card Making Die cutting Projects


