


Card making Christmas cards Christmas crafts How to Stamping Techniques Card Making
Use stamp masking to add depth and dimension to your one-layer cards
It’s often tricky with one-layer cards to achieve enough depth, but Francesca Vignoli uses stamp masking to add a dimensional effect to her quartet and it certainly does the job! These sea-themed greetings make you feel as if you’ve just dived down into the depths of the ocean. Masking is a simple, clever and cheap technique that you can easily master for yourself using a few stash essentials. Plus, people will wonder how you did it!
Mask for multi-layered effects
Francesca has used the stamp masking method for her cards. This fantastic technique allows you to overlap stamped images to make it look like one is sitting in front of the other. It’s a great way to add perspective and dimension. If the masking paper or tape didn’t do its job and you can see a fine white line around your image, simply fill in the gap using a marker pen in a similar colour to the ink behind – sorted!
Accentuate areas using distress oxides
Whilst you’ve got the masking tape to hand, you can also use it to mask off areas for your ink blending. Choose which areas you want to ink and mask off the areas you wish to leave blank. Francesca has opted for different shaped inked areas, including multiple narrow strips and a diagonal section. Remember, be sure to press your masking tape down thoroughly to achieve clean and crisp lines without any ink seeping through.
Keep your colours simple
Francesca has applied minimal colour to her stamped characters and there’s a very good reason for it. As the characters are sat partially on top of the inked areas, you don’t want to overload your motifs with colour to ensure they stand out. Go ahead and highlight certain areas such as the scarves, feet and presents, but be sure to opt for a very light grey marker pen to colour in the body of your stamped characters.
You Will Need:
Stamps, Avery Elle Joyeux Narwhal
Ink pads: Ranger Distress Oxide Cracked Pistachio, Broken China, Prize Ribbon; black
Copic markers
Masking paper or masking tape
Cardstock, white
Gel pen, white
Ink blending tool
Stamp Masking Ocean Card
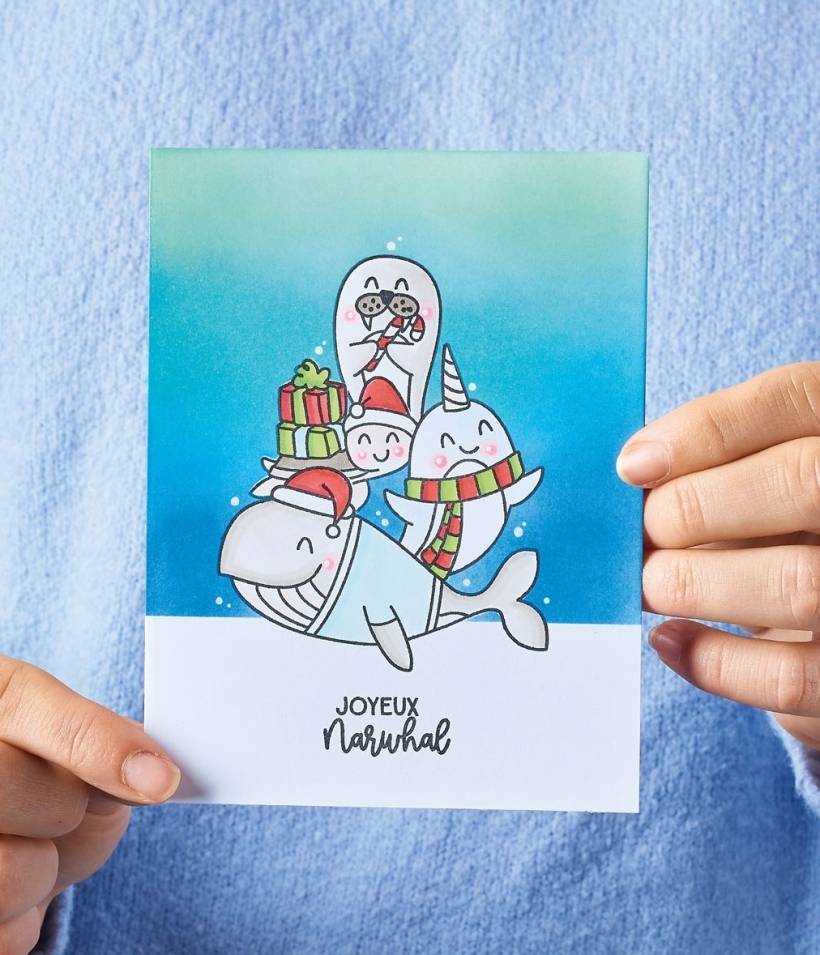
1. Create a 10.5cm x 14cm blank from white. Stamp a sentiment towards the bottom in black, then a whale. Stamp the same whale onto masking paper, cut out and use it to mask and cover up the whale on the card.
2. Stamp a narwhal onto the card in black, then again onto masking paper. Trim and mask the narwhal on the card. Stamp a turtle onto the card in black, then repeat as before to mask the turtle on the card. Stamp a sea lion onto the card and repeat again.
3. Mask the sentiment area along the bottom with masking tape and blend the top with green, light blue and dark blue distress oxide inks. Remove all the masks, colour the stamped motifs in and add bubbles to the inked scene using a white gel pen.
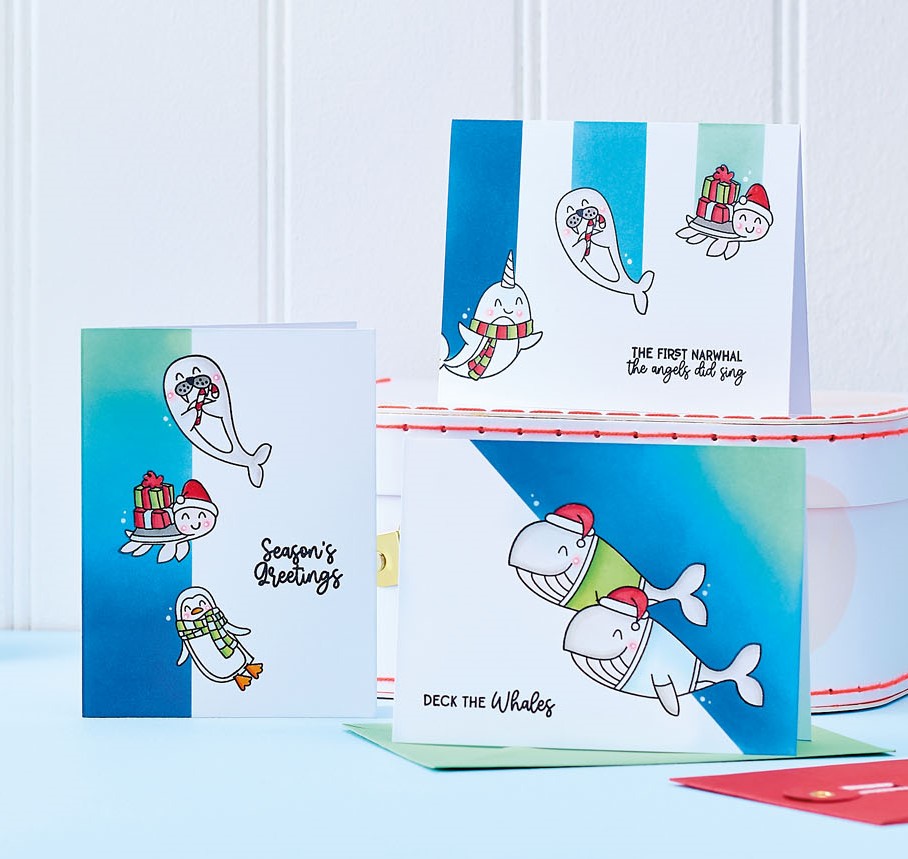
Masked Inking Christmas Card
1. Create a 10.5cm x 14cm blank from white card. Stamp a narwhal, whale, turtle and sentiment in black. Stamp the characters again onto masking paper or tape, cut out and mask all the matching motifs on the card.
2. Use masking tape to create three strips starting from each character and going upwards. Ink blend each one using different coloured distress oxide inks. Remove the masks, colour in the stamped motifs and add bubbles with a white gel pen.
Stamp Masking Whale Card
1. Make a 10.5cm x 14cm blank from white card. Stamp a whale onto the front panel in black ink. Stamp the same whale again onto masking paper and cut out. Mask the whale on the card and stamp another whale next to it, making sure they overlap slightly.
2. Stamp another whale onto masking paper, trim and mask the second whale on the card. Run masking tape from the bottom-right corner to the top of the card at an angle, then blend distress oxide inks in three different colours to the right of the tape.
3. Remove the masks and stamp a sentiment in the bottom-left corner in black ink. Colour in all the characters, then add bubbles to the inked section with a white gel pen.
Stamp Masking Christmas Characters Card
1. Take a white 10.5cm x 14cm blank. Stamp a whale, turtle and penguin onto the front panel in black ink. Stamp all three characters again onto masking paper, trim, then mask all the matching stamped motifs on the card.
2. Snip a piece of masking paper to 6.5cm x 14cm and mask the right-hand side of the card. Blend distress oxide inks in three different colours to the left of the mask.
3. Remove all the masks. Stamp a sentiment onto the right-hand side of the card in black ink and colour in the stamped characters with alcohol markers. Add bubbles to the inked section with a white gel pen.
TOP TIPS
- Enhance the layered look by overlapping the inked lines with your stamped motifs
- Use a Nuvo drops instead of a white gel pen to add mini bubbles to the inked areas
- Francesca has used Ranger Distress Oxide inks in Cracked Pistachio, Broken China and Prize Ribbon

YOU WILL NEED:
Old books
Die, circle
Wooden skewer
Binder clips
Alcohol marker, orange
Adhesives: PVA glue, glue stick
Die-cutting machine

METHOD:
1. Use a circle die to cut lots of discs from book pages. Fold each circle in…
Halloween crafts Home decor Home decorations How to Papercraft Papercrafter Revamping Techniques Projects

Whilst this may look like a paper cutting that took hours to create, it really couldn’t be any easier. Our talented designer Corinne Bradd has created 15 templates for you to…
Die cutting Home decor Home decorations How to Papercraft Papercrafter Projects

You Will Need:
Templates or SVG files
Brother ScanNCut SDX1200 (optional)
Strong card
Cardstock, various colours
Jute yarn
PVA glue
Autumnal Display
1. Draw a 25cm wide circle on strong card, then draw a concentric 17cm wide circle…
Home decor Home decorations Papercraft Papercrafter Techniques

Shadow box cards, otherwise known as tunnel greetings or diorama cards, are designed to transport the recipient to picture-perfect backdrops in an instant. In this case, PaperCrafter designer Francesca Vignoli…
Birthday crafting Card making Die cutting How to Stamping Techniques Card Making


