


Card making Christmas cards Christmas crafts Die cutting How to Papercraft Papercrafter Stamping Techniques Projects
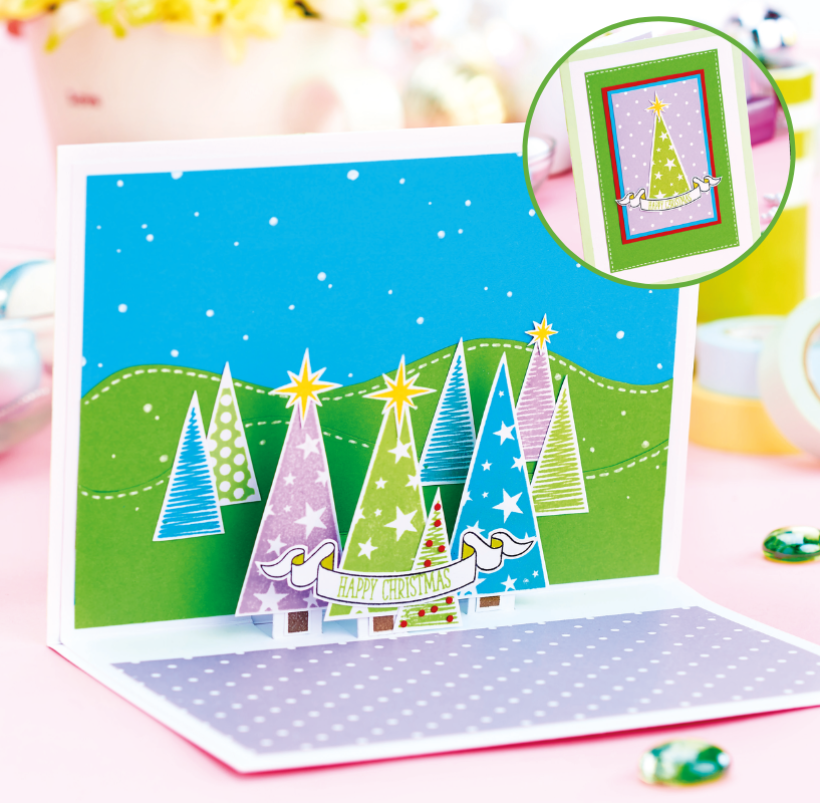
Christmas trees don’t come much prettier than on this fabulous pop-up Christmas scene. Our wonderful designer Keren Baker has crafted a brilliant 3D DIY Christmas card that shows off the pop-up technique in all its glory. The best bit? This pop-up Christmas scene is simpler to craft than you’d imagine, thanks to Keren’s wonderful instructions.
YOU WILL NEED:
Dies, Mama Elephant Pop-Up
Stamps: Winnie & Walter It’s A Wonderful Pennant; banner, Christmas sentiment
Ink pads: black, purple, teal, green, yellow
Cardstock: various colours, spotted
Gel pen, white
Washi tape, green
Glue
Die-cutting machine
METHOD:
1. Create a white 12cm x 16.5cm blank and line up three pop-up dies along the inside central fold at 5cm, 8cm and 10cm from the top.
2. Run through a die-cutting machine and push each fold forwards from the back of the card. Stamp six small and three large Christmas trees and in green, teal and purple.
3. Glue an 11cm x 15cm piece of blue card on the left-hand panel inside the card. Trim two green panels into hill shapes and layer on top. Attach three trees to the pop-out folds and the rest to the hills. Stamp three stars in yellow ink, cut out and add to the trees.
4. Add a 9cm x 15cm piece of spotted card to the right-hand side of the card. Stamp a banner and sentiment and add to the card. Using a white gel pen, add snow and highlights to the hills.
5. To decorate the front, layer four varied sizes of coloured card and add green washi tape around the edges. Stamp a Christmas tree and star as before. Cut them out and add on top with another banner sentiment.

YOU WILL NEED:
Old books
Die, circle
Wooden skewer
Binder clips
Alcohol marker, orange
Adhesives: PVA glue, glue stick
Die-cutting machine

METHOD:
1. Use a circle die to cut lots of discs from book pages. Fold each circle in…
Halloween crafts Home decor Home decorations How to Papercraft Papercrafter Revamping Techniques Projects

Whilst this may look like a paper cutting that took hours to create, it really couldn’t be any easier. Our talented designer Corinne Bradd has created 15 templates for you to…
Die cutting Home decor Home decorations How to Papercraft Papercrafter Projects

You Will Need:
Templates or SVG files
Brother ScanNCut SDX1200 (optional)
Strong card
Cardstock, various colours
Jute yarn
PVA glue
Autumnal Display
1. Draw a 25cm wide circle on strong card, then draw a concentric 17cm wide circle…
Home decor Home decorations Papercraft Papercrafter Techniques

Shadow box cards, otherwise known as tunnel greetings or diorama cards, are designed to transport the recipient to picture-perfect backdrops in an instant. In this case, PaperCrafter designer Francesca Vignoli…
Birthday crafting Card making Die cutting How to Stamping Techniques Card Making


