


Home decor Home decorations Papercraft Papercrafter Video tutorial
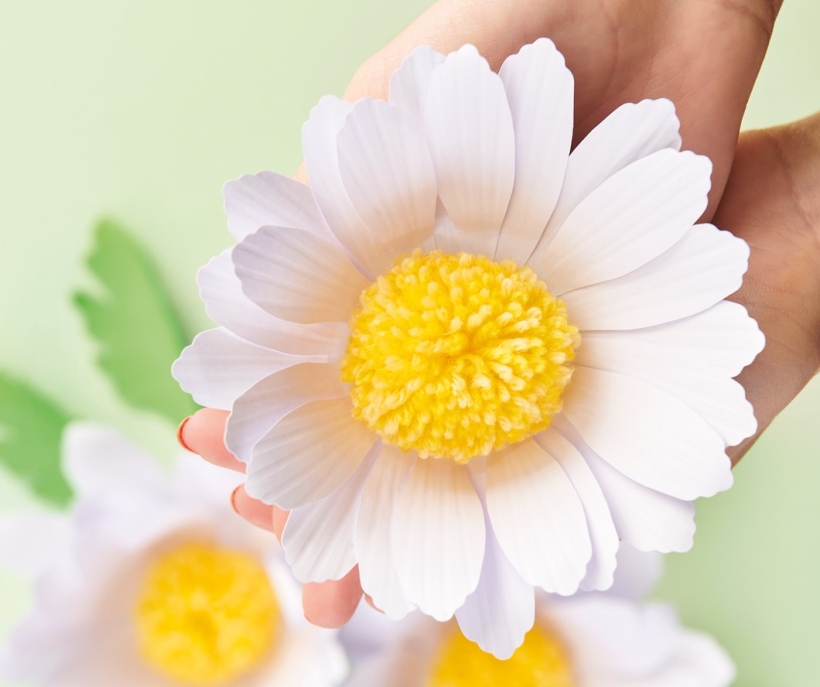
Yep, those petals really are just made from white printer paper!
You Will Need:
Templates or SVG files
White bond paper, 100gsm
Green paper, 100gsm
Stiff card
Yarn, yellow
Lino
Digital cutting machine (optional)
Pom-pom maker, small
Craft knife
Ball-ended tool
Needle tool
Adhesive
Faux Flowers
1. For each flower, cut at least 27 petals from white paper, then one petal and one 5cm wide disc from stiff card. Draw around the card petal onto a rectangle of lino or similar print block making sheet. Sketch veining lines from the edge of the petal to 2cm from the base. Use a craft knife at an angle to carve either side of each line to create a channel around 1-2mm wide.
2. Lay a paper petal over the veining block and use a medium-sized ball-ended tool to run from the bottom of each channel to the edge of the petal to blind emboss the lines. Repeat for all petals. Cut a number of leaves from green paper and create a veining board for them in the same way if desired.
3. Use the blade of a pair of scissors to curl the top of each petal under slightly and the base of each petal up. Begin fixing the petals to the stiff card disc, starting with a ring of nine equally-spaced pieces. Layer the remaining petals onto the disc, allowing the bottom ends of each to sit nearer the disc centre.
4. Make a pom-pom using yellow yarn and a small pom-pom maker. Fasten off and keep the yarn ends intact while trimming the pom-pom. Use a needle tool to pierce two holes in the middle of the disc, 2cm apart. Thread the
ends of the pom-pom through the holes and tie securely on the back. When arranging your daisies, tuck the leaves between the flowers and adhere.
“Our template can be enlarged or reduced as desired”
Corinne Bradd, designer

YOU WILL NEED:
Old books
Die, circle
Wooden skewer
Binder clips
Alcohol marker, orange
Adhesives: PVA glue, glue stick
Die-cutting machine

METHOD:
1. Use a circle die to cut lots of discs from book pages. Fold each circle in…
Halloween crafts Home decor Home decorations How to Papercraft Papercrafter Revamping Techniques Projects

Whilst this may look like a paper cutting that took hours to create, it really couldn’t be any easier. Our talented designer Corinne Bradd has created 15 templates for you to…
Die cutting Home decor Home decorations How to Papercraft Papercrafter Projects

You Will Need:
Templates or SVG files
Brother ScanNCut SDX1200 (optional)
Strong card
Cardstock, various colours
Jute yarn
PVA glue
Autumnal Display
1. Draw a 25cm wide circle on strong card, then draw a concentric 17cm wide circle…
Home decor Home decorations Papercraft Papercrafter Techniques

Shadow box cards, otherwise known as tunnel greetings or diorama cards, are designed to transport the recipient to picture-perfect backdrops in an instant. In this case, PaperCrafter designer Francesca Vignoli…
Birthday crafting Card making Die cutting How to Stamping Techniques Card Making


