


Birthday crafting Card making Die cutting How to Papercraft Papercrafter Party makes Projects
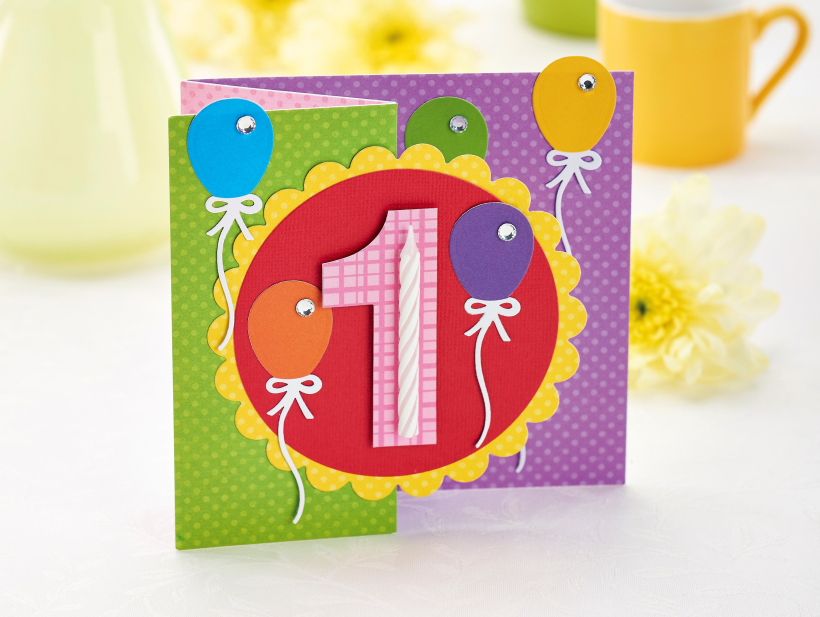
Looking for an extra special card for an extra special birthday? Look no further than this easily customisable card that’s perfect for milestone birthdays. In this case, Tracey Daykin-Jones has crafted an adorable card for a little someone’s very first birthday. It can easily be personalised, however, with the help of a handy set of number stickers, templates or dies. Read on to find out how she does it!
You will need:
Dies: balloon, scallop-edged circles, circles
Candle
Patterned papers
Cardstock, white
Adhesives: 3D foam pads, glue
1. Take a 12cm square white blank and score a vertical line down the centre of the front panel. Fold the panel back on itself.
2. Cover the inside back section of the blank with purple spotty paper and the front with a green spotty design. Add pink dotty paper to the left panel on the front of the card, behind the new fold.
3. Die cut a 10cm scallop-edged circle from yellow spotty paper and mount a 8.5cm circle of red card in the centre. Cut out the number ‘1’ from pink patterned paper and adhere to the centre of the red circle with 3D foam pads.
4. Cut a slither from the back of a small candle and attach it to the centre of the number. Affix this panel to the left edge of the folded panel. Die cut several balloons from different coloured papers. Adhere the balloons to the card.

YOU WILL NEED:
Old books
Die, circle
Wooden skewer
Binder clips
Alcohol marker, orange
Adhesives: PVA glue, glue stick
Die-cutting machine

METHOD:
1. Use a circle die to cut lots of discs from book pages. Fold each circle in…
Halloween crafts Home decor Home decorations How to Papercraft Papercrafter Revamping Techniques Projects

Whilst this may look like a paper cutting that took hours to create, it really couldn’t be any easier. Our talented designer Corinne Bradd has created 15 templates for you to…
Die cutting Home decor Home decorations How to Papercraft Papercrafter Projects

You Will Need:
Templates or SVG files
Brother ScanNCut SDX1200 (optional)
Strong card
Cardstock, various colours
Jute yarn
PVA glue
Autumnal Display
1. Draw a 25cm wide circle on strong card, then draw a concentric 17cm wide circle…
Home decor Home decorations Papercraft Papercrafter Techniques

Shadow box cards, otherwise known as tunnel greetings or diorama cards, are designed to transport the recipient to picture-perfect backdrops in an instant. In this case, PaperCrafter designer Francesca Vignoli…
Birthday crafting Card making Die cutting How to Stamping Techniques Card Making


