


Card making Die cutting How to Stamping
Take your inking to new heights with Claire Richards’ expert but ever so easy blends
Ink Tricks
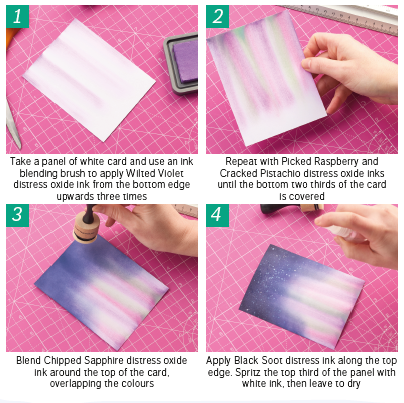
Ranger Distress Oxide Inks are a lot easier to blend with a sponge or brush tool than Distress Inks and you can layer up the colours without them bleeding into one another. As the name suggests, the ink will oxidise when water is applied and the colour will be a lot more intense than the Distress Inks – these are more transparent in nature so I’ve used Black Soot Distress Ink on my backgrounds for a more subtle effect.
Stamp A Scene
Avery Elle’s Camping Critters stamps are both cute and magical, and will certainly bring your cards to life. Copy mine or tailor the nighttime scenes to suit your favourite outdoor activity – I’ve opted for camping under the stars, toasting marshmallows over a crackling campfire and admiring the Northern Lights. To add some finishing touches to these scenes, I’ve paired stencilling with an iridescent glaze medium and ink sprays for extra texture.
YOU WILL NEED:
Dies: Paper Smooches Stitched, Presscut Circles
Stamps, Avery Elle Camping Critters
Stencil, Lawn Fawn Starry Sky
Ink pads: Ranger Distress Oxide Wilted Violet, Seedless Preserves, Picked Raspberry, Squeezed Lemonade, Chipped Sapphire, Cracked Pistachio, Lucky Clover, Tea Die, Pumice Stone; Distress Ink Black Soot; green, black, brown
Vicki Boutin Mixed Media Iridescent Glaze
Ink sprays: white, gold
Cardstock, various colours
Nuvo Aqua Shimmer Glitter Pen
Ranger Glossy Accents
Alcohol markers
Ink blending brushes
Adhesives: 3D foam pads, glue
Die-cutting machine
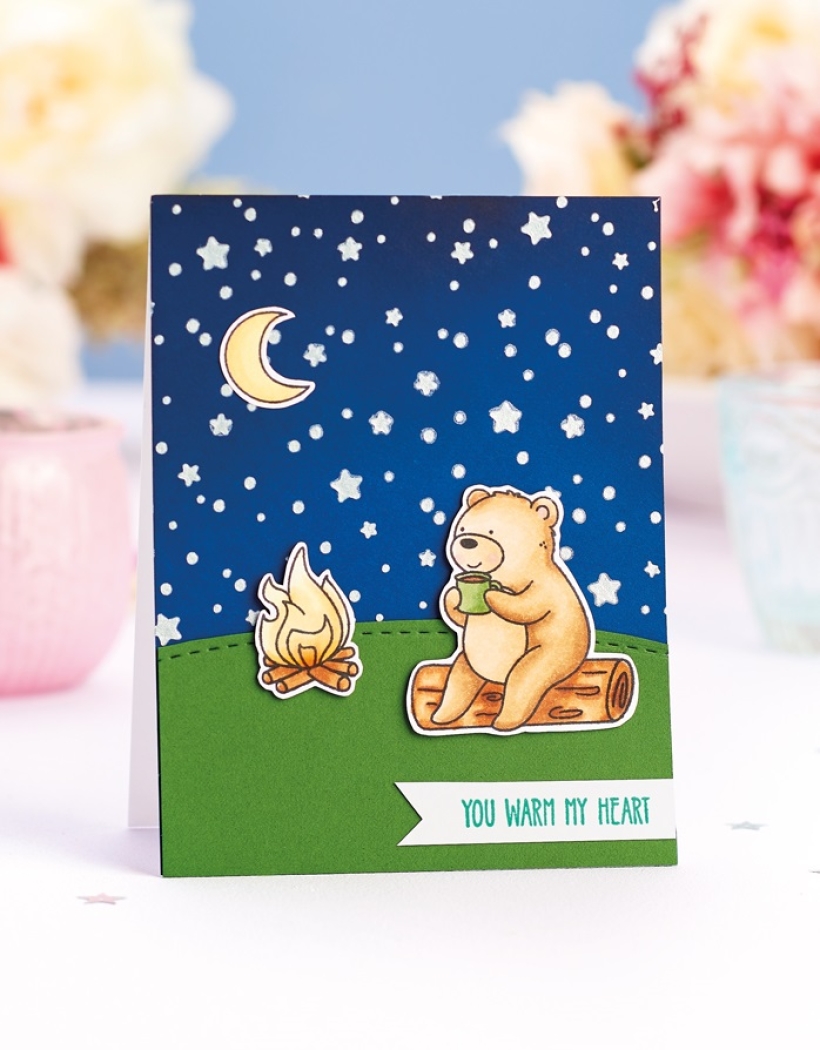
Stencilled Stars Card
1. Create an 11cm x 14cm top-folding white blank. Trim navy card to 11cm x 14cm and blend Chipped Sapphire distress oxide ink to the top third of the card. Add Black Soot distress ink
along the top.
2. Apply iridescent glaze through a star stencil, then leave to dry. Fix the navy panel to the blank. Trim green card to 5.5cm x 11cm, die cut a curved stitched edge from one side. Secure to the bottom of the card front, trimming to fit.
3. Stamp a bear, moon and campfire onto white, then colour in with alcohol markers. Cut out and glue to the greeting, using 3D foam pads for the bear and campfire. Cut a thin banner from white and stamp a sentiment on top in green. Fix to the bottom-right corner of the card. Use a glitter pen to embellish the campfire and moon motifs.
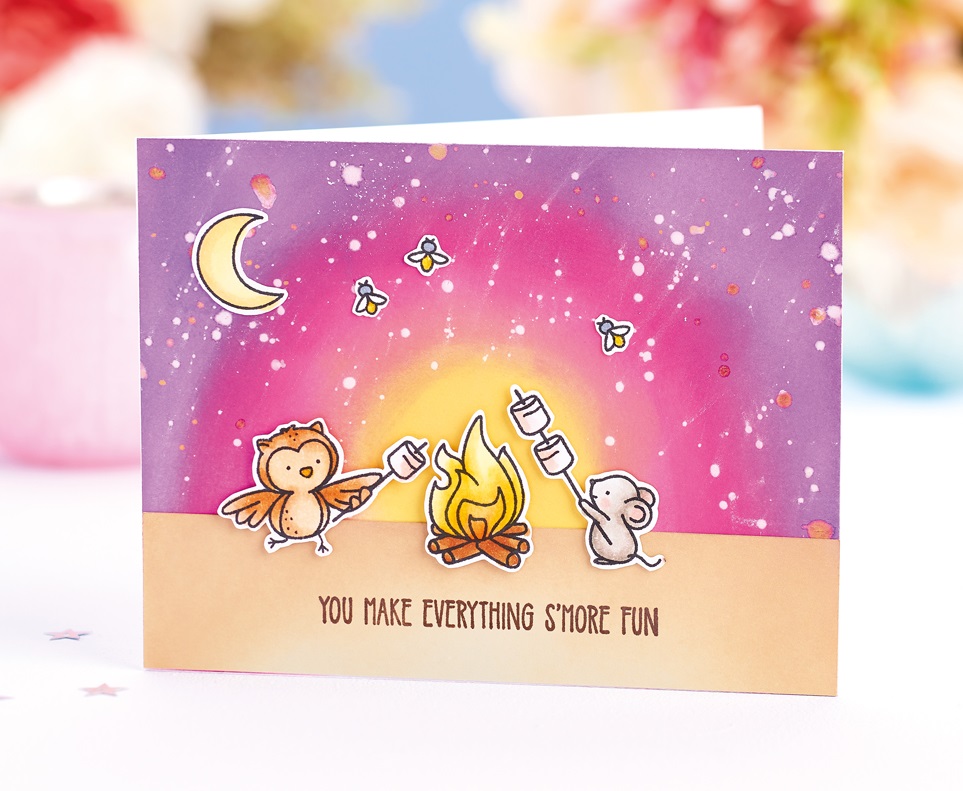
Inked Sunset Card
1. Create an 11cm x 14cm white landscape blank. Apply Squeezed Lemonade distress oxide ink in a circular motion in the centre. Surround with Picked Raspberry, Seedless Preserves and Wilted Violet distress oxide inks, blending them well to lose any harsh edges.
2. Cover up the yellow area, then spritz the rest of the card with white and gold ink mists. Leave to dry thoroughly. Trim grey card to 3cm x 14cm. Blend Tea Die distress oxide ink along the top and side edges. Stamp a sentiment in brown, then adhere to the bottom of the greeting.
3. Stamp a moon, owl, mouse, fire and fireflies onto white card. Colour in with alcohol markers and cut out. Secure to the card front, using 3D foam pads for the owl, mouse and fire motifs. Use a glitter pen to embellish the fire and moon. Add Glossy Accents to the fireflies and owl’s beak to complete.
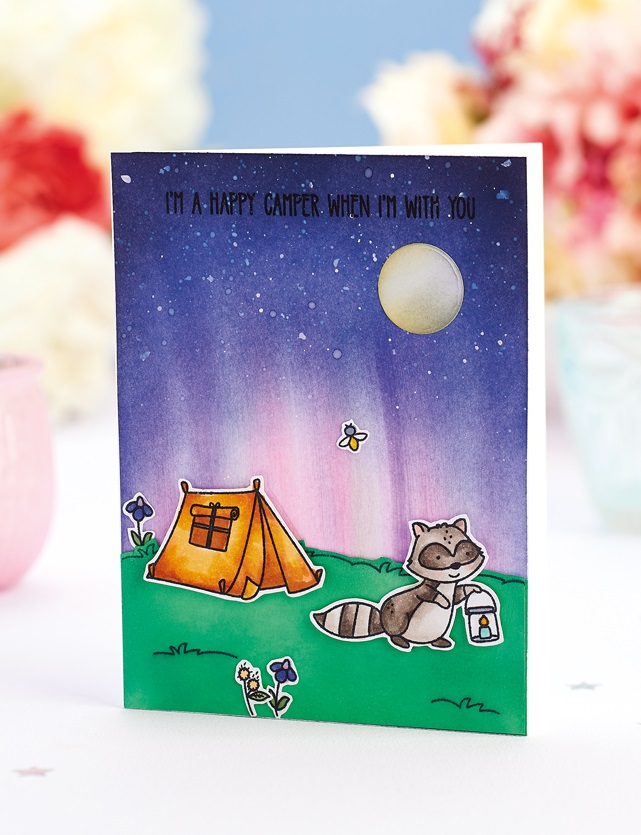
Northern Lights Card
1. Make an 11cm x 14cm white blank. Use the step-by-step below to create the inked night sky effect, then adhere. Snip white cardstock to 5cm x 11cm. Stamp grassy edges in black ink to form a border, then trim. Apply Lucky Clover distress oxide ink all over. Glue to the bottom of the greeting. Stamp a sentiment centrally in black along the top.
2. Die cut a 2cm circle from white, then lightly blend yellow and grey distress oxide inks. Adhere to the top-right of the card front. Stamp a raccoon, tent, firefly and flowers onto white, then colour in with alcohol markers. Cut out and fix to the card, using 3D foam pads for the raccoon and tent. Apply Glossy Accents to the firefly and candle flame motifs.

YOU WILL NEED:
Old books
Die, circle
Wooden skewer
Binder clips
Alcohol marker, orange
Adhesives: PVA glue, glue stick
Die-cutting machine

METHOD:
1. Use a circle die to cut lots of discs from book pages. Fold each circle in…
Halloween crafts Home decor Home decorations How to Papercraft Papercrafter Revamping Techniques Projects

Whilst this may look like a paper cutting that took hours to create, it really couldn’t be any easier. Our talented designer Corinne Bradd has created 15 templates for you to…
Die cutting Home decor Home decorations How to Papercraft Papercrafter Projects

You Will Need:
Templates or SVG files
Brother ScanNCut SDX1200 (optional)
Strong card
Cardstock, various colours
Jute yarn
PVA glue
Autumnal Display
1. Draw a 25cm wide circle on strong card, then draw a concentric 17cm wide circle…
Home decor Home decorations Papercraft Papercrafter Techniques

Shadow box cards, otherwise known as tunnel greetings or diorama cards, are designed to transport the recipient to picture-perfect backdrops in an instant. In this case, PaperCrafter designer Francesca Vignoli…
Birthday crafting Card making Die cutting How to Stamping Techniques Card Making


