


Home decorations Papercrafter Revamping Techniques
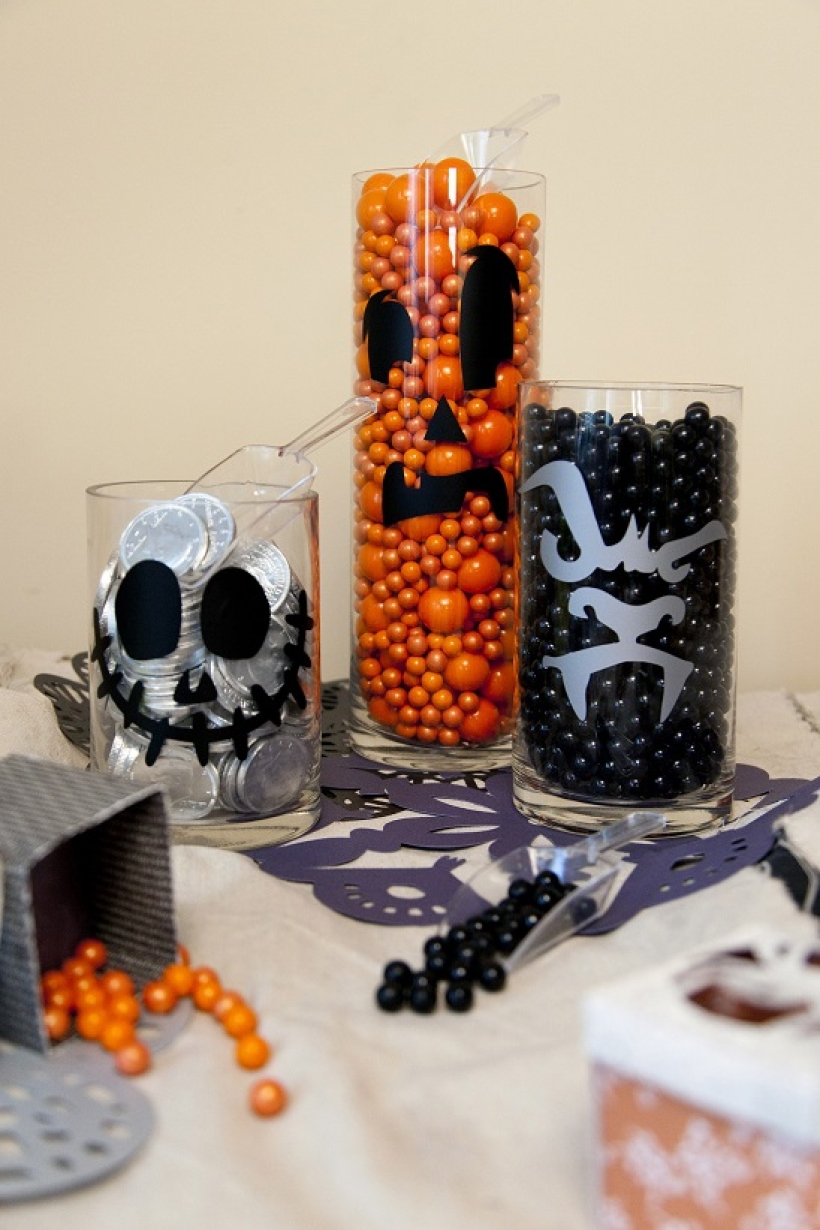
Decorate fantastic ghoulish candy containers for your Halloween parties with this fun project using a Cricut Explore
Cricut Explore™ machine, Cricut Design Space™ software, 12” x 12” standard grip cutting mat, Cricut vinyl in Midnight and Silver, Cricut tool set, Vinyl transfer tape, Glass vases of varying heights
The Cricut Explore is a revelation for papercrafters and budding designers. By simply designing, cutting, writing or scoring, a wide range of items can be made in just minutes with a variety of materials including card, fabric, iron on, vinyl, denim, felt and even faux leather.
The machine is great for so many projects and occasions, so every week in September we’re going to show you a fab Halloween make so you can prepare for your spooky shin-digs well in advance. For more inspiration, there is a huge range of ‘ready to make’ projects from Cricut Design Space.
• Connect the Cricut Explore™ to the computer. Log on to your Design Space™ account, search for ‘parties & events’ in the categories and select the Halloween Candy Container project.
• Click on ‘Customise’.
• Resize the images as required for your chosen vases by first highlighting the image and then dragging the corner point. The size appears in a black text box as the image is altered.
• Cut the images from Midnight and Silver Cricut vinyl, turning the Smart Dial™ to ‘vinyl’.
TIP: Use the scraper tool to apply the vinyl to the mat; this ensures good contact and removes any air bubbles.
• Carefully remove the vinyl from the cutting mat. Use the weeder tool to remove the unwanted pieces. Use the vinyl transfer tape to apply the images to the vases. Fill with candy.
TOP TIP! Cut these images from iron-on vinyl and iron them on to T-shirts to create funky Halloween party outfits.
Cricut Explore
Available from Create & Craft, selected Hobbycraft stores, Amazon.co.uk and other well-known craft retailers and etailers at £249.99 including VAT.

YOU WILL NEED:
Old books
Die, circle
Wooden skewer
Binder clips
Alcohol marker, orange
Adhesives: PVA glue, glue stick
Die-cutting machine

METHOD:
1. Use a circle die to cut lots of discs from book pages. Fold each circle in…
Halloween crafts Home decor Home decorations How to Papercraft Papercrafter Revamping Techniques Projects

Whilst this may look like a paper cutting that took hours to create, it really couldn’t be any easier. Our talented designer Corinne Bradd has created 15 templates for you to…
Die cutting Home decor Home decorations How to Papercraft Papercrafter Projects

You Will Need:
Templates or SVG files
Brother ScanNCut SDX1200 (optional)
Strong card
Cardstock, various colours
Jute yarn
PVA glue
Autumnal Display
1. Draw a 25cm wide circle on strong card, then draw a concentric 17cm wide circle…
Home decor Home decorations Papercraft Papercrafter Techniques

Shadow box cards, otherwise known as tunnel greetings or diorama cards, are designed to transport the recipient to picture-perfect backdrops in an instant. In this case, PaperCrafter designer Francesca Vignoli…
Birthday crafting Card making Die cutting How to Stamping Techniques Card Making


