


Use the Hunkydory Step Into Springtime collection to decoupage your makes
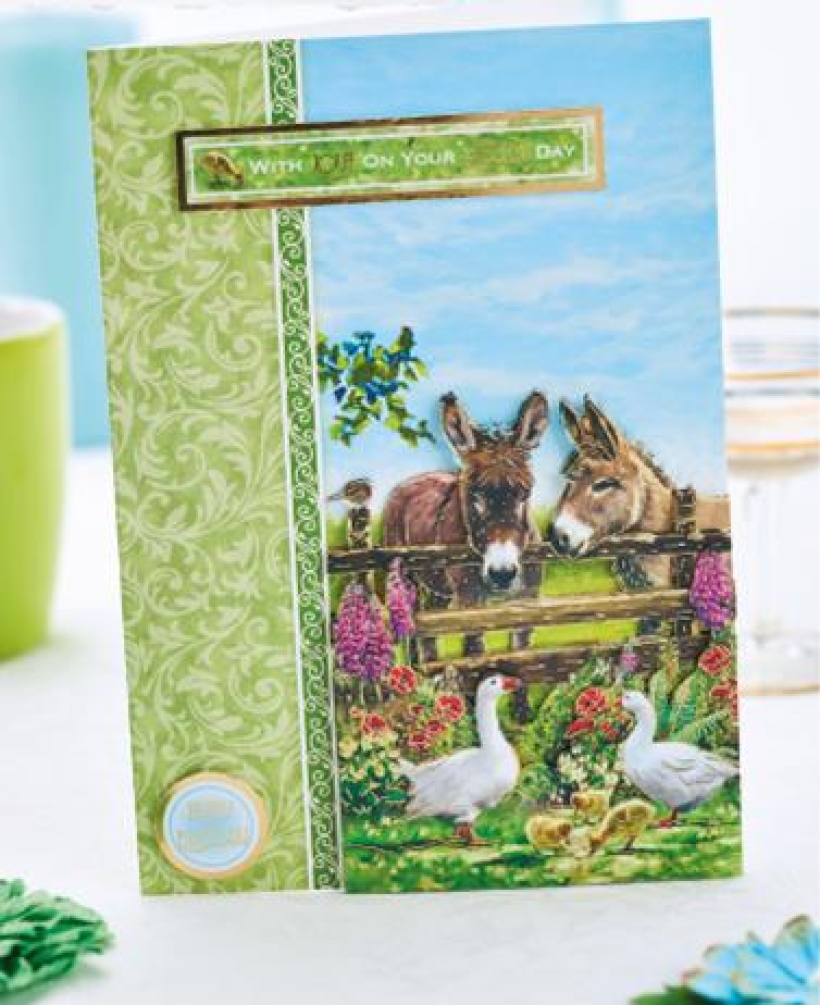
Isn’t Corinne Bradd’s donkey decoupage greeting the cutest little pick-me-up? We can’t get enough of the technique at the moment, and Hunkydory’s latest Step Into Springtime Designer Deco-Large collection is packed with everything you would find in the most charming of farmyards and gardens, is just the set we need to reach higher crafting heights. Whip up a professional-quality card in a jiffy with this die-cut decoupage set containing plenty of motifs and sentiments, then let your recipient admire the finished 3D effect!
Decoupage is the art of using cut-out replicate layers to add depth and dimension to an image. Traditional decoupage involves manually cutting each element, or alternatively, die-cut decoupage is extremely popular, with everything supplied ready-cut. The Step Into Springtime Designer Deco-Large Collection is quite spectacular because the ‘jumbo’ style of this collection means that more detail can be seen, and the die-cut elements are easier to use than more intricate decoupage sets.
Layers are built up one by one, with each element of the scene on its own level. It’s very easy to make any design look three-dimensional by backing each section with small foam pads to raise it up off the previous layer. You can even emphasise special parts by adding more height, making it look like it’s coming towards the recipient more than other elements.
The fabulous Designer Deco-Large collection covers everything a crafter could want for springtime crafting, with a classic country cottage scene that evokes wonderful memories of warm spring days from times gone by and fresh new floral blooms. There are also wonderful kittens and collie dogs that are always so popular for cardmaking, plus Easter chicks and bunnies, delightful donkeys and iconic spring lambs!
• Push out the largest section from the sheet and remove the small shapes. Fix foam pads to the corners on the back of the shapes

• Line up the decoupage section with the printed design and press to adhere

• Fix pads onto the reverse of smaller shapes such as the chick, then stick to form the next layer

• Finish the card with individual sentiment pieces at the top and side of the card


YOU WILL NEED:
Old books
Die, circle
Wooden skewer
Binder clips
Alcohol marker, orange
Adhesives: PVA glue, glue stick
Die-cutting machine

METHOD:
1. Use a circle die to cut lots of discs from book pages. Fold each circle in…
Halloween crafts Home decor Home decorations How to Papercraft Papercrafter Revamping Techniques Projects

Whilst this may look like a paper cutting that took hours to create, it really couldn’t be any easier. Our talented designer Corinne Bradd has created 15 templates for you to…
Die cutting Home decor Home decorations How to Papercraft Papercrafter Projects

You Will Need:
Templates or SVG files
Brother ScanNCut SDX1200 (optional)
Strong card
Cardstock, various colours
Jute yarn
PVA glue
Autumnal Display
1. Draw a 25cm wide circle on strong card, then draw a concentric 17cm wide circle…
Home decor Home decorations Papercraft Papercrafter Techniques

Shadow box cards, otherwise known as tunnel greetings or diorama cards, are designed to transport the recipient to picture-perfect backdrops in an instant. In this case, PaperCrafter designer Francesca Vignoli…
Birthday crafting Card making Die cutting How to Stamping Techniques Card Making


