


Christmas crafts How to Papercraft Papercrafter Techniques Projects
Embrace the tropical craze this Christmas with the Brother ScanNCut
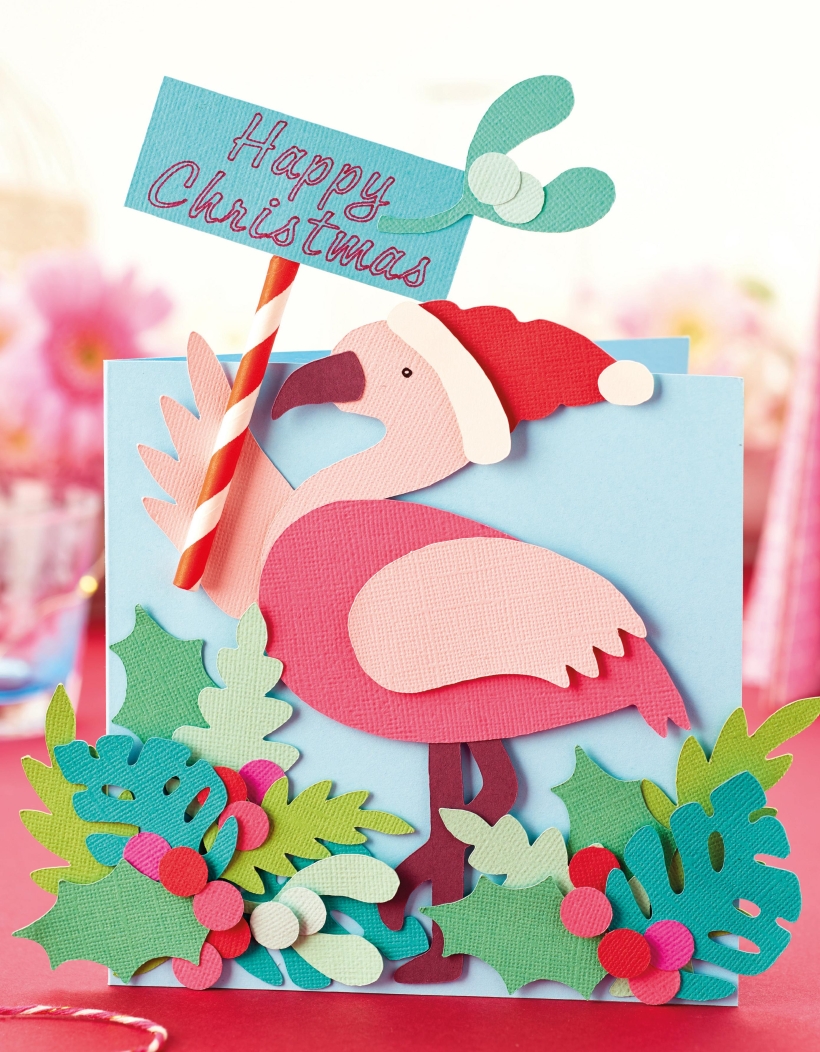
Forgo the traditional look and embrace the trend that’s warming up your cockles this winter! We may have waved goodbye to summer, but we’re not giving up on the flamboyant flamingo just yet. Corinne Bradd gets busy crafting with the Brother ScanNCut and your free templates to achieve two whimsical makes, a wreath for the home and a fun flamingo greeting your loved ones will adore.
Please login to download. Sign in here
Templates from pape craftermagazine.co.uk
Brother ScanNCut CM900 machine
Paper straws
1. Create a square blank from blue card. Download the flamingo templates from our website. Assemble the elements together using the display on your ScanNCut machine to make a flamingo with an outstretched wing, then fix to the centre of the card. Use leftover shapes to add foliage either side.
2. Draw a sentiment onto turquoise card and trim into a rectangle. Glue half a paper straw to the back of the sentiment and secure to the flamingo’s wing so that it extends above the top of the card.
1. Download the templates from our website. Print them out and scan them into your Brother ScanNCut machine, then unify any parts of the same image if necessary.
2. Enlarge or reduce, ensuring the flamingo elements are at the same percentage. Arrange the images on the layout screen, positioning elements of the same colour together in different corners of the mat.
3. Flip over half of the images so you can cut symmetrical designs. Trim pieces of coloured card and fix them to the cutting mat in the corresponding areas, before cutting out all the shapes.
4. Using the built-in image library, cut a 20cm scalloped circle from green. Snip a 17cm scalloped heart from blue and place in the centre of the circle with 3D foam pads.
5. Arrange the various pieces of foliage around the circle so that the leaves extend from the centre. Use 3D foam pads to add layers and top each section with coloured berries.
6. Take the flamingo elements and assemble, checking the flipped pieces are all together. Use a 3D foam pad to add height to the wings and hat. Make a second flamingo, flipping the elements to create a mirror image.
7. Fix the flamingos to face each other in the middle of the heart. Select a script typeface from the machine’s library, type out a greeting and resize to 7cm wide.
8. Change the blade to the pen holder with a colour nib and draw the sentiment onto pink card. Trim into a rectangle and place between the two flamingos.

YOU WILL NEED:
Old books
Die, circle
Wooden skewer
Binder clips
Alcohol marker, orange
Adhesives: PVA glue, glue stick
Die-cutting machine

METHOD:
1. Use a circle die to cut lots of discs from book pages. Fold each circle in…
Halloween crafts Home decor Home decorations How to Papercraft Papercrafter Revamping Techniques Projects

Whilst this may look like a paper cutting that took hours to create, it really couldn’t be any easier. Our talented designer Corinne Bradd has created 15 templates for you to…
Die cutting Home decor Home decorations How to Papercraft Papercrafter Projects

You Will Need:
Templates or SVG files
Brother ScanNCut SDX1200 (optional)
Strong card
Cardstock, various colours
Jute yarn
PVA glue
Autumnal Display
1. Draw a 25cm wide circle on strong card, then draw a concentric 17cm wide circle…
Home decor Home decorations Papercraft Papercrafter Techniques

Shadow box cards, otherwise known as tunnel greetings or diorama cards, are designed to transport the recipient to picture-perfect backdrops in an instant. In this case, PaperCrafter designer Francesca Vignoli…
Birthday crafting Card making Die cutting How to Stamping Techniques Card Making


