


Card making Christmas cards Christmas crafts Die cutting How to Stamping Techniques Card Making
Francesca Vignoli shows you how to get the stitch look with your die-cutting machine
Francesca Vignoli’s stitch-look cards have been crafted using a favourite stash essential of ours… dies. That’s right, no needle or thread required! Pairing together these faux-stitch elements with cute character stamps, there’s no better combo in our eyes. Before you get carried away with your Copics (we know, it’s hard to resist), consult our colouring hacks first to ensure you get the most from your markers.
No-sew stitch effects
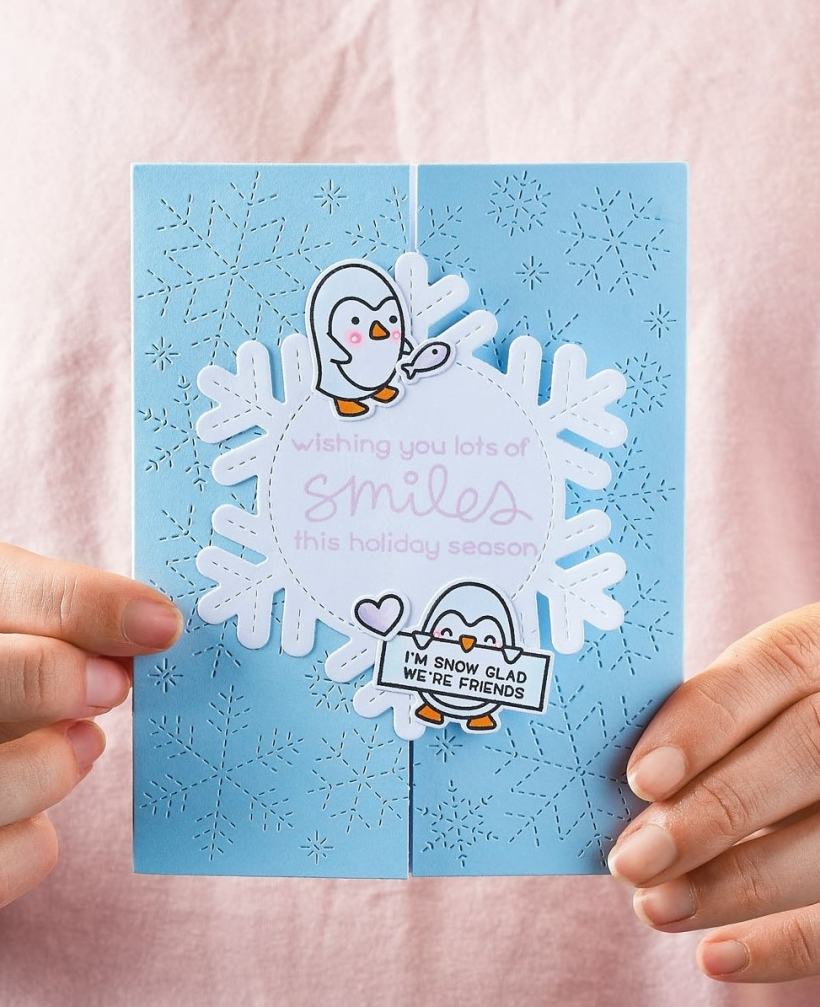
Stitching on cards has become very popular amongst cardmakers, but you can achieve the same look in half the time using dies. That’s right, ditch the sewing machine and dust off your trusty die-cutting machine. Francesca has used Lawn Fawn’s Stitched Snowflake Backdrop die for these cards to create subtle textured backgrounds. The die will cut tiny stitches through the cardstock to create a lovely textured imprint. To enhance the stitchy look even further, use dies with a stitched edge.
Options for every ability
If you’re new to cardmaking, Francesca’s beginner-friendly makes are a good place to start. Up for a challenge? Give the more complex designs a go, such as the gatefold card. As the name suggests, the front of the greeting opens and closes like a gate. When it comes to decorating the two panels, be sure to adhere the central snowflake die-cut to one side only so that the card can still open. Want to test your skills even further? Try a platform pop-up card with the help of Lawn Fawn dies.
Get creative with your Copics
Francesca has decided on a muted colour scheme using Copic markers in the shades RV10, RV13, B00, BG10, BV00, BV02, YR16, BG70 and B60 for the stamped motifs. When colouring in, apply a very light pressure to the pen so that the pigment isn’t too heavy. Perhaps skip some areas of your motifs and add small highlights instead. You can also use a white gel pen to add in small details. Francesca has applied small white dots to the cheeks of the penguins to make them glow – cute!
YOU WILL NEED:
Dies: Lawn Fawn Stitched Snowflake Backdrop, Outside In Stitched Snowflake, Penguin Party, Platform Pop-up: circles
Stamps: Lawn Fawn Penguin Party, Merry Messages
Cardstock: white, light blue
Ink pads: Lawn Fawn Dye Fresh Lavender, Memento Tuxedo Black
Copic markers
Gel pen, white
Adhesives: glue, 3D foam pads
Die-cutting machine
Snowflake Gatefold Card
1. Cut four panels from white cardstock, two measuring 11cm x 14cm, the other two measuring 6.5cm x 14cm. Score the last two at 1cm to leave you with 5.5cm x 14cm panels with 1cm tabs. Run glue along the inside of the tabs and fix onto one of the larger panels to create a gatefold card.
2. Die cut a snowflake background from light blue and a stitched snowflake from white. Trim the light blue panel in half and glue onto each side of the card front. Fix the other white panel on the reverse of the card to hide the tabs.
3. Stamp a sentiment onto the snowflake in lilac ink and glue to the left-hand panel. Stamp, colour in and die cut two penguins, then secure to the snowflake. Add details with a white gel pen.
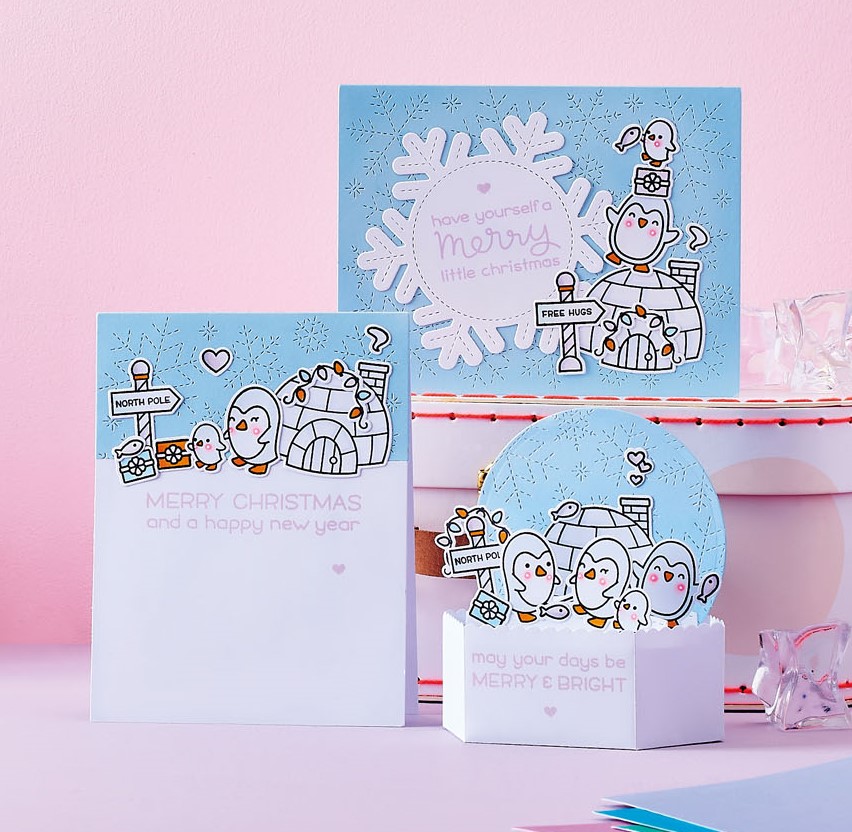
North Pole Scene Card
1. Create a top-folding 11cm x 14cm blank from white, then a panel of white card to 9cm x 11cm. Die cut a snowflake panel from a strip of light blue. Glue the blue snowflake panel along the top and the white panel below.
2. Stamp a sentiment onto the white panel in lilac ink. Stamp, colour in and die cut an igloo, two penguins and North Pole motifs and fix them onto the blue snowflake strip along the top of the card. Add details with a white gel pen and stamp a small heart below the sentiment.
Stitched Snowflake Card
1. Create a white landscape blank and trim light blue card to the same size. Die cut a stitched snowflake background from the light blue panel and a snowflake from white.
2. Stamp a sentiment and a small heart onto the snowflake in lilac ink. Stamp, colour in and die cut penguins, an igloo and North Pole elements. Fix to the right-hand side of the blue panel with glue and 3D foam pads. Secure the snowflake on the left. Add details with a white gel pen.
Pop-up Penguin Card
1. Using Lawn Fawn’s Platform Pop-up die set, die cut the elements from white card – you’ll need two of the scallop-edged rectangular die, three of the t-shaped tab and three of the stitched hill).
2. Before assembling, stamp a sentiment onto the scallop-edged rectangular element. Fold all the score lines and run glue onto the tabs, then assemble into a pop-up box card.
3. Die cut out a snowflake background from light blue cardstock and cut into a circle. Trim 2cm from the bottom. Fix the hills to the tabs inside the card and glue the snowflake circle to the back tab.
4. Stamp, colour in and die cut four penguins, an igloo and North Pole elements. Add white gel details to the motifs and fix them to the platform pop-up.

YOU WILL NEED:
Old books
Die, circle
Wooden skewer
Binder clips
Alcohol marker, orange
Adhesives: PVA glue, glue stick
Die-cutting machine

METHOD:
1. Use a circle die to cut lots of discs from book pages. Fold each circle in…
Halloween crafts Home decor Home decorations How to Papercraft Papercrafter Revamping Techniques Projects

Whilst this may look like a paper cutting that took hours to create, it really couldn’t be any easier. Our talented designer Corinne Bradd has created 15 templates for you to…
Die cutting Home decor Home decorations How to Papercraft Papercrafter Projects

You Will Need:
Templates or SVG files
Brother ScanNCut SDX1200 (optional)
Strong card
Cardstock, various colours
Jute yarn
PVA glue
Autumnal Display
1. Draw a 25cm wide circle on strong card, then draw a concentric 17cm wide circle…
Home decor Home decorations Papercraft Papercrafter Techniques

Shadow box cards, otherwise known as tunnel greetings or diorama cards, are designed to transport the recipient to picture-perfect backdrops in an instant. In this case, PaperCrafter designer Francesca Vignoli…
Birthday crafting Card making Die cutting How to Stamping Techniques Card Making


