


Learn how to make a card that flips back and forth with Tracey Daykin-Jones and add a twist to your Christmas greetings
Please login to download. Sign in here
Flip cards are both incredibly fun to craft and receive. If you’re looking to send something extra special to your loved ones this season then why not recreate these playful Christmas greetings, featuring a fun flip element? They may seem intricate to craft, but with some simple die-cutting techniques you can create whimsical greetings both adults and kids will love.
The key to success is in the measuring and marking – make sure you erase the pencil mark on the central flip section to avoid scoring in error. Washi tape is invaluable when partial die-cutting, it doesn’t tear the paper and ensures accurate cutting which is essential. Once these first steps are mastered, the fun begins. Fold scored lines in opposite directions and add layers, stickers and embellishments to create eye-catching designs guaranteed to wow your friends.
Craft essentials
Dies: circles, decorative edged squares, scalloped edged circle, snowflakes
Chipboard elements
Silver foil
Stickers
1. Trim patterned paper to 13.5cm x 20cm. Draw a vertical line 7cm from the left and a second, 2.5cm to the right of the first line. Tape the middle of a scalloped edged square die to the centre of the first vertical line.
2. Place the cutting mat to the first line only and die cut. Repeat this on the other side, using the second line as your guide. Leave the central strip clear. Remove the tape and fold along the two lines to create a flip card base, before erasing the pencil marks.
3. Trim the parcel image, round the corners and adhere to the centre of the left panel. Die cut a scalloped edged square from patterned paper. Layer bauble and sentiment stickers to the shape and adhere to the central panel. Embellish with gems to finish.
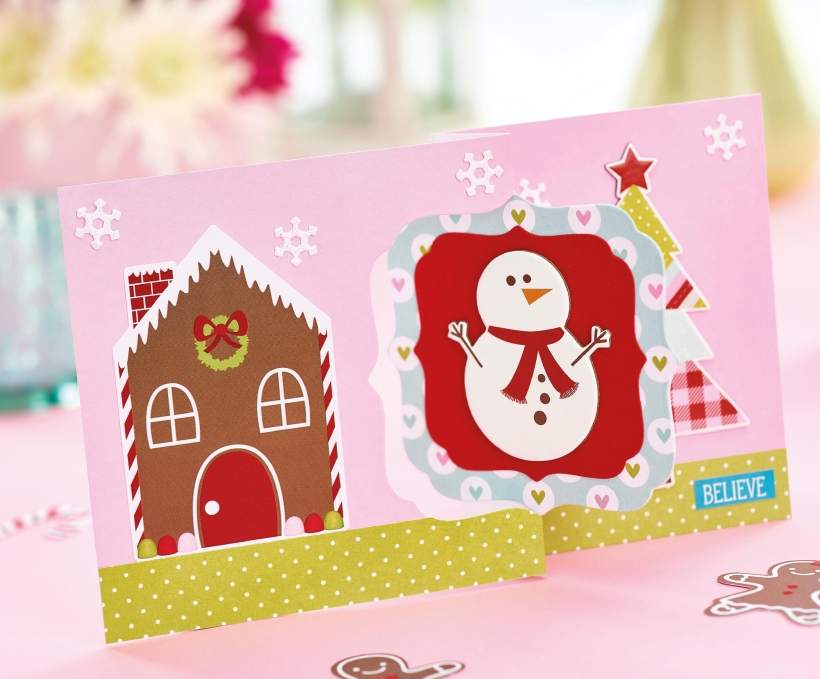
1. Take an 8cm x 12cm panel of pink paper. Draw a vertical line down the centre and a second, 2.5cm to the right of the first line. Tape a square decorative edged die to the centre of the first vertical line.
2. Place the cutting mat to the first line only and die cut. Repeat this on the other side, using the second line as your guide. Leave the central strip clear. Remove the tape and fold along the two lines to create a flip card base, before erasing the pencil marks.
3. Die cut a second square from patterned paper and adhere to the die-cut shape. Mount a smaller layer of red, before adding a chipboard snowman. Adhere strips of green spotty paper along the bottom and add a house sticker to left panel.
4. Fix a Christmas tree chipboard shape and sentiment to the right panel. Finish by adhering small snowflake die-cut shapes to the greeting.

YOU WILL NEED:
Old books
Die, circle
Wooden skewer
Binder clips
Alcohol marker, orange
Adhesives: PVA glue, glue stick
Die-cutting machine

METHOD:
1. Use a circle die to cut lots of discs from book pages. Fold each circle in…
Halloween crafts Home decor Home decorations How to Papercraft Papercrafter Revamping Techniques Projects

Whilst this may look like a paper cutting that took hours to create, it really couldn’t be any easier. Our talented designer Corinne Bradd has created 15 templates for you to…
Die cutting Home decor Home decorations How to Papercraft Papercrafter Projects

You Will Need:
Templates or SVG files
Brother ScanNCut SDX1200 (optional)
Strong card
Cardstock, various colours
Jute yarn
PVA glue
Autumnal Display
1. Draw a 25cm wide circle on strong card, then draw a concentric 17cm wide circle…
Home decor Home decorations Papercraft Papercrafter Techniques

Shadow box cards, otherwise known as tunnel greetings or diorama cards, are designed to transport the recipient to picture-perfect backdrops in an instant. In this case, PaperCrafter designer Francesca Vignoli…
Birthday crafting Card making Die cutting How to Stamping Techniques Card Making


