


Follow our nine steps below to stamp and emboss a charming Christmas card
PaperCrafter kit, Downloadable papers from papercraftermagazine.co.uk, Card, white, Versamark ink, Embossing powder, silver, light pink, Dies, 6cm circle, 6.5cm scallop-edged circle, Heat embossing tool, Adhesive gems, Buttons, pink
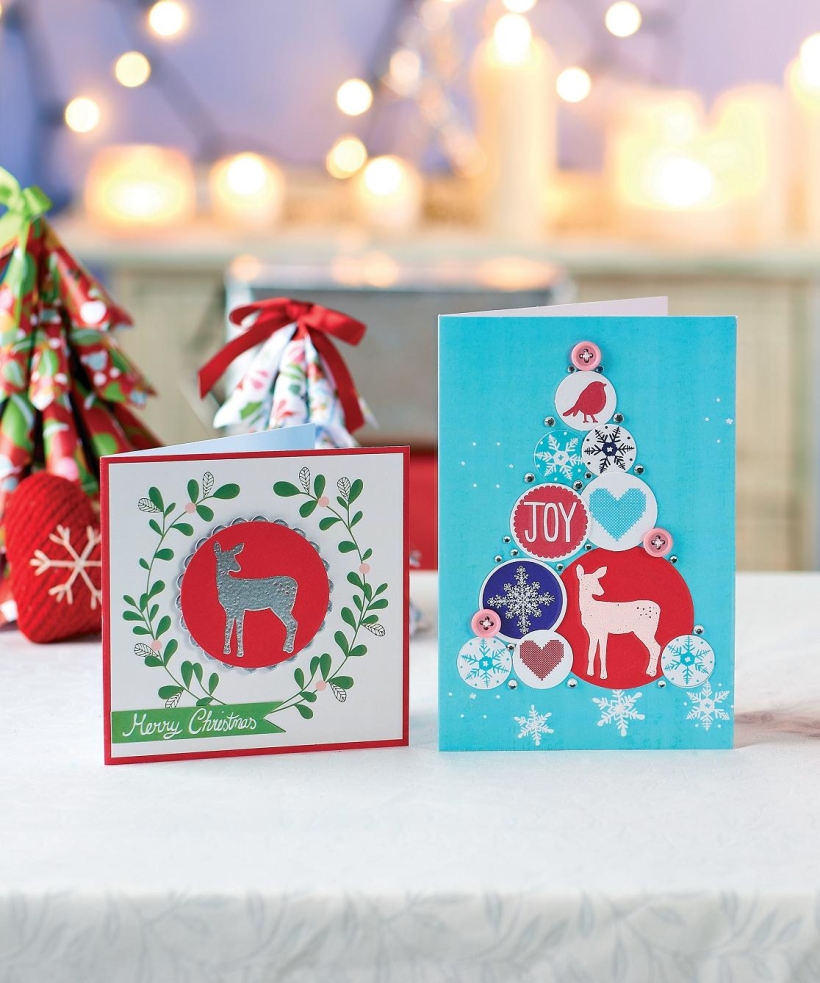
Here, Tracey Daykin-Jones’ four greetings make light of heat embossing — the method of creating a raised image through heat, which can be applied to give your card makes a dazzling new look!
• Take a white 12cm square card blank and cover the front with paper from a red envelope. Trim the wreath section of the card into a 11.2cm square and mount centrally to the red paper, leaving a small border.
• Stamp a reindeer onto red paper with Versamark ink and emboss with silver powder. Use a circle die to create a disc around the stamped image, 6cm in diameter. Die cut a 6.5cm scallop-edged circle and emboss again with silver powder.
• Layer the red circle onto the scallop-edged one, and stick in the centre of the wreath with foam pads. Adhere a 'Merry Christmas'sentiment to the bottom left.
• Stamp a reindeer onto red paper with Versamark ink and emboss with light pink powder. Use a 6cm circle die to cut around the image.
• Roughly mark a triangular shape centrally on the blue snowflake patterned card, with the peak 1cm from the top of the card, and each lower point 2.5cm from the bottom of the card and 1cm from each side.
• Arrange an assortment of die-cut motifs, including the stamped reindeer die-cut, within the triangular outline. When happy with the design, stick the elements down and fill any gaps with silver gems and pink buttons.
• Take a red card blank and stick the heart banner 3cm from the bottom. Adhere a dark blue border, light blue strip and thin border of mistletoe above the banner. Add a length of lace, securing inside the card.

• Cut three triangle shapes from the Christmas tree images and stick them to the left of the card. Stamp a reindeer onto white card using Versamark ink and purple embossing powder. Use a 6cm circle die around the motif.
• Make a 6.5cm scallop-edged circle from white card, ink the edges with Versamark ink and emboss with silver powder. Layer the stamped image onto this section and affix to the card with foam pads.
• Punch two small stars from a diecut cloud and stick to the top right of the card. Embellish with a pink button and silver gems.
• Cut a 12cm circle from white card, score and fold in half. Trim a 0.5cm line from the bottom edge of the back of the card so the card can stand securely.
• Cover the front of the card with a semicircle of patterned paper and mount a layer of holly patterned paper on top, leaving a 3mm border. Wrap twine around the fold in the card so it coils around the front three times and tie into a bow.
• Stamp a reindeer image onto green card and emboss using Versamark ink and silver powder. Trim to a 6cm circle and layer onto a 6.5cm scallop-edged disc of red card. Mount this section onto a 7cm circle of white card, and then again onto a 7.5cm scallop-edged disc of red card.
• Add the layered section to the card with foam pads on the bottom half of the motif only.

YOU WILL NEED:
Old books
Die, circle
Wooden skewer
Binder clips
Alcohol marker, orange
Adhesives: PVA glue, glue stick
Die-cutting machine

METHOD:
1. Use a circle die to cut lots of discs from book pages. Fold each circle in…
Halloween crafts Home decor Home decorations How to Papercraft Papercrafter Revamping Techniques Projects

Whilst this may look like a paper cutting that took hours to create, it really couldn’t be any easier. Our talented designer Corinne Bradd has created 15 templates for you to…
Die cutting Home decor Home decorations How to Papercraft Papercrafter Projects

You Will Need:
Templates or SVG files
Brother ScanNCut SDX1200 (optional)
Strong card
Cardstock, various colours
Jute yarn
PVA glue
Autumnal Display
1. Draw a 25cm wide circle on strong card, then draw a concentric 17cm wide circle…
Home decor Home decorations Papercraft Papercrafter Techniques

Shadow box cards, otherwise known as tunnel greetings or diorama cards, are designed to transport the recipient to picture-perfect backdrops in an instant. In this case, PaperCrafter designer Francesca Vignoli…
Birthday crafting Card making Die cutting How to Stamping Techniques Card Making


