


Christmas crafts Home decor Home decorations How to Papercraft Papercrafter Party makes Techniques
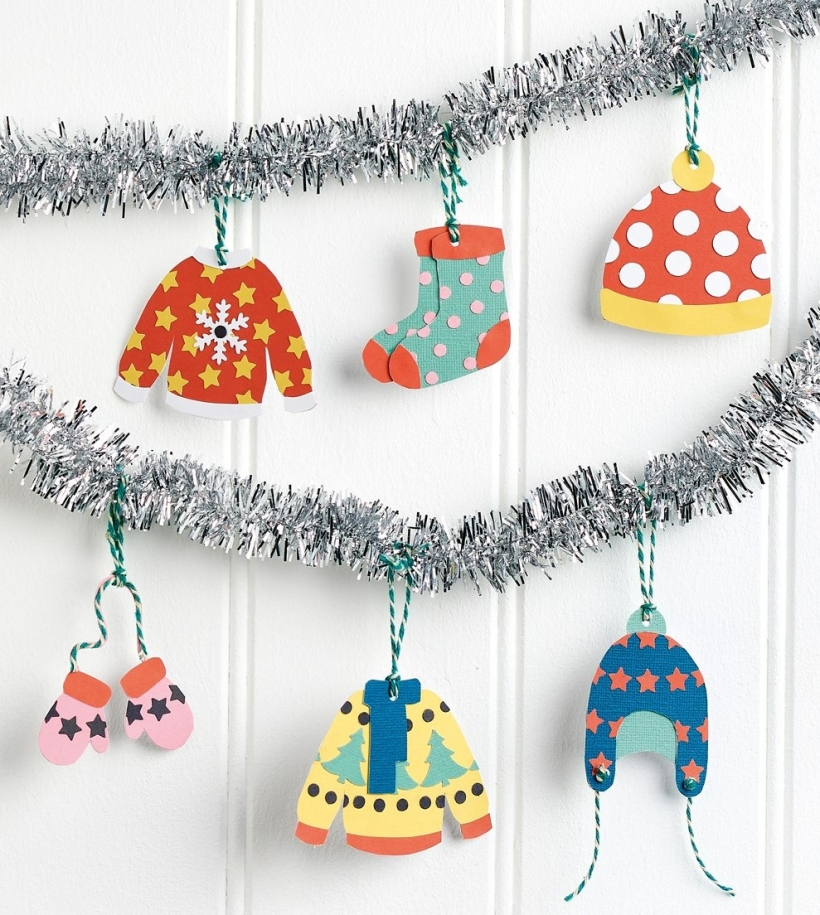
These Christmas knitwear decorations are sure to lift your festive home décor to the next level. Sarah Jackman Read is on hand to show you how to whip up these Christmas knitwear decorations extra quickly… no yarn required! With Sarah’s handy templates by your side, all you have to do is layer up the elements bit by bit – easy. Grab your stack of coloured card to make our cosy Christmas jumpers, snuggly socks, a bobble hat and mittens. Why not try out different colourways for your Christmas knitwear decorations too?
Please login to download. Sign in here
YOU WILL NEED:
Templates or Christmas knitwear SVG files
Cardstock, various colours
Punches: Christmas tree, circle, snowflake, hole, star
Baker’s twine, green
Tracing paper
Glue
Red Jumper
1. Trace the jumper onto red card, then cut out. Layer onto white card and trim. Punch small stars from yellow, then glue onto the jumper, snipping to fit. Trace the collar and cuffs onto white card, cut out and secure to the jumper. Punch a snowflake from white and fix in the centre.
2. Punch a small circle from dark grey card using a hole punch, then adhere to the centre of the snowflake. Punch a hole through the top of the jumper, thread with green baker’s twine and tie a knot in the top to form a loop for hanging.
Yellow Jumper
1. Trace the jumper onto yellow card, then cut out. Adhere onto white card and trim. Punch small Christmas trees from green card, then glue onto the jumper, trimming to fit. Punch multiple small circles from dark grey card using a hole punch. Secure above and below the Christmas trees.
2. Next, trace the cuffs onto red card, cut out and glue to the jumper. Trace the scarf onto teal cardstock, then fix to the top. Punch a hole through the top of the jumper, thread with green baker’s twine and tie a knot in the top to form a loop for hanging.
Blue Hat
1. Trace the back of the earflap hat onto green card, then cut out. Punch a small circle from green and adhere to the top. Trace the front of the hat onto teal card, trim, then layer onto the green hat. Adhere onto white card, then cut out.
2. Punch small stars from red card and glue onto the hat, trimming to fit. Punch holes in the ends of the hat, thread with green baker’s twine and tie knots to secure. Punch a hole through the top, thread with green baker’s twine and tie a knot in the top to form a loop for hanging.
Red Hat
1. Trace the bobble hat onto red card, then cut out. Layer onto white and trim. Punch small circles from white card and secure to the hat, trimming to fit.
2. Trace the brim onto yellow card, cut out and fix to the hat. Punch a small circle in yellow card and glue to the top. Punch a hole through the top of the hat, thread with green baker’s twine and tie a knot in the top to form a loop for hanging.
Mittens
1. Trace the mittens onto pink card, cut out, layer onto white and trim. Punch small stars from dark grey card, then fix onto the mittens, snipping to fit.
2. Trace the cuffs onto red card, cut out and secure to the mittens. Run a length of green baker’s twine onto the mitten string. Create a loop of baker’s twine and thread onto the string for hanging.
Socks
1. Trace two socks onto green card, then cut out. Layer onto white and trim. Punch small circles from pink card using a hole punch, then glue onto the socks, trimming to fit.
2. Trace the top, toe and heel section of the socks onto red card. Cut out and secure. Glue the socks together, then punch a hole through the top. Thread with green baker’s twine and tie a knot in the top to form a loop for hanging.

YOU WILL NEED:
Old books
Die, circle
Wooden skewer
Binder clips
Alcohol marker, orange
Adhesives: PVA glue, glue stick
Die-cutting machine

METHOD:
1. Use a circle die to cut lots of discs from book pages. Fold each circle in…
Halloween crafts Home decor Home decorations How to Papercraft Papercrafter Revamping Techniques Projects

Whilst this may look like a paper cutting that took hours to create, it really couldn’t be any easier. Our talented designer Corinne Bradd has created 15 templates for you to…
Die cutting Home decor Home decorations How to Papercraft Papercrafter Projects

You Will Need:
Templates or SVG files
Brother ScanNCut SDX1200 (optional)
Strong card
Cardstock, various colours
Jute yarn
PVA glue
Autumnal Display
1. Draw a 25cm wide circle on strong card, then draw a concentric 17cm wide circle…
Home decor Home decorations Papercraft Papercrafter Techniques

Shadow box cards, otherwise known as tunnel greetings or diorama cards, are designed to transport the recipient to picture-perfect backdrops in an instant. In this case, PaperCrafter designer Francesca Vignoli…
Birthday crafting Card making Die cutting How to Stamping Techniques Card Making


