


Card making Christmas cards Papercraft Papercrafter Stamping Techniques Card Making Projects
Master the circular blank and meet some festive friends with Sarah Jackman Read
Please login to download. Sign in here
Dies: Pigment Craft Round Nesting Tags, circles
Stamps, Avery Elle Merriest
Ink pads: embossing, green
Cardstock: various colours, glitter
Marker pens: green, black
Gel pen, white
Punches: hole, star, circle
Embellishments: red ribbon, googly eyes
Embossing powder, silver
Heat tool
Adhesives: 3D foam pads, low-tack tape, glue
Die-cutting machine
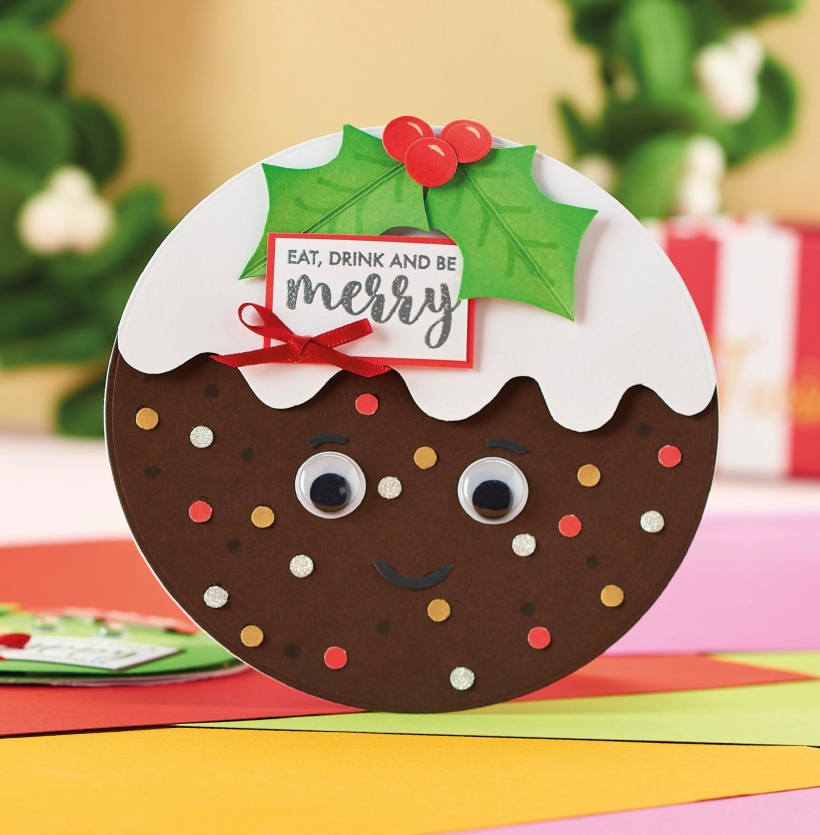
1. Create a 13.5cm circular blank using the step-bystep opposite, then cover the front with dark brown card. Die cut a 13.5cm circle from white card, trim a wavy line across it and attach to the top of the greeting with 3D foam pads.
2. Cut out holly leaves from green card. Score and fold in half, then open up and add veins with a green marker pen. Punch out red berries and add shine with a white gel pen. Fix to the top using 3D foam pads.
3. Punch out tiny circles of beige, red and silver glitter card. Glue across the brown area and add googly eyes. Snip black curves for a mouth and eyebrows, then attach.
4. Stamp a sentiment in embossing ink on white card and heat emboss with silver embossing powder. Trim, matt onto red cardstock and secure under the holly with 3D foam pads. Add a small red bow below.
1. Follow the step-by-step opposite to make an 11.5cm circular blank. Die cut a large bauble tag from red and glue to the front. Add shine lines on the right with a white gel pen. Trim a curved panel from silver glitter card, then adhere across the centre.
2. Punch out small stars from green and silver glitter card. Stick across the top. Add googly eyes under the glitter curve, to the right, then draw on a mouth and eyebrows with a black marker pen. Punch out two tiny circles in pink card and fix either side of the mouth.
3. Thread ribbon through the hole in the top of the bauble. Stamp a sentiment on white with embossing ink, then heat emboss with silver embossing powder. Cut out, mount onto green card and attach on the left-hand side with 3D foam pads. Embellish with a small red bow.

YOU WILL NEED:
Old books
Die, circle
Wooden skewer
Binder clips
Alcohol marker, orange
Adhesives: PVA glue, glue stick
Die-cutting machine

METHOD:
1. Use a circle die to cut lots of discs from book pages. Fold each circle in…
Halloween crafts Home decor Home decorations How to Papercraft Papercrafter Revamping Techniques Projects

Whilst this may look like a paper cutting that took hours to create, it really couldn’t be any easier. Our talented designer Corinne Bradd has created 15 templates for you to…
Die cutting Home decor Home decorations How to Papercraft Papercrafter Projects

You Will Need:
Templates or SVG files
Brother ScanNCut SDX1200 (optional)
Strong card
Cardstock, various colours
Jute yarn
PVA glue
Autumnal Display
1. Draw a 25cm wide circle on strong card, then draw a concentric 17cm wide circle…
Home decor Home decorations Papercraft Papercrafter Techniques

Shadow box cards, otherwise known as tunnel greetings or diorama cards, are designed to transport the recipient to picture-perfect backdrops in an instant. In this case, PaperCrafter designer Francesca Vignoli…
Birthday crafting Card making Die cutting How to Stamping Techniques Card Making


