


Die cutting Home decor Home decorations How to Papercraft Papercrafter Techniques Projects
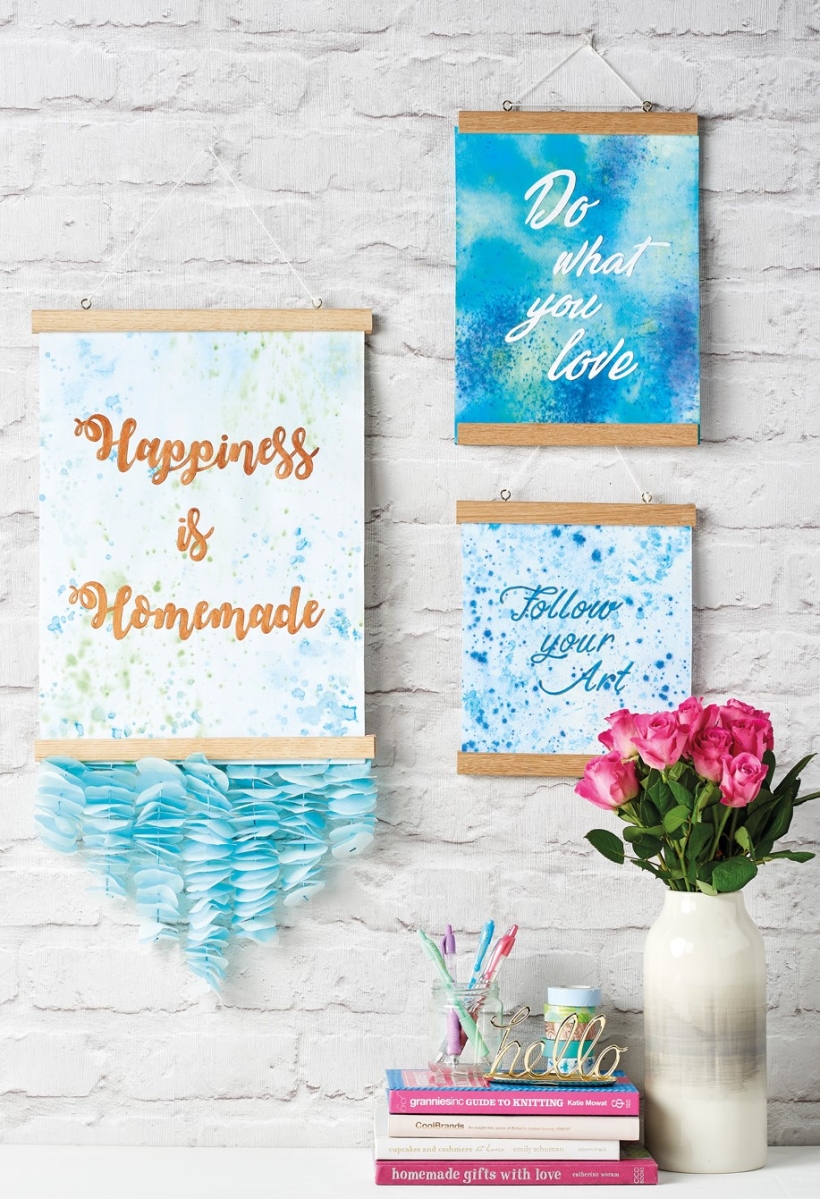
Make a statement with Corinne Bradd’s inspirational wall hangings… what winter blues?
YOU WILL NEED:
Paint, metallic acrylic
Water-soluble inks
Gel pen, glitter
Watercolour paper
Tissue paper: white, blue
Dies: circles, 4cm, 4.5cm, 5cm
Tools: water spritzer, paintbrush, lightbox (optional)
Beads
Die-cutting machine
METHOD:
1. Pour water-soluble ink onto a saucer and dip the tip of a paintbrush into it. Flick tiny spots of ink onto a sheet of dry watercolour paper. Add another shade of ink in the same way and allow it to soak in.
2. Lightly spritz areas of the paper with water and shake ink onto the surface as before. This time the ink should spread and dilute a little. Leave to dry before repeating the process in different areas.
3. Continue building up the layers of colour as desired. More layers, water and darker inks can create an almost solid background which is perfect for white lettering. Scattered colours with a lot of white space looks great with metallics.
4. For the garland trim, take two sheets of tissue paper in white and blue. Fold them carefully to a manageable size and die cut several circles, measuring 4cm, 4.5cm and 5cm.
5. Arrange the discs in alternating colours and decreasing sizes to make an odd number of piles. Decrease the number of discs in each pile working out from the centre so that the garlands will be different lengths.
6. Take a long piece of cotton and thread a bead onto it. Take the loose end of the thread and pass through the eye of the needle so the bead sits at the centre of a loop. Pass the double thread through the centre of a small paper disc and add another bead.
7. Continue adding circles and beads to separate the circles from each other. Add a final bead and pass the needle through this a second time to lock the garland in place. Fix the loose end of thread to the inside of a magnetic poster hanger with washi tape. Repeat to complete the trim.
Three ways with… faux lettering
White lettering
Print out the alphabet in your chosen font and position onto a lightbox to see a reversed image. Place a sheet of thin card on top and trace the individual letters in pencil. Use a craft knife to cut out the letters and flip them over. Arrange onto ink dyed paper and fix in place.
Faux lettering
Take a sheet of ink dyed paper, draw parallel guidelines onto the back, print out an alphabet in your chosen font, then layer the sheet over the top and lightly sketch around the letters in pencil. Use a watercolour pencil in a darker tone to trace over the sketched lines, filling in the thickness of the strokes. Take a glitter gel pen and add a drop shadow, accentuating each character.
Metallic lettering
Repeat the first step from the faux lettering. Take a fine paintbrush to apply metallic acrylic paint to the letters, outlining them carefully before filling in as necessary. Leave to dry completely before adding a second coat of paint.

YOU WILL NEED:
Old books
Die, circle
Wooden skewer
Binder clips
Alcohol marker, orange
Adhesives: PVA glue, glue stick
Die-cutting machine

METHOD:
1. Use a circle die to cut lots of discs from book pages. Fold each circle in…
Halloween crafts Home decor Home decorations How to Papercraft Papercrafter Revamping Techniques Projects

Whilst this may look like a paper cutting that took hours to create, it really couldn’t be any easier. Our talented designer Corinne Bradd has created 15 templates for you to…
Die cutting Home decor Home decorations How to Papercraft Papercrafter Projects

You Will Need:
Templates or SVG files
Brother ScanNCut SDX1200 (optional)
Strong card
Cardstock, various colours
Jute yarn
PVA glue
Autumnal Display
1. Draw a 25cm wide circle on strong card, then draw a concentric 17cm wide circle…
Home decor Home decorations Papercraft Papercrafter Techniques

Shadow box cards, otherwise known as tunnel greetings or diorama cards, are designed to transport the recipient to picture-perfect backdrops in an instant. In this case, PaperCrafter designer Francesca Vignoli…
Birthday crafting Card making Die cutting How to Stamping Techniques Card Making


