


Issue 64 is packed with amazing paper-crafting ideas plus wonderful creative tools for you to explore a wealth of fab techniques with. We’re including a origami and paper folding this issue by including some gorgeous decorative projects plus some beautiful embellished cards featuring this effective skill. To whet your appetite take a look at Elizabeth Moad’s two bonus paper-fold greetings… And for more help on perfecting your paper folding be sure to buy issue 64 of PaperCrafter!
PaperCrafter Kit, PaperCrafter Studio Selection Paper Book, Blank white card, Glue, Brads
• Mount light blue floral patterned paper to a card blank.Use a home computer to print “Happy Birthday” on to spare patterned paper and mount to the card with foam pads.

• Cut another square and mount to the card. Then cut four 5cm squares from light blue origami paper and four squares 4cm each from the patterned paper.
• Take one square fold the square of paper edge-to-edge with the pattern innermost. Open out and fold the square corner to corner pattern outermost. The square will then form a hat shape.
• Do this for all squares, then interlock alternating between large and small. Add a brad and glue to the card.
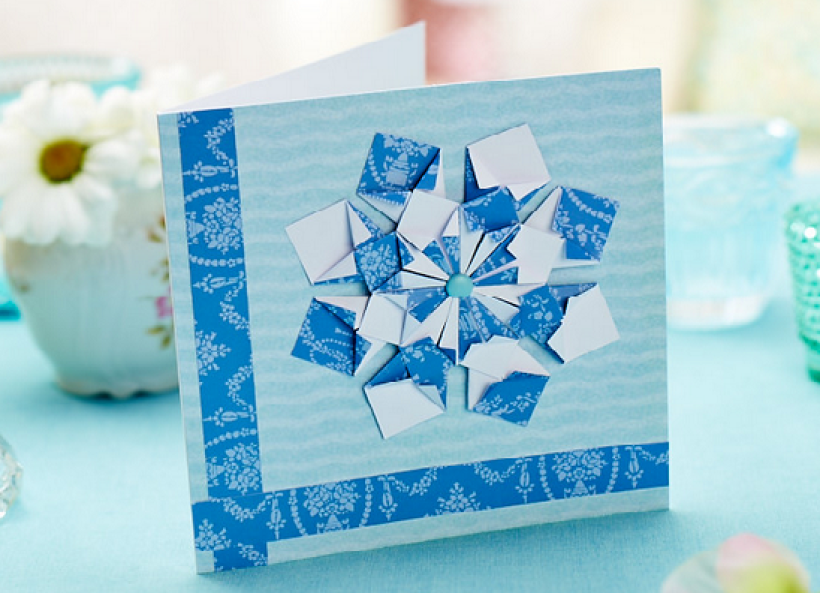
• Take blue patterned paper and cut eight 2.5cm squares and eight 4cm squares. Take one square and fold over corner to corner pattern outermost, lightly crease to give a centre line. Open out and then fold each side to the centre line just made. Then take the top of this section just folded, and fold back over to give a small “collar” type effect. Repeat with another square but fold with the pattern innermost. Do this with all the paper squares.

• Cover a blank white card with light origami blue paper and attach two strips of blue patterned paper vertically and horizontally. Now glue the larger folded pieces to the card to form a circle with points inwards but not touching at the centre.
• Glue the smaller pieces on top of the other, as shown, this time with the points touching at the centre. Add a brad to the centre.

YOU WILL NEED:
Old books
Die, circle
Wooden skewer
Binder clips
Alcohol marker, orange
Adhesives: PVA glue, glue stick
Die-cutting machine

METHOD:
1. Use a circle die to cut lots of discs from book pages. Fold each circle in…
Halloween crafts Home decor Home decorations How to Papercraft Papercrafter Revamping Techniques Projects

Whilst this may look like a paper cutting that took hours to create, it really couldn’t be any easier. Our talented designer Corinne Bradd has created 15 templates for you to…
Die cutting Home decor Home decorations How to Papercraft Papercrafter Projects

You Will Need:
Templates or SVG files
Brother ScanNCut SDX1200 (optional)
Strong card
Cardstock, various colours
Jute yarn
PVA glue
Autumnal Display
1. Draw a 25cm wide circle on strong card, then draw a concentric 17cm wide circle…
Home decor Home decorations Papercraft Papercrafter Techniques

Shadow box cards, otherwise known as tunnel greetings or diorama cards, are designed to transport the recipient to picture-perfect backdrops in an instant. In this case, PaperCrafter designer Francesca Vignoli…
Birthday crafting Card making Die cutting How to Stamping Techniques Card Making


