


Home decorations Papercrafter Revamping Techniques Decoupage
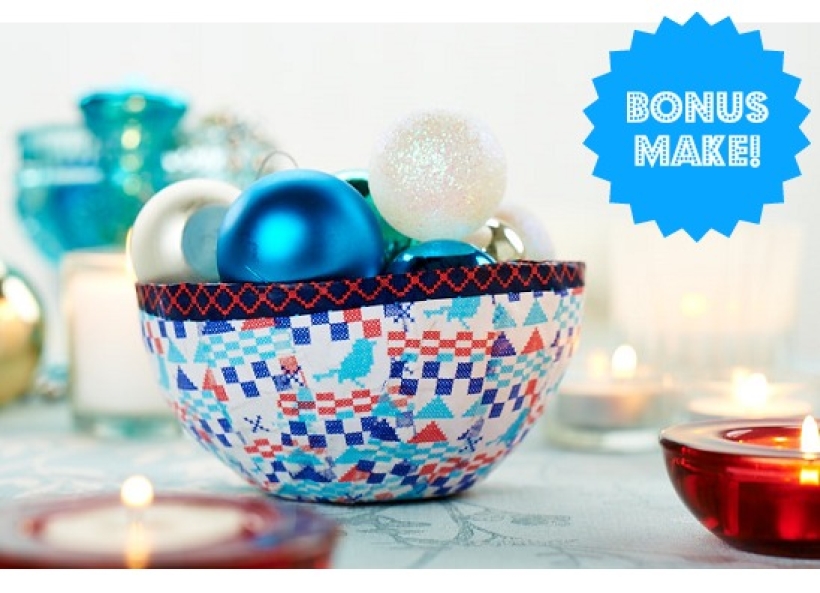
Check out our bonus make. These pretty paper bowls are a great idea and make a beautiful pressie for a friend or gift for yourself. What’s more they are so easy to make!
PaperCrafter 74 kit, PaperCrafter Studio Selection Paper Book, White computer paper, Diamond glaze, PVA glue, Cling film
Make sure you pick up the latest issue of PaperCrafter (out on 15th August) so can get all the essentials you need to create Elizabeth Moad’s delightful containers. The confetti bowl is made from PaperCrafter Studio Selection Paper Book papers designed by the amazing Jessica Hogarth while Elizabeth’s round bowl employs delicate decoupage papers illustrated by talented Lydia Meiying. All these papers are only available in the PaperCrafter 74 pack.
Both bowls use a papier mache paste, we use a PVA glue watered down to two parts glue to one part water, as it’s easy to make and washes off easily.
• Cut out lots of 3.5cm and 2.5cm circles out from patterned papers. Plenty are needed.
• Cover a small ceramic bowl with cling film and place upturned on a plastic sheet. Paste the circles on the reverse side and put good side up on the cling film. Cover the bowl shape with the circles of two sizes leaving gaps between the circles near the rim. Leave to dry.
• Remove from the cling film and ceramic bowl to reveal the inside. Now cut lots of circles 2.5cm in diameter from the pink patterned paper and glue these inside the bowl, with a large circle of blue at the base. Once dry cover the whole bowl with Diamond Glaze or similar to protect it.
• Cover the outside of a small ceramic bowl with cling film, then tear strips of white cheap computer paper and leave aside. With a 1cm wide brush, coat a strip of paper with papier mache paste, and place on the cling film of the upturned bowl.
• Continue overlaying pasted strips of paper until the bowl is covered and leave to dry. Then tear strips of patterned decoupage paper from the kit and cover the container.
• Ensure the whole of the bowl is covered. Then when dry remove from the cling film and ceramic bowl, revealing the inside of the container. Use decoupage tissue paper to cover the inside and rim of the bow.

YOU WILL NEED:
Old books
Die, circle
Wooden skewer
Binder clips
Alcohol marker, orange
Adhesives: PVA glue, glue stick
Die-cutting machine

METHOD:
1. Use a circle die to cut lots of discs from book pages. Fold each circle in…
Halloween crafts Home decor Home decorations How to Papercraft Papercrafter Revamping Techniques Projects

Whilst this may look like a paper cutting that took hours to create, it really couldn’t be any easier. Our talented designer Corinne Bradd has created 15 templates for you to…
Die cutting Home decor Home decorations How to Papercraft Papercrafter Projects

You Will Need:
Templates or SVG files
Brother ScanNCut SDX1200 (optional)
Strong card
Cardstock, various colours
Jute yarn
PVA glue
Autumnal Display
1. Draw a 25cm wide circle on strong card, then draw a concentric 17cm wide circle…
Home decor Home decorations Papercraft Papercrafter Techniques

Shadow box cards, otherwise known as tunnel greetings or diorama cards, are designed to transport the recipient to picture-perfect backdrops in an instant. In this case, PaperCrafter designer Francesca Vignoli…
Birthday crafting Card making Die cutting How to Stamping Techniques Card Making


