


Card making Papercrafter Techniques
Subscribe to this issue of PaperCrafter and you’ll get a free gift of the Bo Bunny Welcome Home collection. This simply stunning set includes a selection of gorgeous 12-inch square papers, adorable trinkets and rub-ons plus great looking motifs and stickers. To whet your appetite for these amazing paper-craft goodies, we show you how to make lovely gift boxes and greetings using the package. To get your free gifts subscribe today by clicking here
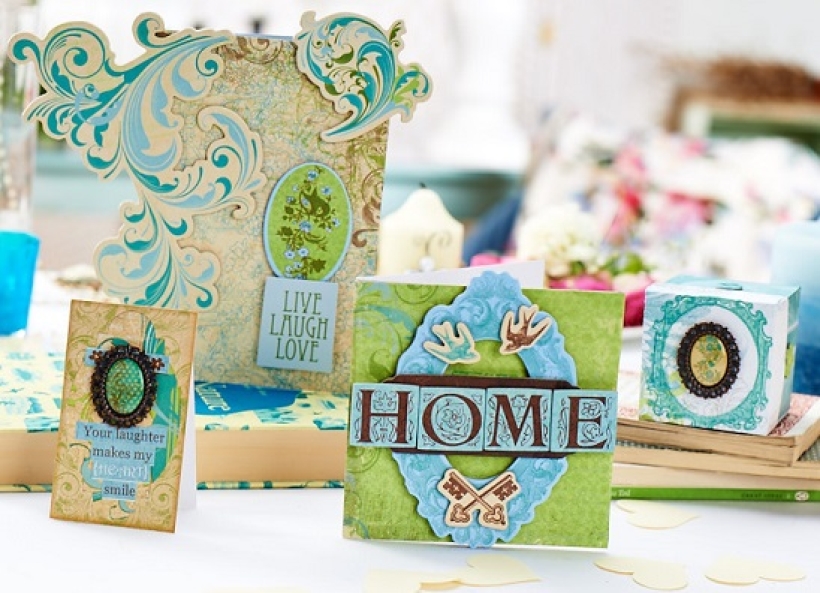
Bo Bunny Welcome Home Collection, Card stock, white, Card blank, Double-sided tape, Foam pads, Ruler, Pencil
• Make a blank by trimming a piece of card to 23cm x 17cm and fold in half. Now trim a 17cm x 11.5cm section from the Welcome Home Dreams and adhere to the front of the card.
• Using double-sided tape, affix the swirls from the Welcome Home 12x12 Chipboard sheets on the side and top right of the card as shown. Stick an oval floral chipboard piece onto the card with foam pads as shown.
• Transfer a Live Laugh Love rub-on to a 4cm square of card and attach with foam pads so it overlaps the oval shape.
• Trim a card blank to 11.5 square and affix a 11.5 square section of green paper from the Welcome Home Family paper onto the front.
• Attach the blue chipboard frame to the centre with foam pads. Use double-sided tape to fix the 'It takes hands' sentiment over the centre of the frame, then fix the 'HOME' lettering over this to obscure the text.
• Secure the bird chipboard shapes to point towards each other and fix the crossed keys chipboard motif at the bottom of the frame.
• Draw a 18 cm square on the light side of a the Welcome Home Portrait paper marking off 6cm intervals along each edge. Use a pencil to draw a line from the top and bottom of these marks and score. Then draw a line from the side marks and score, this should leave you with a nine-square grid within the square.
• Number the nine squares from left to right so the top left square is '1', the middle square is '5' and the bottom right is '9'. Cut out the 18cm square and snip right edge of square 1. Fold to create a flap.
• Rub out all pencil marks. Work clockwise to snip and fold the bottom edge of square 3, the left edge of square 9 and the top edge of square 7. You will now have four flaps. Use the double-sided tape to adhere outside edges of the flaps to the inside of the box. You now have a strong, sturdy box.
• To make the lid, draw a 10.2cm square on the blue side of a the Welcome Home Portrait paper, marking each inside edge at 2cm, this will give you a 6.2cm inside square which means your lid will fit nicely over your box. Turn over and transfer the rub on frame in the centre of the middle square, then turn back to the blue side.
• As with the box, draw and score a line from top to bottom, then left to right to join your marks. You should have a grid with one large square in the middle with four 1.5cm squares in each corner.
• Cut out the 10.2cm square and snip the right edge of the top left mini square, the bottom edge of the top right square, the left edge of the bottom right square and the top edge of the bottom left square. Rub out all pencil marks. Fold in the four flaps and use double sided tape to adhere outside edges of the flaps to the inside of the lid.
• Embellish your boxes by adhering adhering the small chipboard shapes on the side of the box and a Welcome home trinket to the top of the box lid.

YOU WILL NEED:
Old books
Die, circle
Wooden skewer
Binder clips
Alcohol marker, orange
Adhesives: PVA glue, glue stick
Die-cutting machine

METHOD:
1. Use a circle die to cut lots of discs from book pages. Fold each circle in…
Halloween crafts Home decor Home decorations How to Papercraft Papercrafter Revamping Techniques Projects

Whilst this may look like a paper cutting that took hours to create, it really couldn’t be any easier. Our talented designer Corinne Bradd has created 15 templates for you to…
Die cutting Home decor Home decorations How to Papercraft Papercrafter Projects

You Will Need:
Templates or SVG files
Brother ScanNCut SDX1200 (optional)
Strong card
Cardstock, various colours
Jute yarn
PVA glue
Autumnal Display
1. Draw a 25cm wide circle on strong card, then draw a concentric 17cm wide circle…
Home decor Home decorations Papercraft Papercrafter Techniques

Shadow box cards, otherwise known as tunnel greetings or diorama cards, are designed to transport the recipient to picture-perfect backdrops in an instant. In this case, PaperCrafter designer Francesca Vignoli…
Birthday crafting Card making Die cutting How to Stamping Techniques Card Making


