


Papercraft Stamping Techniques Projects
Our resident crafter Corinne Bradd puts this new paper collection from Hobbycraft through its paces
Please login to download. Sign in here
Flight paths, colourful suitcases, ticket stubs, luggage tags… this paper pad is filled with 36 sheets of 180gsm travel-inspired designs. In fact, it has everyone at PaperCrafter HQ itching to get away to some exotic, far-off place. In the meantime, we’ll be adding a touch of wanderlust to our crafting, as you can see with Corinne’s inspiring makes here. You’re sure to pick up lots of great skills throughout each tutorial. Concertina folding and paper stitching, anyone?
Craft essentials
Template from paper craftermagazine.co.uk
Stamps, alphabet
Ink, black
Fabric, foiled
Elastic, round
Snap fasteners
Thread, extra strong
Needle tool
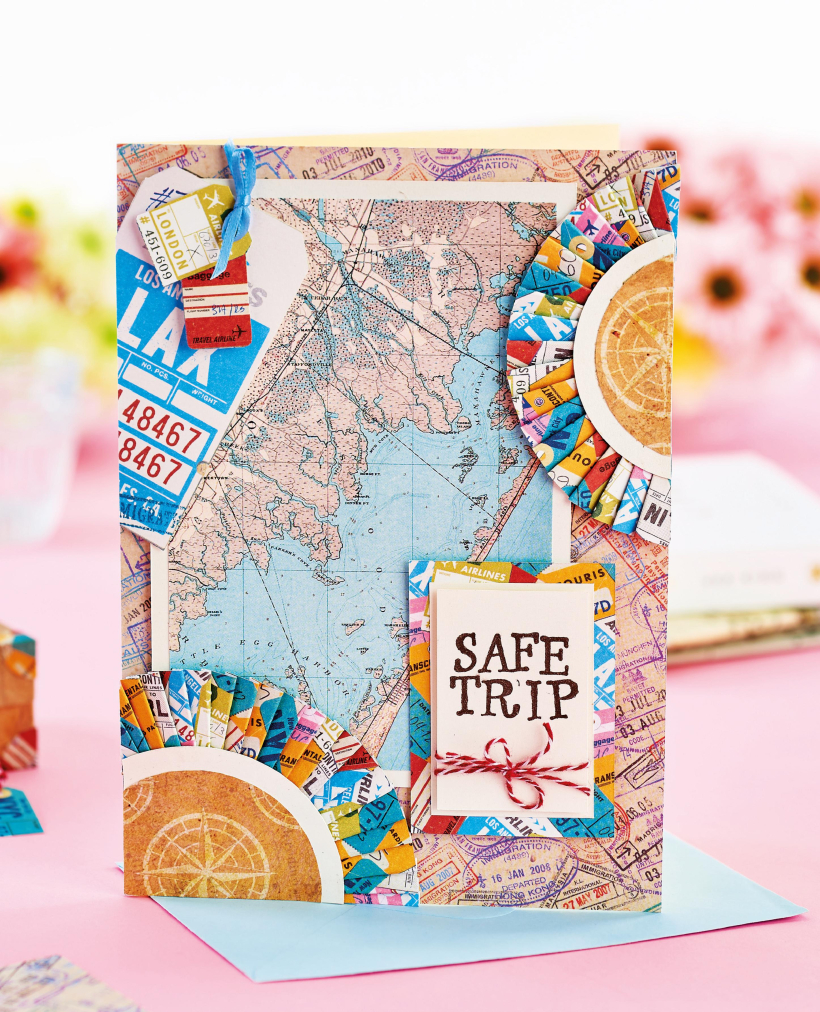
1. Cover a 15cm x 21cm side-opening blank with visa patterned paper. Cut a 10.5cm x 15.5cm panel of map paper, mount onto 11.5cm x 16.5cm of pearlescent cream card, then fix to the top-left of the card with 3D foam pads.
2. Trim two 3cm x 30cm strips of ticket patterned paper and score at 5mm intervals. Concertina fold the score lines and manipulate the strip into a ruffled curve, securing it with double-sided tape on the reverse. Fix the ruffles to the edges of the layout and trim in line with the card. Top each curve with layered circles cut from paper and pearlescent cardstock.
3. Stamp ‘Safe trip’ onto a panel of cream card in black ink. Wrap with baker’s twine before layering onto patterned paper and fixing to the bottom-right of the card. Cut a luggage tag design from paper, add smaller motifs and tie with ribbon before adhering top-left.
1. Score scrap paper, 15cm x 25cm, at 3cm in on both long edges. Score across the rectangle at 2cm, 9cm, 11cm, 12cm, 15cm and 22cm. Clip the edges and intersections using our template as a guide.
2. Fold in and glue the tabs to make a suitcase base and lid with a 1cm gusset between the two. Fold the gusset down and fix to the back of the base with double-sided tape so the lid will close and overlap the base.
3. Trim 1cm wide strips of map print paper and glue these around the case to make strapping. Glue two 6mm wide strips back to back, curving them as the glue dries. Fold out 5mm at each end and glue to the base as a handle.
4. Cut eight 2.5cm wide circles of paper and fold each one into quarters. Snip into the circle along one quarter line and glue each one around the corners of the case, overlapping the first and last quarters. Trim a tiny tag motif and tie to the handles with baker’s twine.
1. Cut luggage patterned paper to 15cm x 30cm. Score at 5mm in on all edges. Keeping the paper landscape and face-down, score vertically at 11cm, 11.5cm and 12cm from the left side. Score again at 6.5cm and 7cm from the right side.
2. Glue the 5mm border folds in and glue. Concertina fold the left side score lines and fold the right side folds inwards. Cut panels of postcard paper slightly smaller than the different sections of the folder and glue in place.
3. Make a main pocket from an 11.5cm x 14cm piece of paper. Score and fold at 5mm in on all edges. Glue down one long fold and use the remaining folds to fix the paper to the centre section to make a pocket. Create smaller pockets in the same way from 5cm x 10cm pieces of card and place these on the left side of the folder to make credit card pockets.
4. Cut two lengths of round elastic and tie tightly into loops with an overhand knot. Slip one over the concertina fold and use to hold a passport in place. Slip the other elastic over the right fold, close the short edge before closing the main cover, tucking the cover under the loop to hold the folder shut.
1. Trim several 15cm x 21cm sheets of yellow and kraft card, then score down the centre. Fold each one in half and stack up. Mark the spines of the cards at 4cm in from each side and use a needle tool to pierce each piece at these marks, 2mm in from the fold.
2. Alternate the cards and use extra strong thread to stitch the spines together through the holes, oversewing several times through one set of holes before passing the thread up diagonally and sewing through the other set of holes. Make a feature of the stitching and secure the thread ends in neat, tight knots.
3. Cut four 4cm x 8cm rectangles of foiled fabric. Fold under 5mm on one long edge and glue, before using the strips to cover the outer corners of the front and back cover, folding the ends of the strip to the inside. Make a fastening strap from a 5cm x 8cm strip of fabric, fold the corners on one end, then fold the long edges in on themselves and glue. Paste the unfolded end of the strap to the inside back cover.
4. Glue the covers to the adjacent page in the book to strengthen them and disguise the ends of the fabric. Use a hammer to set a snap fastener in the end of the fabric strap and then fix the other half to the centre-right of the front cover according to the length of the strap. Cut 10cm x 15cm pieces of patterned paper to use as photo backgrounds and glue to the pages of the journal as desired.

YOU WILL NEED:
Old books
Die, circle
Wooden skewer
Binder clips
Alcohol marker, orange
Adhesives: PVA glue, glue stick
Die-cutting machine

METHOD:
1. Use a circle die to cut lots of discs from book pages. Fold each circle in…
Halloween crafts Home decor Home decorations How to Papercraft Papercrafter Revamping Techniques Projects

Whilst this may look like a paper cutting that took hours to create, it really couldn’t be any easier. Our talented designer Corinne Bradd has created 15 templates for you to…
Die cutting Home decor Home decorations How to Papercraft Papercrafter Projects

You Will Need:
Templates or SVG files
Brother ScanNCut SDX1200 (optional)
Strong card
Cardstock, various colours
Jute yarn
PVA glue
Autumnal Display
1. Draw a 25cm wide circle on strong card, then draw a concentric 17cm wide circle…
Home decor Home decorations Papercraft Papercrafter Techniques

Shadow box cards, otherwise known as tunnel greetings or diorama cards, are designed to transport the recipient to picture-perfect backdrops in an instant. In this case, PaperCrafter designer Francesca Vignoli…
Birthday crafting Card making Die cutting How to Stamping Techniques Card Making


