


Use origami skills to make traditional Japanese decorations
Magazines, Scissors, Glue, Small wooden pegs
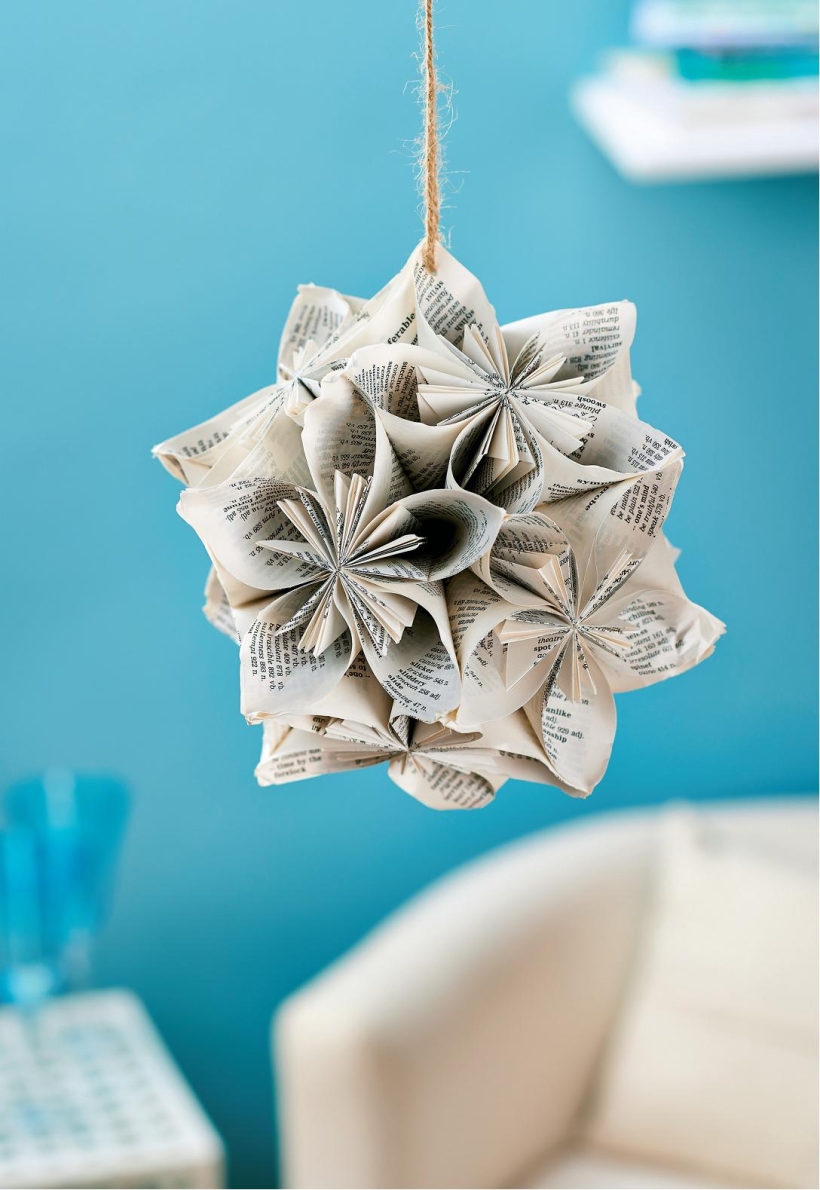
In Japanese, kusudama means ‘medicine ball’ and is the name given to a spherica model made by sticking together identical paper flower shapes. Originally they were used to suspend incense in but now they make fab decorations for wedding venues, parties or your home. We’ve given ours a modern twist by making them from old books and magazines. When choosing your papers, fashion and home magazines featuring lots of tropical beach scenes, bright colours and cosmetics adverts work best. Avoid anything too dark as this will make your finished project dark too.
• Cut magazine pages into 60 same size squares. As a guide, 6cm squares will make a ball approximately 10cm across and 10cm squares will create a 14cm sphere.

• Fold the first square in half diagonally, with the paper side you want to see in the finished piece on the outside. Holding the fold at the bottom, bring the two outer points up to the top point to make a diamond shape.
• Vertically fold each of the front two flaps back on themselves halfway. Open up the flaps just folded, place your finger inside and squash the fold to make a diamond kite shape on each side of the central diamond. Fold down the top points of each kite to line up with the edge of the main diamond and then fold the outer edge of each kite shape back in on itself.
• Run a thin line of glue along one folded edge and then curve over nd fix to the other folded edge without creasing the paper. This creates a cone type petal with folded stamens inside. Clip the lued edges with a small peg while the glue dries if necessary. Fold all squares in this way and divide into groups of similar colours.
• Take five cone petals and glue together along the folded edges with a tacky glue. Do this by sticking the five petals together in a stack and holding with pegs. When the glue has dried, open out the stack like a book and glue the first and last piece together to make a larger flower.
• When you have made 12 flowers this way, glue them together into a ball. Each petal will be stuck to two others. It's easiest to glue them together in sets of three and allow the glue to dry before assembling the whole ball.

Busy lives often involve a lot of memos and reminders, and it can sometimes be hard to keep track. Luckily, we’ve got a sophisticated solution to keep your desk tidy and…

If you’re having a quiet Valentine’s with your beloved at home this year, make the place look a little more special with a speedy-to-make hearts frieze. Papercrafting doesn’t get much easier than…
Home decor Home decorations How to Papercraft Papercrafter Techniques Projects

1. Using a 3.5cm circle die, cut eight discs from chipboard and sixteen circles from patterned paper. Glue the patterned circles to either side of the discs and punch a…

Craft essentials
1. Cut a 5cm x 15cm strip of double-sided patterned paper and fold in half lengthways. Draw parallel pencil lines at 1.5cm and 2cm from the…


