


Our readers are a very clever bunch and really put our kits to excellent use. One such reader, Dr Sarah Burnett-Moore has been particularly enterprising, making two lovely jewellery pieces from our 68 papers. She’s very kindly revealed her methods in this handy how-to.
PaperCrafter Kit, Studio Selection Paper Book, Silver plated earring wire, Silver plated cufflink findings, 150gsm card, 2.5cm scallop-edged circle punch, 0.8cm rondelle bead, Strong glue, Eye pins, Head or ball pins
• Reinforce the grey patterned paper from our Studio Selection Paper Book with some 150gsm card stock. Use a 2.5cm scallop-edged circle punch to cut a total of 16 rounds from the paper.
• Fold 14 in half leaving a crisp edge, with the grey pattern on the inside. Glue seven back-to-back using PVA or a similar glue. Repeat with another seven circles to create a second hemisphere.
• Attach the remaining two circles to the back of each hemisphere. Using a strong glue, adhere the circles to a silver plated cufflink finding to each.
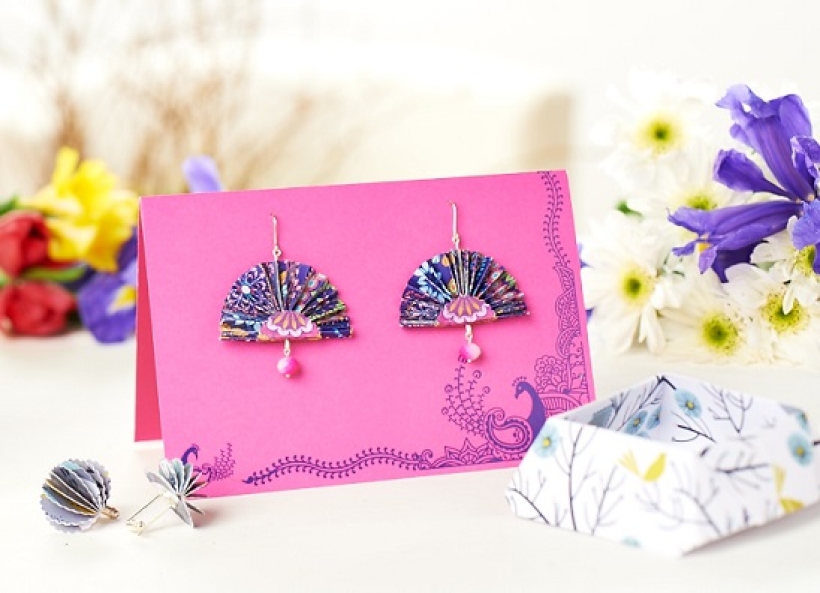
• Cut a 5 x 9.5 cm rectangle from the purple patterned paper. Concertina fold every 0.5 cm. Bend upright in the middle and glue to make a 180-degree fan, embedding a silver plated eye pin flush within the top of the fan.
• Punch two scalloped circles from the mauve paper strips as for the cufflinks. Pierce through the centre with a needle. Score 0.25 cm either side of the hole and fold with the pattern side out.
• Place a further eye pin from the pattern side inwards. Make a 90-degree bend in the pin and secure along the base of the fold.
• Put a head or ball pin through a 0.8cm rondelle bead, trim and make a loop at the top. Open the eye pin in the circular base and attach the bead. Glue the circular base to the fan component. Attach a silver plated earring wire to the eye pin at the top.
• To present, take a pink card blank and rub-on a the bottom left corner of the peacock frame transfer on to the front as shown. Do the same with the peacock motif transfer. Place some putty underneath the front of the card and pierce two holes with a pin. Remove the putty and thread the earrings through as shown.

Busy lives often involve a lot of memos and reminders, and it can sometimes be hard to keep track. Luckily, we’ve got a sophisticated solution to keep your desk tidy and…

If you’re having a quiet Valentine’s with your beloved at home this year, make the place look a little more special with a speedy-to-make hearts frieze. Papercrafting doesn’t get much easier than…
Home decor Home decorations How to Papercraft Papercrafter Techniques Projects

1. Using a 3.5cm circle die, cut eight discs from chipboard and sixteen circles from patterned paper. Glue the patterned circles to either side of the discs and punch a…

Craft essentials
1. Cut a 5cm x 15cm strip of double-sided patterned paper and fold in half lengthways. Draw parallel pencil lines at 1.5cm and 2cm from the…


