


Card making Die cutting Card Making Die cutting Projects
Not sure how to get the most from one die set? Never fear, Keren Baker is here!
Please login to download. Sign in here
Using the new Nature Friends dies from Sizzix, Keren Baker proves how easy it is to transform adorable woodland motifs into knockout card designs… and a real variety of them at that! The key is in how you layer up your die-cuts (3D foam pads are your best friends) to help keep your scenes interesting. And choosing a lovely colour palette of course. Shall we begin?
Dies: Sizzix Nature Friends, circles
Stamps, Sugar Pea Designs Everyday Sentiments
Ink pads: Ranger Distress Oxide Broken China, Cracked Pistachio; black
Cardstock, various colours
Gel pens: white, gold
Marker pen, black
Spray bottle
Adhesives: 3D foam pads, glue
Die-cutting machine
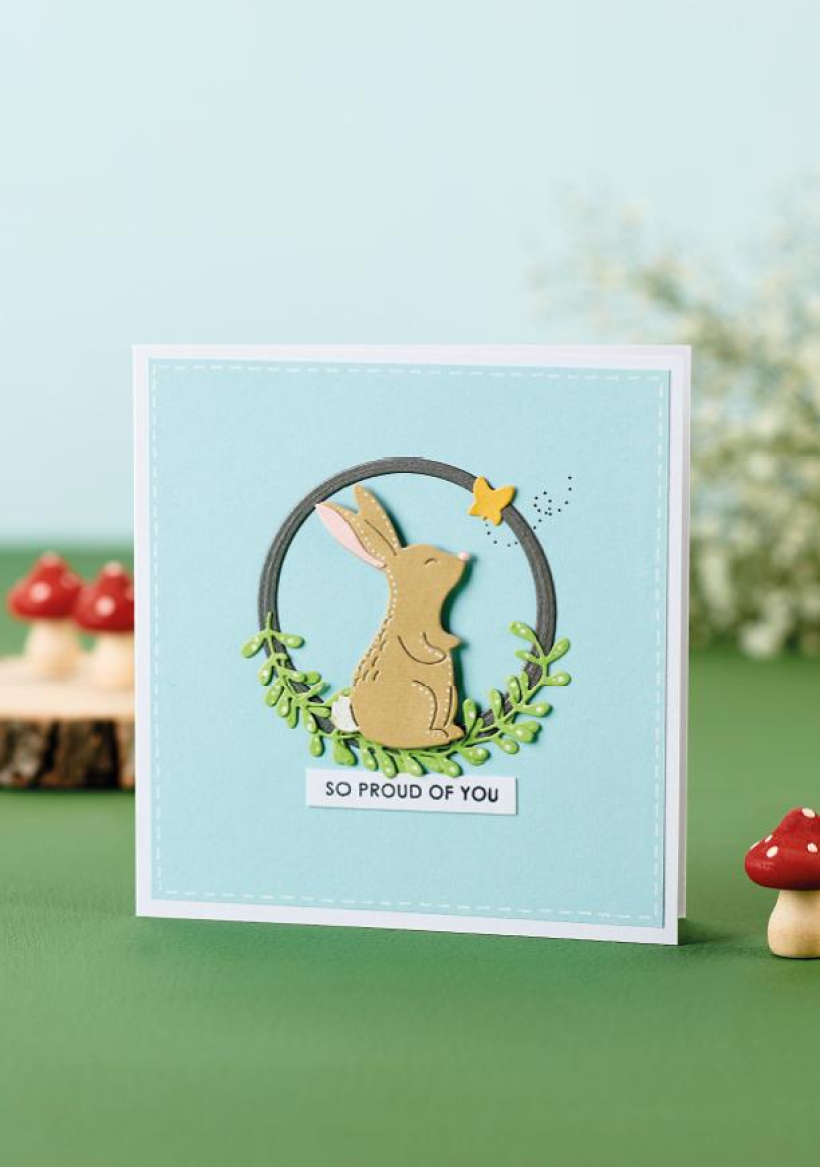
1. Matt light blue card onto a 12.5cm x 13cm white blank. Die cut a circular frame from grey and glue to the centre of the card. Die cut a rabbit from brown and pink, then adhere the elements together. Secure green die-cut foliage around the base of the circle.
2. Attach the rabbit using 3D foam pads, then add white gel pen dots to the rabbit and leaves. Fix a yellow butterfly top-right. Using a black marker pen, add dots for a trail. Draw white gel pen dashes around the edge of the blue panel. Finish with a stamped sentiment.
Mount light blue card onto an 11.5cm x 19.5cm white blank. Fix a strip of green card along the bottom. Die cut animals from different coloured card, plus leaves and flowers. Adhere the elements together and fix to the card front, using 3D foam pads for the hedgehog and one of the rabbits. Stamp a black sentiment onto white card, then trim and glue to the greeting.

You will need:
Templates or SVG files
Stencil, Inkylicious Sunbeam 6”
Ink pad, Ranger Distress Oxide Salvaged Patina
Cardstock, various colours
Gems, clear
Faber Castell Polychromos coloured pencils
Pens: shimmer pen, black fineliner, white gel pen
Hampton Art Action…
Card making How to Papercraft Papercrafter Techniques Projects

YOU WILL NEED:
Craft essentials
FREE PaperCrafter patterned papers
Dies: circle, scalloped circle
METHOD
1 Create a 13cm x 17cm white blank then cover the front with orange card. Cut tennis racket paper, 12cm…
Card making Decoupage Die cutting How to Papercraft Papercrafter Card Making

You will need:
Templates
Coloured paper or thin cardstock, various colours
Wooden skewers or thin garden canes
Tools: scoring board, scoring tool, clips, small hole punch
Glue
Concertina Fold & Bind Method
1. Take a sheet of landscape…
Home decor Home decorations How to Papercraft Papercrafter Techniques Video tutorial Projects Make it Today

Stencils: Altenew Doily Frame, Watercolor Bouquet; My Favorite Things Basic Shapes Triangles
Stamps: Avery Elle Simple Sentiments, Simply Said Hugs
Die, Altenew Mega You
Ink pads: Ranger Distress…
Card making Die cutting How to Papercraft Papercrafter Techniques Card Making Die cutting Projects


