


Home decorations Papercrafter Revamping Techniques Decoupage
Us papercrafters always have a stash of papers and tools that are constantly looking for a good home, so instead of shoving them into an old cupboard or ‘filing’ them in bags and old boxes why not invest in some dedicated storage? S
Storage 4 Crafts stacker units, A selection of papers, PVA adhesive such as Berol's Marvin Medium, Chalk based or emulsion paint in suitable colour, Screwdriver, One-inch paintbrush
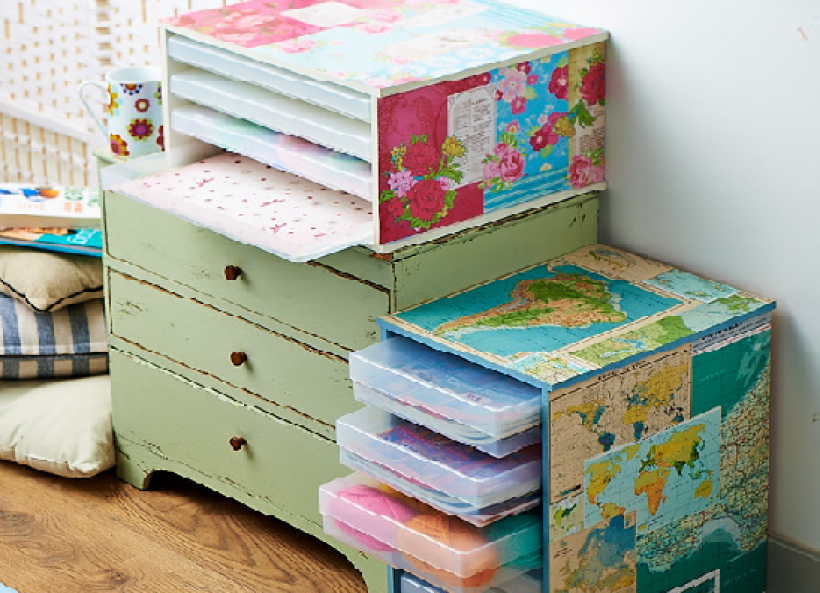
Storage 4 Crafts has a range of lovely stacker units with drawers that act as inexpensive mini plan-chests. Available in a range of sizes, these units are perfect for storing precious patterned papers and work equally well in the home office or general crafts room. And,while you’re banishing the untidy workspace, you can dress up your units and give yourself an engaging new project in the process with Corinne Bradd’s brilliant decoupage update. It will give your crafty space a stylish revamp and use up some of your favourite papers.
Handy paper storage
Lovely decoupage
GET ORGANISED AND CHECK OUT A RANGE OF STORAGE SOLUTIONS AT STORAGE4CRAFTS.COM
Where do you keep your supplies? We’d love to see your innovative ideas and savvy storage. Share a photo with us on facebook.com/papercraftermag
• Unpack your storage unit and familiarise yourself with the different pieces. Use a good quality chalk-based or emulsion paint to cover both sides of each piece and the edges and leave to dry.
• Assemble the unit according to the instructions; fitting the sides to the base and top, slotting in the shelves and adding the back. Ensure that you screw the fittings in well so they are flush with the surface of the MDF.
• Work on one side of the unit at a time. Dilute the PVA glue with the same amount of water and paste the area liberally with this. Choose one large piece of paper or printed page to be the background of your arrangement and carefully lay down on the glue, adjusting if necessary before smoothing down from the centre out towards the edges.
• Don't worry if thinner paper appears to bubble up; avoid rubbing these areas down as this could cause a crease. Instead allow the paper to dry out and most of the bubbles will disappear.Any that are left can be slit with a craft knife, reglued and smoothed down. Once the paper is flat rub it down firmly with a clean, dry cloth folded into a pad.
• Choose more papers to arrange over the top of the background.Atlases sometimes have small comparative maps showing things like rainfall or crops and these can add interest to your layout. Some floral designs on scrapbook papers lend themselves to being cut out;for example, traditional Victorian decoupage and can look really effective when laid over text.
• Once you are happy with your layout, begin gluing the pieces down as before, allowing bubbles to settle and rubbing over with a cloth pad. Once all the pieces are fixed give the whole surface a coat of diluted PVA. Use a clean dry washing up sponge and a pouncing motion to remove any excess PVA and leave a subtle stippled effect on the surface. Allow this coat to dry before repeating the process and then moving on to the next side.

You will need:
Templates or SVG files
Stencil, Inkylicious Sunbeam 6”
Ink pad, Ranger Distress Oxide Salvaged Patina
Cardstock, various colours
Gems, clear
Faber Castell Polychromos coloured pencils
Pens: shimmer pen, black fineliner, white gel pen
Hampton Art Action…
Card making How to Papercraft Papercrafter Techniques Projects

YOU WILL NEED:
Craft essentials
FREE PaperCrafter patterned papers
Dies: circle, scalloped circle
METHOD
1 Create a 13cm x 17cm white blank then cover the front with orange card. Cut tennis racket paper, 12cm…
Card making Decoupage Die cutting How to Papercraft Papercrafter Card Making

You will need:
Templates
Coloured paper or thin cardstock, various colours
Wooden skewers or thin garden canes
Tools: scoring board, scoring tool, clips, small hole punch
Glue
Concertina Fold & Bind Method
1. Take a sheet of landscape…
Home decor Home decorations How to Papercraft Papercrafter Techniques Video tutorial Projects Make it Today

Stencils: Altenew Doily Frame, Watercolor Bouquet; My Favorite Things Basic Shapes Triangles
Stamps: Avery Elle Simple Sentiments, Simply Said Hugs
Die, Altenew Mega You
Ink pads: Ranger Distress…
Card making Die cutting How to Papercraft Papercrafter Techniques Card Making Die cutting Projects


