


Create negative effects with your die cuts
Craft Essentials, Dies: heart, feather, Sentiment stamp
Save your scraps and double your options by using the negative space left behind from die cutting – perfect for savvy crafters! Always use tape to secure the die to card because die-cutting plates can often become bowed with repeated use, causing the die to move before it’s wound through the machine.
There are a number of effects you can create using the outline of a die-cut shape. For the illusion of 3D depth in your design, secure a second piece of darker paper behind a top layer; this creates a great shadow effect. For a subtle ‘show-through’ result, use positive and negative elements together in contrasting colours. To do this, just adhere a negative image to acetate and cover the inside of your card with patterned paper.
Using negative space allows you to build a collection of dies for future projects. Always remember to consider the element left behind – any image that has a strong visual shape will work brilliantly. This technique is a thrifty way of using essential leftovers in your craft room, so what are you waiting for? Get stash-busting now!
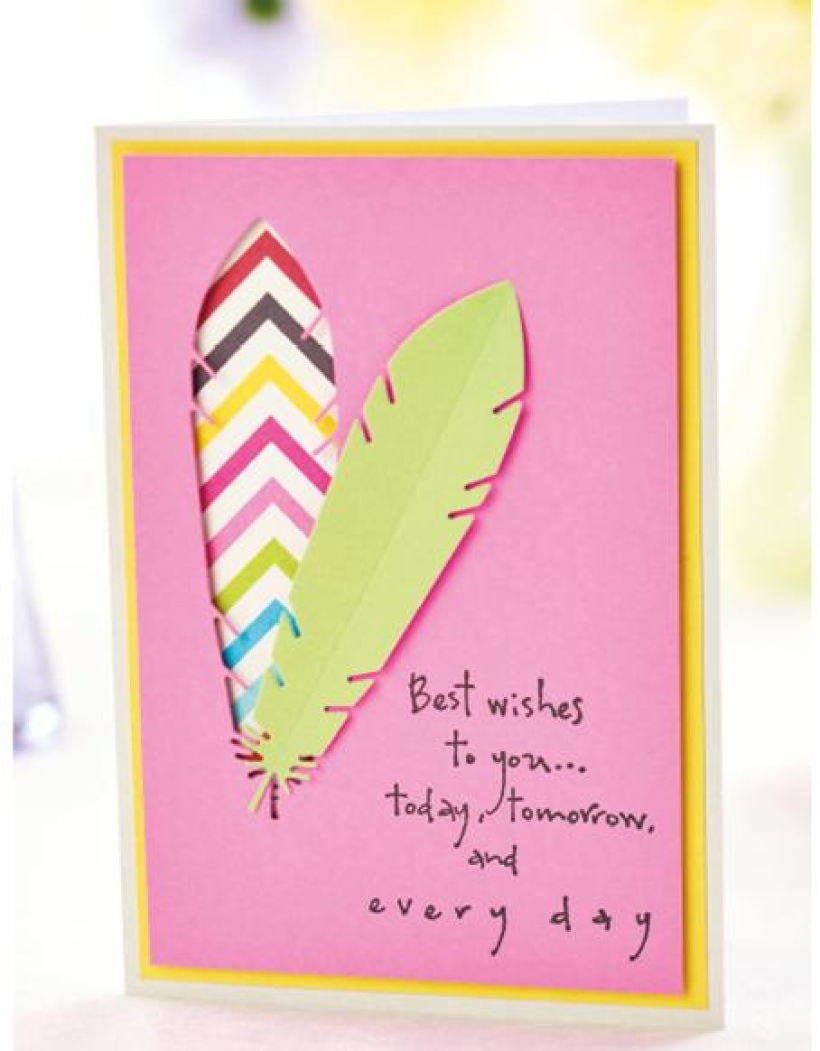
• Cover the front of a 10cm x 15cm blank with grey card. Adhere a yellow panel to the centre and add a strip of stripy paper down the left-hand side.
• Take a 9cm x 14cm piece of pink card, stamp a sentiment in the bottom right corner and die cut a feather from the top left. Fix this to the card using 3D foam pads.
• Die cut another feather from green card, gently fold down the centre and glue to the card front at an angle.
• Take two pieces of 12.5cm square white card. On the first, score a line 3cm from one edge and attach to the other card above the scored line. Layer grey and yellow card and adhere to the front.

• Using a heart die, follow step 1 (right) with an 11cm square piece of blue card and a 10.5cm square piece of navy card. Adhere the lighter card onto the darker, as shown in step 2.
• Attach a square of floral paper to the yellow card and use 3D foam pads to stick the blue papers on top.
• Die cut two small hearts and layer them. Stick to the card front and stamp a sentiment on the top heart. Embellish with silver gems.
• Attach a die to coloured card and run through a die-cutting machine

• Layer two negative pieces of card, offsetting the bottom piece slightly

• Add foam pads underneath and stick to a patterned card front

• Glue layered embellishments to the top for a deeper shadow effect

• Cover a 10cm x 15cm blank with grey card. Add a layer of pink card and floral paper to the centre

• Die cut a butterfly from the top of a 6.5cm x 10cm piece of white card and emboss with a floral pattern.
• Add black patterned paper to the back of the butterfly aperture. Attach the white card on top using 3D foam pads.

You will need:
Templates or SVG files
Stencil, Inkylicious Sunbeam 6”
Ink pad, Ranger Distress Oxide Salvaged Patina
Cardstock, various colours
Gems, clear
Faber Castell Polychromos coloured pencils
Pens: shimmer pen, black fineliner, white gel pen
Hampton Art Action…
Card making How to Papercraft Papercrafter Techniques Projects

YOU WILL NEED:
Craft essentials
FREE PaperCrafter patterned papers
Dies: circle, scalloped circle
METHOD
1 Create a 13cm x 17cm white blank then cover the front with orange card. Cut tennis racket paper, 12cm…
Card making Decoupage Die cutting How to Papercraft Papercrafter Card Making

You will need:
Templates
Coloured paper or thin cardstock, various colours
Wooden skewers or thin garden canes
Tools: scoring board, scoring tool, clips, small hole punch
Glue
Concertina Fold & Bind Method
1. Take a sheet of landscape…
Home decor Home decorations How to Papercraft Papercrafter Techniques Video tutorial Projects Make it Today

Stencils: Altenew Doily Frame, Watercolor Bouquet; My Favorite Things Basic Shapes Triangles
Stamps: Avery Elle Simple Sentiments, Simply Said Hugs
Die, Altenew Mega You
Ink pads: Ranger Distress…
Card making Die cutting How to Papercraft Papercrafter Techniques Card Making Die cutting Projects


