


Birthday crafting Card making Die cutting How to Stamping Techniques Card Making
Receiving any card is a lovely surprise, but a card with a secret scratch ‘n’ reveal message is even more exciting!
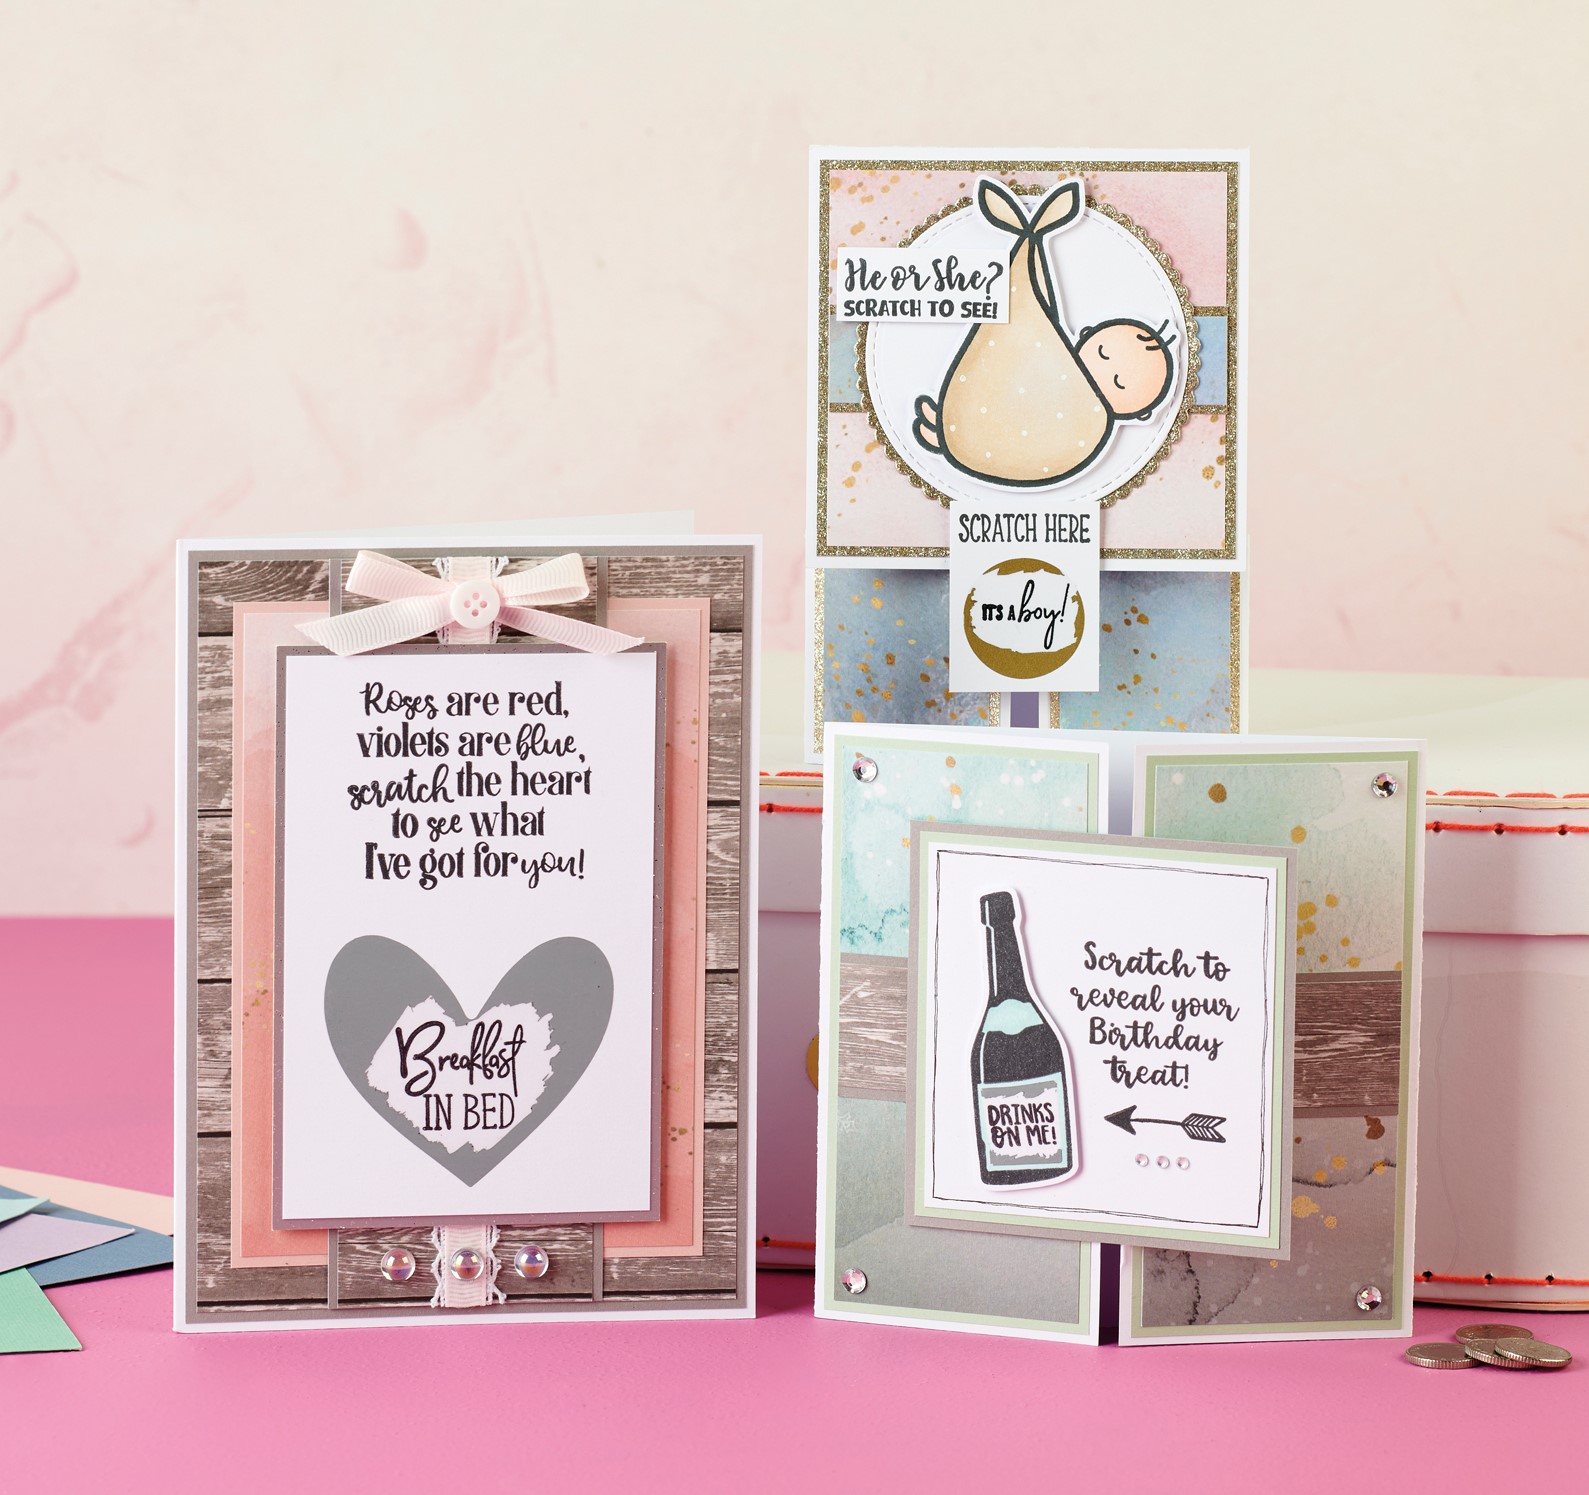
Kitty Day’s card feature a stamped sentiment concealed below a reveal sticker. All your recipient has to do is scratch to uncover the hidden words. You can craft for a variety of occasions using this technique – have a go!
Stamp ‘n’ scratch
The Scratch Reveal Kit from Crafter’s Companion boasts 55 clear acrylic stamps suitable for a range of occasions from gender reveals to engagements and birthdays. Simply stamp your sentiment, then cover the surprise with a scratch reveal sticker. We recommend leaving the sentiment to dry fully before adhering the sticker on top to prevent the ink from smudging. If you can’t find a sentiment in the kit to suit your occasion, why not make it bespoke and write your own message or use a stamp from your stash?
All in one
Aside from the stickers and stamps, the kit includes blanks, envelopes and patterned papers, so you’ve got everything you need to get cracking. If you want to go the extra mile and add a little flair to your cards, take inspiration from Kitty’s quartet. She has incorporated gold glitter cardstock to coordinate with the foiled stickers and lengths of pastel ribbon for texture. As a final finishing touch, decorate with gems or bubble embellishments for an added dose of sparkle.
Next-level cardmaking
Elevate your designs even more by mixing up your blanks. Kitty shows you how to make a standard card, as well as the more advanced gatefold and dutch fold styles. The gatefold opens like a gate (hence the name) and the dutch fold includes two smaller panels at the bottom for the main panel to sit on. For an added surprise, why not include the hidden message inside the gatefold? Your recipient will come across it as they open the two side panels.
YOU WILL NEED:
Crafter’s Companion Scratch & Reveal Kit
Dies: circles, stitched circles, scallop-edged circles
Versafine Clair Ink Pad, Nocturne
Cardstock: various colours, glitter
Alcohol markers
Fineliner, black
Embellishments: ribbon, lace, gems, bubbles, button
Adhesives: glue, 3D foam pads
Die-cutting machine
Star Scratch Card
1. Mount pink marble paper, 10cm x 13.5cm, onto gold glitter card. Layer onto a white blank. Matt a smaller panel of wood patterned paper onto gold glitter card, then white. Fix to the centre of the card front.
2. Run a length of pink ribbon along the bottom of the card. Die cut a circle from white and mount onto a larger gold glitter circle. Stamp a sentiment in the centre. Layer a gold scratch reveal star sticker over the sentiment.
3. Adhere the circular scratch reveal panel towards the top of the card with 3D foam pads. Stamp another sentiment onto white, then mount onto gold glitter card. Fix below the circles with 3D foam pads. Embellish with bubble embellishments.
Heart Scratch Card
1. Create a 13.5cm x 18.5cm blank from white card. Mount wood patterned paper onto grey, then layer onto the blank. Trim a 10.5cm x 15cm panel from peach marble paper, mount onto peach card and fix to the greeting.
2. Run lengths of lace and ribbon vertically onto a strip of wood patterned paper. Mount onto grey card and glue vertically onto the card front. Take a smaller panel of white card and stamp a sentiment at the top. Stamp another sentiment below, then layer a silver heart scratch reveal sticker over the top.
3. Mount the white panel onto silver glitter card, then adhere to the greeting. Add a pink ribbon bow with a button in the centre. Finish with bubble embellishments.
Gender Reveal Dutch Fold Card
1. Cut white card to 10.5cm x 25cm and fold along the long side at 10cm. Trim two pieces of white card to 5.5cm x 6cm. Score along the long side at 1cm. Attach each piece to the bottom of the card, securing the tabs on the reverse of the card.
2. Snip pink marble paper to 9cm square, mount onto gold glitter card and glue to the top panel on the greeting. Matt a strip of blue card onto gold glitter card and run along the middle of the top panel. Cut two pieces of blue paper to 4cm x 4.5cm, mount onto gold glitter card and fix to the bottom panels.
3. Die cut a white stitched circle and a larger scallop-edged circle from gold glitter card. Layer together and secure to the top panel. Stamp a baby onto white and colour in with alcohol markers. Cut out and attach to the circular panel.
4. Stamp a sentiment onto white in black ink and glue top-left. Stamp another sentiment onto white card. Layer a gold circular scratch reveal sticker on top. Stamp ‘Scratch here’ above the sticker, trim the panel and fix to the bottom of the front panel on the card.
Scratch Reveal Gatefold Card
1. Create a 14cm square gatefold card. Mount two pieces of mint marble paper onto green card and glue to each front panel of the blank. Matt a strip of wood patterned paper onto grey and run along the middle of each panel.
2. Stamp a sentiment and an arrow on the right-hand side of white card, 8.5cm square. Draw a frame around the edge with a blank fineliner, then mount onto green and grey card. Stamp a bottle onto white and a sentiment in black ink.
3. Colour in the bottle with alcohol markers and cover the sentiment with a silver scratch reveal sticker. Cut out the bottle and fix to the square with 3D foam pads. Secure the panel to the left-hand side of the card front. Add a silver gem in each corner.
TOP TIPS
- Colour in the motifs with soft and muted shades to match the patterned papers
- Make your scratch and reveal sentiment the focal point
- Choose from a range of motifs and sentiments to suit your occasion

You will need:
Templates or SVG files
Stencil, Inkylicious Sunbeam 6”
Ink pad, Ranger Distress Oxide Salvaged Patina
Cardstock, various colours
Gems, clear
Faber Castell Polychromos coloured pencils
Pens: shimmer pen, black fineliner, white gel pen
Hampton Art Action…
Card making How to Papercraft Papercrafter Techniques Projects

YOU WILL NEED:
Craft essentials
FREE PaperCrafter patterned papers
Dies: circle, scalloped circle
METHOD
1 Create a 13cm x 17cm white blank then cover the front with orange card. Cut tennis racket paper, 12cm…
Card making Decoupage Die cutting How to Papercraft Papercrafter Card Making

You will need:
Templates
Coloured paper or thin cardstock, various colours
Wooden skewers or thin garden canes
Tools: scoring board, scoring tool, clips, small hole punch
Glue
Concertina Fold & Bind Method
1. Take a sheet of landscape…
Home decor Home decorations How to Papercraft Papercrafter Techniques Video tutorial Projects Make it Today

Stencils: Altenew Doily Frame, Watercolor Bouquet; My Favorite Things Basic Shapes Triangles
Stamps: Avery Elle Simple Sentiments, Simply Said Hugs
Die, Altenew Mega You
Ink pads: Ranger Distress…
Card making Die cutting How to Papercraft Papercrafter Techniques Card Making Die cutting Projects


