


Card making Papercrafter Card Making
The circus looks set to be a hot trend in the craft world throughout 2013 and this issue’s free kit will get you well and truly prepared for plenty of party cards, invitations, decorations and other celebratory creations.
Every month we pick one reader at random and send them the next issue’s kit so that they may experience what it’s like to be a PaperCrafter designer for the day. This issue, the lucky winner of this fantastic opportunity was avid PaperCrafter fan Sarah Jackman Read. In addition to the pretty bird card design that was professionally photographed and printed in the magazine, Sarah also sent us a project that really shows off the kit’s circus-themed stamps and motifs. You can find the instructions for this great circus card making idea below.
Find the instructions for Sarah’s bird card design on page 8 of PaperCrafter issue 62 (on sale now!)
For your chance to become a PaperCrafter Designer For The Day, fill in the form on page 8 of the magazine and send it to Your Paper Project, PaperCrafter, 1 Phoenix Court, Hawkins Road, Colchester, Essex, CO2 8JY. Alternatively, email your name, address, email and telephone number to gabriella.blake@aceville.co.uk. See page 8 of the magazine for terms and conditions. Please note the winner is drawn at random and there is no need to submit project samples.
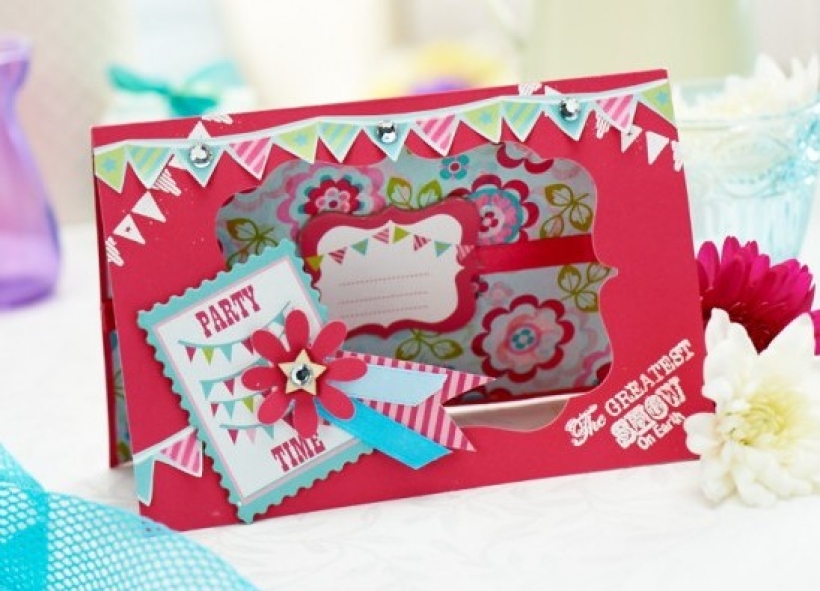
• Die cut a frame-shaped aperture from the front of a pink card blank. Set the cut-out card aside for now. Stick two layers of floral tissue paper, a length of ribbon and a chipboard element to the inside of the card as shown.
• Using the stamp set included in your kit, stamp and emboss bunting images and the phrase ‘The Greatest Show On Earth’. Glue the ‘Party Time’ sentiment at an angle in the bottom left corner of the aperture.
• Snip the image of stripy ribbon from the kit’s packaging and adhere this on top of the ‘Party Time’ sentiment. Add lengths of blue ribbon and a die=-cut flower made from the pink card you set aside earlier.
• Cut around the bunting from the kit’s flocked paper and attach it to the top and left-hand side of the card, curling it slightly. Add a wooden star and gems as shown. Finish the card by drawing outlines along the bunting in white gel pen.

You will need:
Templates or SVG files
Stencil, Inkylicious Sunbeam 6”
Ink pad, Ranger Distress Oxide Salvaged Patina
Cardstock, various colours
Gems, clear
Faber Castell Polychromos coloured pencils
Pens: shimmer pen, black fineliner, white gel pen
Hampton Art Action…
Card making How to Papercraft Papercrafter Techniques Projects

YOU WILL NEED:
Craft essentials
FREE PaperCrafter patterned papers
Dies: circle, scalloped circle
METHOD
1 Create a 13cm x 17cm white blank then cover the front with orange card. Cut tennis racket paper, 12cm…
Card making Decoupage Die cutting How to Papercraft Papercrafter Card Making

You will need:
Templates
Coloured paper or thin cardstock, various colours
Wooden skewers or thin garden canes
Tools: scoring board, scoring tool, clips, small hole punch
Glue
Concertina Fold & Bind Method
1. Take a sheet of landscape…
Home decor Home decorations How to Papercraft Papercrafter Techniques Video tutorial Projects Make it Today

Stencils: Altenew Doily Frame, Watercolor Bouquet; My Favorite Things Basic Shapes Triangles
Stamps: Avery Elle Simple Sentiments, Simply Said Hugs
Die, Altenew Mega You
Ink pads: Ranger Distress…
Card making Die cutting How to Papercraft Papercrafter Techniques Card Making Die cutting Projects


