


Die cutting Papercrafter Stamping Techniques
Let your imagination fly with Keren Baker’s colourful winged designs
Please login to download. Sign in here
As one year ends and another begins, it’s the perfect opportunity to try new techniques and use up those old paper scraps you’ve been hoarding. From die cutting and paper piecing to stamping, you can do just that with Tonic Studios’ beautiful dies! You could even position a butterfly onto a white background and colour it in. So, spread your wings and flutter into a world of creativity.
Craft essentials
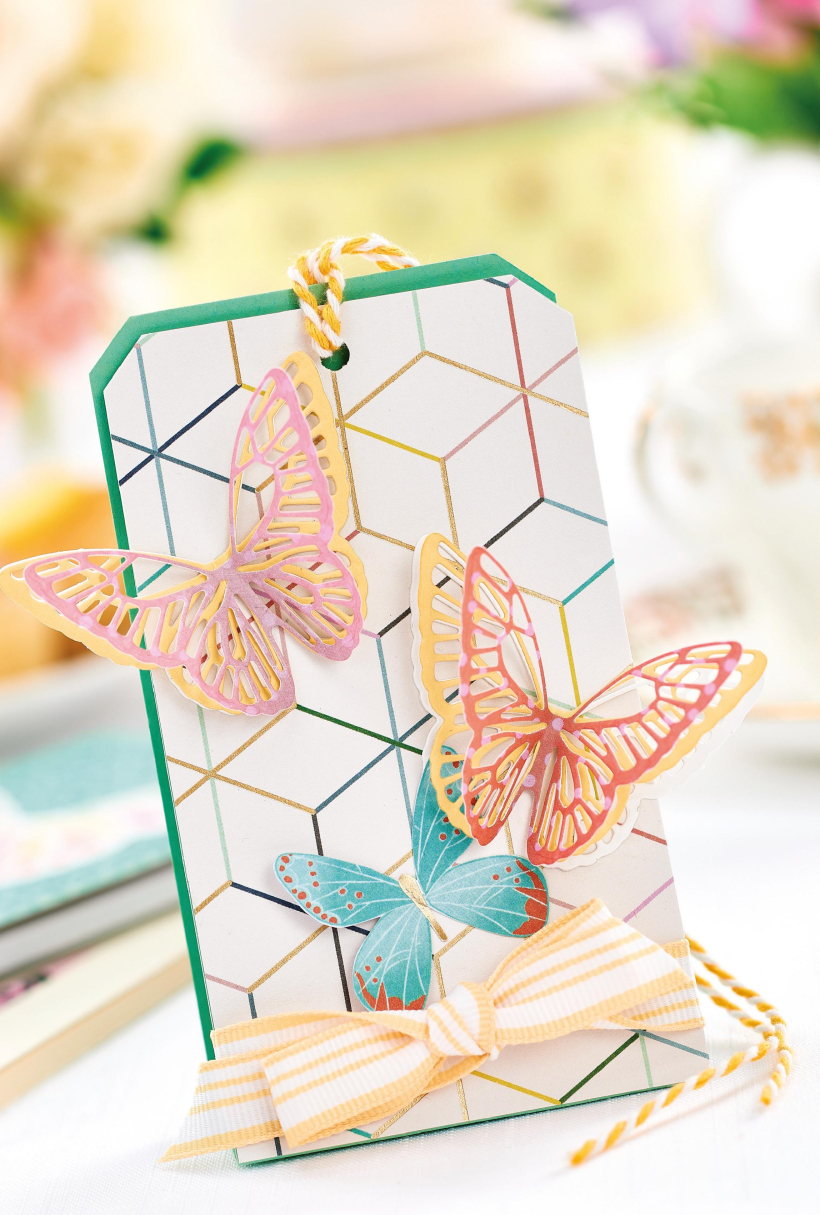
Dies: Tonic Studios Wings & Things, Monarch & Princess Wings, Mariposa Wings, Butterfly & Dragonfly
Stamps, Winnie & Walter Wish Big
Ink, Tonic Studios Nuvo hybrid, black
1. Score and fold at 12cm and 14.5cm along green card, 7cm x 26.5cm, to create a bag shape. Add patterned paper to the front panel and punch a hole through the top of both layers.
2. Die cut a small butterfly twice in white, yellow and pink patterned paper. Fold each one in half, then glue the three colours together. Die cut a butterfly from patterned paper and fix to the front of the bag, along with the stacked butterflies.
3. Wrap yellow and white ribbon around the base, then attach a bag filled with sweets in the centre. Tie yellow baker’s twine to secure the bag together.
1. Mount green star paper onto a white top-folding blank, 14cm x 15.5cm, leaving a border at the top and bottom. Glue a strip of pink spotty paper across the bottom.
2. Die cut a Mariposa butterfly from white card, trace around the edge of it and cut it out, then layer together. Die cut the same butterfly from a variety of patterned papers, then arrange the pieces onto the die-cut base in a pretty pattern.
3. Score down the middle of the design and die cut a butterfly centre from patterned paper and card. Secure together. Apply 3D foam pads near the centre of the butterfly and fix onto the card base. Stamp and trim out a sentiment, then add to the butterfly.
1. Cover a 10cm x 14cm notebook in turquoise patterned paper. Die cut a medium butterfly from white card and fix onto the book front. Fold the excess around the back and secure.
2. Die cut a medium butterfly from various patterned papers and arrange into the spaces. To finish, add the excess hearts from the butterfly centre die-cut beneath the butterfly.

You will need:
Templates or SVG files
Stencil, Inkylicious Sunbeam 6”
Ink pad, Ranger Distress Oxide Salvaged Patina
Cardstock, various colours
Gems, clear
Faber Castell Polychromos coloured pencils
Pens: shimmer pen, black fineliner, white gel pen
Hampton Art Action…
Card making How to Papercraft Papercrafter Techniques Projects

YOU WILL NEED:
Craft essentials
FREE PaperCrafter patterned papers
Dies: circle, scalloped circle
METHOD
1 Create a 13cm x 17cm white blank then cover the front with orange card. Cut tennis racket paper, 12cm…
Card making Decoupage Die cutting How to Papercraft Papercrafter Card Making

You will need:
Templates
Coloured paper or thin cardstock, various colours
Wooden skewers or thin garden canes
Tools: scoring board, scoring tool, clips, small hole punch
Glue
Concertina Fold & Bind Method
1. Take a sheet of landscape…
Home decor Home decorations How to Papercraft Papercrafter Techniques Video tutorial Projects Make it Today

Stencils: Altenew Doily Frame, Watercolor Bouquet; My Favorite Things Basic Shapes Triangles
Stamps: Avery Elle Simple Sentiments, Simply Said Hugs
Die, Altenew Mega You
Ink pads: Ranger Distress…
Card making Die cutting How to Papercraft Papercrafter Techniques Card Making Die cutting Projects


