


We love the free Studio Selection Paper Book that comes with issue 61 of PaperCrafter. Featuring designs by Stephanie Thannhauser, the Paper Book is packed with so many versatile patterns that can suit a number of different creations.
PaperCrafter Studio Selection Paper Book, Blue and purple ribbon from your PaperCrafter 61 kit, Peacock die-cut motif from your PaperCrafter 61 kit, Flat-back gems from your PaperCrafter 61 kit, Icicle Box template, Pillow box template , 150gsm card, Tracing paper, Double-sided tape, PVA glue, Scissors
Stephanie’s bird and butterfly motifs will look fab on kids’ greetings and bedroom makes and her more shape-led designs will give your home decoration projects an on-trend mid-century modern edge.
Seeing as issue 61 is already jam-full of great ideas and projects using both Stephanie’s papers and her gorgeous bird and butterfly kit, we couldn’t resist giving you some extra projects with these delicious papers. So here’s a really easy make that will add a touch of elegance to party tables and bedroom side cabinets. They also make great gifts and take next to no time to put together.
• Select a paper from your Studio Selection Paper Book and, using PVA glue, adhere it on to some 150gsm card to strengthen. Leave to dry. You can also cover the card side with another paper if you would like the inside to be patterned.
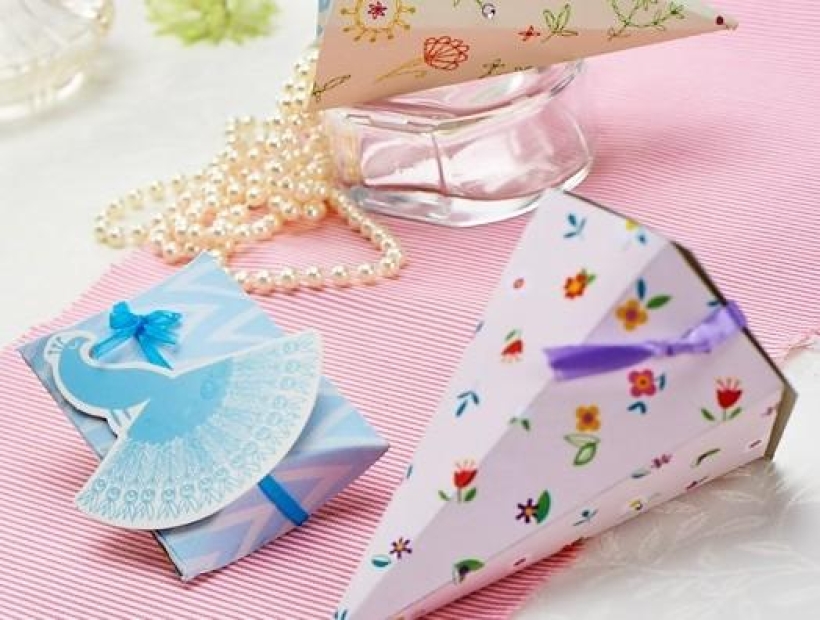
• Download the Icicle Box template by clicking on this link, now print out and trace onto tracing paper making sure you mark where to fold (shown in red dotted lines on the template) and where to cut (shown in black solid lines). Transfer the tracing onto the back of your paper.
• Cut out your traced shape and, referring to the template, score and fold where shown. If you are making the shape without a lid like the one at the top of the picture above, simply cut the hexagon off.
• Assemble your shape to make sure it all fits together and no amendments need to be made. If you are making the lidded version, the hexagon shape should sit on top of your icicle shape like a flip-top lid. Make a small slit in the top of the lid and through the adjoining container panel for you to thread the purple ribbon through to finish later.
• Once you are happy with how your box fits together, fix double-sided tape on the tabs and stick together.
• Thread the purple ribbon through the slits you made earlier and tie in a bow. Embellish the boxes with flat-back gems.
• Choose a design from the Studio Selection Paper Book and, using PVA glue, attach it toa sheet of 150gsm card to strengthen. Leave this to dry.
• Download the Pillow box template and print it out. Trace it onto tracing paper, ensuring you mark where to fold (shown in red dotted lines on the template) and where to cut (shown in black solid lines). Transfer the tracing onto the back of your paper.
• Snip around your traced shape and, using the template as a guide, score and fold along the indicated lines. Assemble the shape to make sure it all fits together and no amendments need to be made.
• Once the box is fitted together, fix double-sided tape on the tabs and stick together. Note that the leaf shaped sides with the semicircle cut out are the box's lid so they need to be folded down but not stuck. Also, on the other side, the underside leaf-shaped side of the box do not need to be stuck, it should simply rest snuggly on the edge of the inside of the box with the top leaf folded over and stuck on.
• Take the blue ribbon and wrap it around the length of the box. Attach at the back with a small square of double-sided tape and tie in a bow at the front. Finish by securing a peacock die-cut motif to the box with double-sided-tape.

You will need:
Templates or SVG files
Stencil, Inkylicious Sunbeam 6”
Ink pad, Ranger Distress Oxide Salvaged Patina
Cardstock, various colours
Gems, clear
Faber Castell Polychromos coloured pencils
Pens: shimmer pen, black fineliner, white gel pen
Hampton Art Action…
Card making How to Papercraft Papercrafter Techniques Projects

YOU WILL NEED:
Craft essentials
FREE PaperCrafter patterned papers
Dies: circle, scalloped circle
METHOD
1 Create a 13cm x 17cm white blank then cover the front with orange card. Cut tennis racket paper, 12cm…
Card making Decoupage Die cutting How to Papercraft Papercrafter Card Making

You will need:
Templates
Coloured paper or thin cardstock, various colours
Wooden skewers or thin garden canes
Tools: scoring board, scoring tool, clips, small hole punch
Glue
Concertina Fold & Bind Method
1. Take a sheet of landscape…
Home decor Home decorations How to Papercraft Papercrafter Techniques Video tutorial Projects Make it Today

Stencils: Altenew Doily Frame, Watercolor Bouquet; My Favorite Things Basic Shapes Triangles
Stamps: Avery Elle Simple Sentiments, Simply Said Hugs
Die, Altenew Mega You
Ink pads: Ranger Distress…
Card making Die cutting How to Papercraft Papercrafter Techniques Card Making Die cutting Projects


