


Card making Christmas cards Home decorations Papercraft Papercrafter Techniques
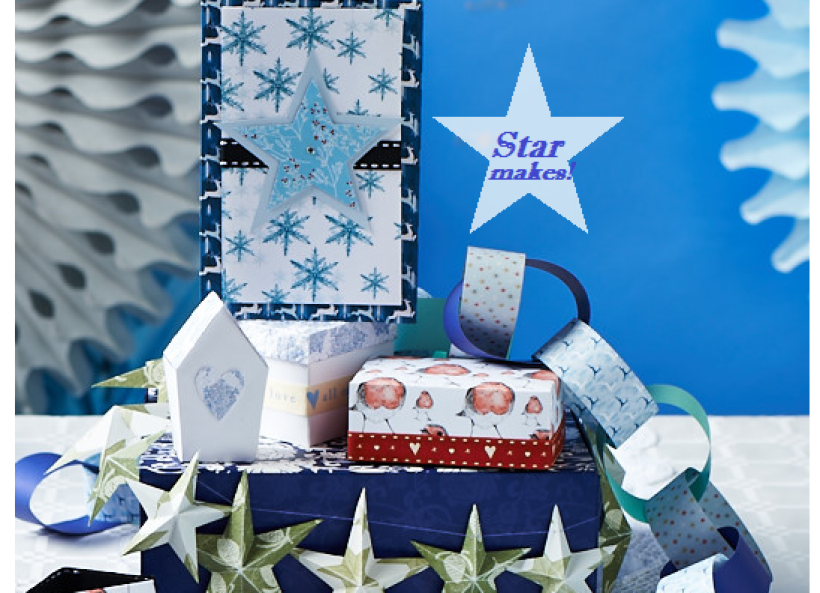
Christmas means crafting at PaperCrafter HQ, which also means we’re often covered in glue and glitter! But it doesn’t always have to be this way, with the help of the Affixit Craft Bumper Adhesive Kit, our 66 kit and a selection from our stash, we’ve come up with some top festive card, gift and decorating makes that are completely mess free…
PaperCrafter 66 kit, PaperCrafter 66 Studio Selection Paper Book, Patterned cardstock, Plain cardstock, black and white, Affixit Craft Bumper Adhesive Kit, A length of 1.5cm Side Stitch Ribbon, black, A length of 1.5cm Hearts and Kisses Ribbon, A length of 1.5cm All My Love Ribbon, Needle and thread, Pencil, ruler and scissors
• Cut a 11.5cm length of the black ribbon and adhere a strip of the Affixit 1.2cm Xtra Clear Double Sided Tape to the back.
• Trim the snowflake patterned paper to 9.5cm x 15cm and affix the ribbon to the centre, making sure the ends tuck under the back of the paper and the ribbon lies flat.
• Use the Star Garland template to cut out the larger star shape from the light blue blank and the smaller star from red on blue berry paper. Apply the Affixit Craft tape pen to the back of the large star and secure onto the middle of the ribbon. Use the Affixit pack's small square foam pads to fix the smaller star as shown.
• Take the reindeer blank and attach two 14cm strips of 3D foam tape from the pack to the front, one 2cm from the inside the other 2cm from the outside. Now fix two 5cm strips of 3D foam tape 2cm from the top and bottom of the blank.
• Attach the central motif to the foam pads ensuring you leave around a 1cm border around the edge of the card.
• Place the Edge Finger Lift Tissue Tape to line up flush against the edge of the garland strip, tear off the top panel and fix to the other end of the gardland strip to form a loop.
• Place the second different garland strip through the newly made loop. Again, join the ends of the strip together with tape.
• Decide on the size you want for your gift boxes and lid edges. Here are the instructions for a 7cm lidded square box with a 1.5cm lid edge but you can adapt the sizes to suit.
• Draw a 21cm square on the wrong side of a sheet of card marking off 7cm intervals along each edge. Use a pencil to draw a line from the top and bottom of these marks and score. Then draw a line from the side marks and score, this should leave you with a nine-square grid within the square.
• Number the nine squares from left to right so the top left square is '1', the middle square is '5' and the bottom right is '9'. Cut out the 21cm square and snip right edge of square 1. Fold to create a flap.
• Rub out all pencil marks. Work clockwise to snip and fold the bottom edge of square 3, the left edge of square 9 and the top edge of square 7. You will now have four flaps.Use the strong 0.6cm Xtra Clear Double Sided Tape to adhere outside edges of the flaps to the inside of the box. You now have a strong, sturdy box.
• To make the lid, draw a 10.2cm square on the wrong side of a sheet of patterned card, marking each inside edge at 1.5cm, this will give you a 7.2cm inside square which means your lid will fit nicely over your box.
• As with the box, draw and score a line from top to bottom, then left to right to join your marks. You should have a grid with one large square in the middle with four 1.5cm squares in each corner.
• Cut out the 10.2cm square and snip the right edge of the top left mini square, the bottom edge of the top right square, the left edge of the bottom right square and the top edge of the bottom left square. Rub out all pencil marks. Fold in the four flaps and use the strong 0.6cm Xtra Clear Double Sided Tape to adhere outside edges of the flaps to the inside of the lid.
• Embellish your boxes by adhering adhere a strip of the Affixit 1.2cm Xtra Clear Double Sided Tape to the back of 1.5cm ribbon and wrapping it around the box sides, or as seen in the large robin box, the lid edges.
• The Trace the large and small garland template shapes onto the wrong side of your chosen paper using the pack's purple masking tape to secure the tracing paper ensuring it doesn't slip.
• Cut out the shapes and, using a ruler, score along the inside lines (shown in red on the template). Now use your thumb and forefinger to pinch the along the scored lines on the right side of the paper to make a 3D shape. Do this on all the stars.
• 3: Using a needle to pierce the top of each star and thread through to create a garland.
Download the star garland template by clicking here: Star Garland template
WHERE TO BUY
- Affixit Craft Bumper Adhesive Kit, £9.98, affixitcraft.co.uk
- Side Stitch Ribbon, £2.50, fantasticribbons.com
- Hearts and Kisses Ribbon, 70p per metre, thelittlewoolcompany.com
- All My Love Ribbon, 70p per metre, thelittlewoolcompany.com

You will need:
Templates or SVG files
Stencil, Inkylicious Sunbeam 6”
Ink pad, Ranger Distress Oxide Salvaged Patina
Cardstock, various colours
Gems, clear
Faber Castell Polychromos coloured pencils
Pens: shimmer pen, black fineliner, white gel pen
Hampton Art Action…
Card making How to Papercraft Papercrafter Techniques Projects

YOU WILL NEED:
Craft essentials
FREE PaperCrafter patterned papers
Dies: circle, scalloped circle
METHOD
1 Create a 13cm x 17cm white blank then cover the front with orange card. Cut tennis racket paper, 12cm…
Card making Decoupage Die cutting How to Papercraft Papercrafter Card Making

You will need:
Templates
Coloured paper or thin cardstock, various colours
Wooden skewers or thin garden canes
Tools: scoring board, scoring tool, clips, small hole punch
Glue
Concertina Fold & Bind Method
1. Take a sheet of landscape…
Home decor Home decorations How to Papercraft Papercrafter Techniques Video tutorial Projects Make it Today

Stencils: Altenew Doily Frame, Watercolor Bouquet; My Favorite Things Basic Shapes Triangles
Stamps: Avery Elle Simple Sentiments, Simply Said Hugs
Die, Altenew Mega You
Ink pads: Ranger Distress…
Card making Die cutting How to Papercraft Papercrafter Techniques Card Making Die cutting Projects


