


Card making Christmas cards Christmas crafts Die cutting How to Papercraft Papercrafter Techniques Digi Stamps
Try slimline cards, 3D decoupage and more with your Christmas printables
Please login to download. Sign in here
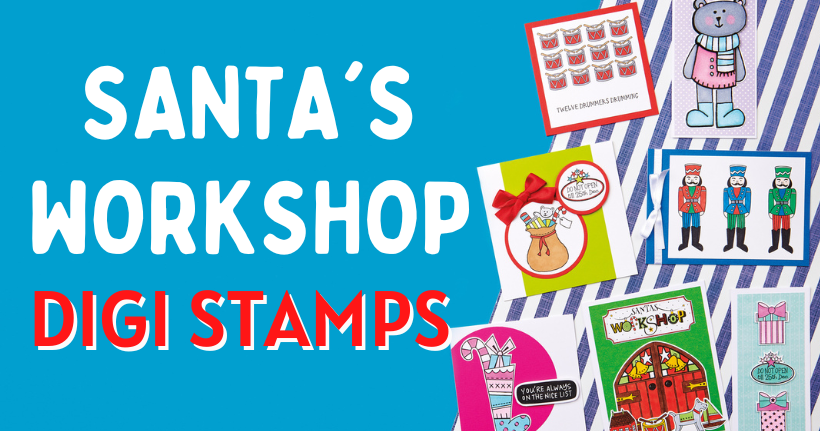
Santa and his elves are getting busy in the workshop, so it’s about time you got busy in the craft room using your digi stamp pack. From drums to sailing boats and teddy bears, we love the traditional toys featured in this set. Plus, we’ve thrown in plenty of cute sentiments for good measure. Colette Smith shows you how to make the most of your printables below.
Download and print them
1 Press ‘Click here to download now’ then log in – or register if you don’t currently have an account with us.
2 Click ‘Download now’ and you’ll see the download processing at the bottom of your screen.
3 Open the folder, then right-click on the file and select ‘Print’.
Slimline duo
Colette has opted for a couple of slimline cards to show off these digi stamps. Tall and narrow, you can resize the motifs to fit the length of the card as you can see on the teddy bear design opposite. Otherwise, stack multiple smaller motifs and sentiments for a simple yet modern look. A slimline card offers you plenty of space to build a scene so be sure to get creative with your digi stamps.
Print, colour, repeat
Don’t be afraid to repeat the same motif several times on one card. You can colour them with the same hues as Colette has done with her drum design or you can switch up the colour combos like the trio of soldiers. Either way, using only one digi stamp makes for a very quick and effective greeting. Sometimes simple is best! If you’re in a hurry, you can copy and paste the motifs on your computer, then colour them in digitally.
Try 3D decoupage
The great thing about our digi stamps is that you can print them off as many times as you like, which makes them ideal for 3D decoupage. The concept is simple – by building up layers and raising parts of the motif using 3D foam pads, you can give your cards added depth and dimension. Cut and layer up individual elements onto a base image, as Colette demonstrates with her teddy bear greeting.
YOU WILL NEED:
Santa’s Workshop digi stamps
Dies, circles
Stamps, Christmas sentiments
Ink pad, black
Cardstock, various colours
Patterned papers
Alcohol markers
Ribbons: red, white
Adhesives: glue, foam tape
Die-cutting machine
Santa’s Workshop
1. Crop the door, toy and Santa’s workshop digi stamps, then resize so that they fit onto a 10cm x 13cm piece of card.
2. Print, colour in and cut out. Trim away the foliage above the door. Mount green card onto a white 11cm x 14cm blank. Layer the motifs onto the card front.
Nutcrackers
1. Crop the Nutcracker digi stamp and resize so it is approximately 7.5cm tall. Copy twice so there are three images in total. Print and colour in the Nutcrackers, then trim to 9cm x 12cm.
2. Cover a 10cm x 14.5cm landscape blank with blue card. Mount the Nutcracker panel towards the right. Wrap and tie white ribbon around the left-hand side.
Toy Sack
1. Crop the toy sack motif and a sentiment. Resize the toy sack so that it will fit within a 6.5cm circle. Resize the sentiment to sit within a 4cm circle. Print and colour in the motif. Die cut both digi stamps into circles. Matt onto circles of red card.
2. Layer an 8cm x 12cm piece of lime card down the centre of a white 12cm square blank. Add the motif and sentiment, offsetting them slightly. Add a red ribbon bow above the toy sack circle.
Twelve Drummers
1. Download the drum motif, crop and resize so that it measures approximately 2cm across at its widest point. Copy so there are twelve drums in total.
2. Arrange into three rows of four. Add a sentiment below so they fit within a 9cm square. Print and colour in. Trim to 9cm square. Cover a 10cm square blank with red card and mount the digi stamp panel centrally on top.
Gift trio
1. Download the gift image and a sentiment. Crop the gift and resize to approximately 3cm wide. Copy so you have two in total. Resize the sentiment to 4cm wide. Print, colour in and trim.
2. Create a 7cm x 14cm white blank and mount patterned paper on top. Add the motifs and sentiment vertically down the centre of the greeting to finish.
Stocking
1. Crop and resize the stocking motif to 9cm tall. Print, colour in and cut out. Die cut a 10.5cm circle from pink.
2. Layer onto the left-hand side of an 11cm square white blank so it overlaps the edge slightly. Trim away any excess. Attach the motif to the circle, stamp a sentiment and fix to the right of the image.
3D Decoupage Bear
1. Crop and resize the bear digi stamp so it is 11cm tall. Copy and paste so there are four bears in total. Print and colour in each one.
2. For layer one, cut out the whole image. Layer two should be the head, tunic, scarf and boots. Layer three is the head and scarf. Layer four should be the scarf only. Assemble the layers with foam tape.
3. Create a 7.5cm x 15cm white blank and matt a 7cm x 14.5cm piece of lilac dotty paper on top. Attach the bear and a stamped sentiment.

To download our templates, simply click ‘Download Now!’ and it will open in your browser. Why not send us a picture of your project once you’re done? For your chance to be…
Home decor Home decorations Papercraft Papercrafter Party makes Templates

There’s nothing quite so relaxing, or quite so fun, as settling down with a good colouring page. It’s even better if that colouring page happens to include Wallace & Gromit. This duo…
Gather your friends, get the TV on, bring a pen, and play Coronation Bingo! Extra points for prizes.
HOW TO PLAY
1. Each player will need one scorecard and a pile of…
.png)
Featuring motifs full of whimsy and joy, this Clearly Besotted digi stamp set is perfectly suited to wish someone a happy day. Use your nine-piece printable pack as many…
Birthday crafting Card making Papercraft Stamping Techniques


