

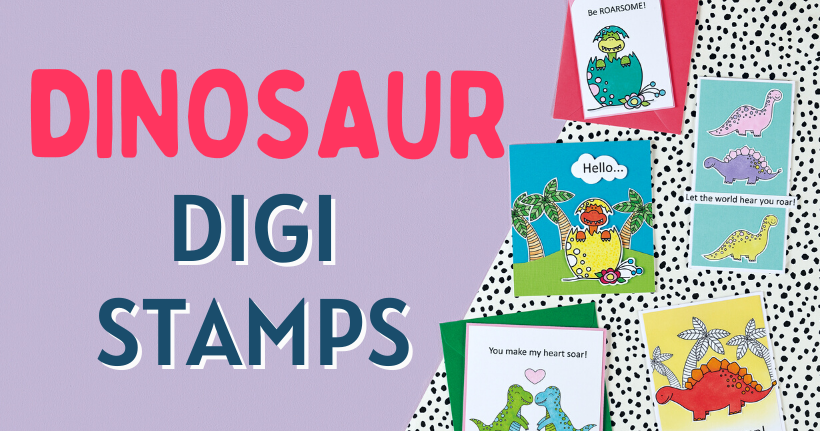


Birthday crafting Card making How to Papercraft Papercrafter Stamping Techniques Digi Stamps
Ensure your cards are a roaring success with this month’s prehistoric printables
Please login to download. Sign in here
Designed by the wonderful Colette Smith, your bonus dino-mite download pack features adorable motifs and sentiments aplenty. We know you love a pun, so we’ve thrown in a few fun greetings for good measure. Ideal for adults and little ones alike, these designs are bound to raise a smile. Craft Colette’s cards below using your exclusive digis and be sure to steal our top tips, too.
Download and print them
1 Press ‘Click here to download now’ then log in – or register if you don’t currently have an account with us.
2 Click ‘Download now’ and you’ll see the download processing at the bottom of your screen.
3 Open the folder, then right-click on the file and select ‘Print’
Resizing shortcuts
It’s a good idea to plan your design before you print out your digi stamps. Using Microsoft Word or a similar programme on your computer, draw a shape with a black outline and no fill. You can resize this shape to the same measurements as the panel or blank you intend to use. This will help you plan a layout by showing how much space you have for your digi stamps. You can then print the outline and cut just within the line.
Layered look
Add depth and dimension to your cards by considering the positioning of your digi stamps. Adhere several motifs to the background and layer the focal images on top. This will give the illusion that the focal motifs are closer. Enhance this effect by reducing the size of the background digi stamps and use hillside panels to add even more depth to your scene. Go one step further and incorporate 3D foam pads.
Shaped sentiments
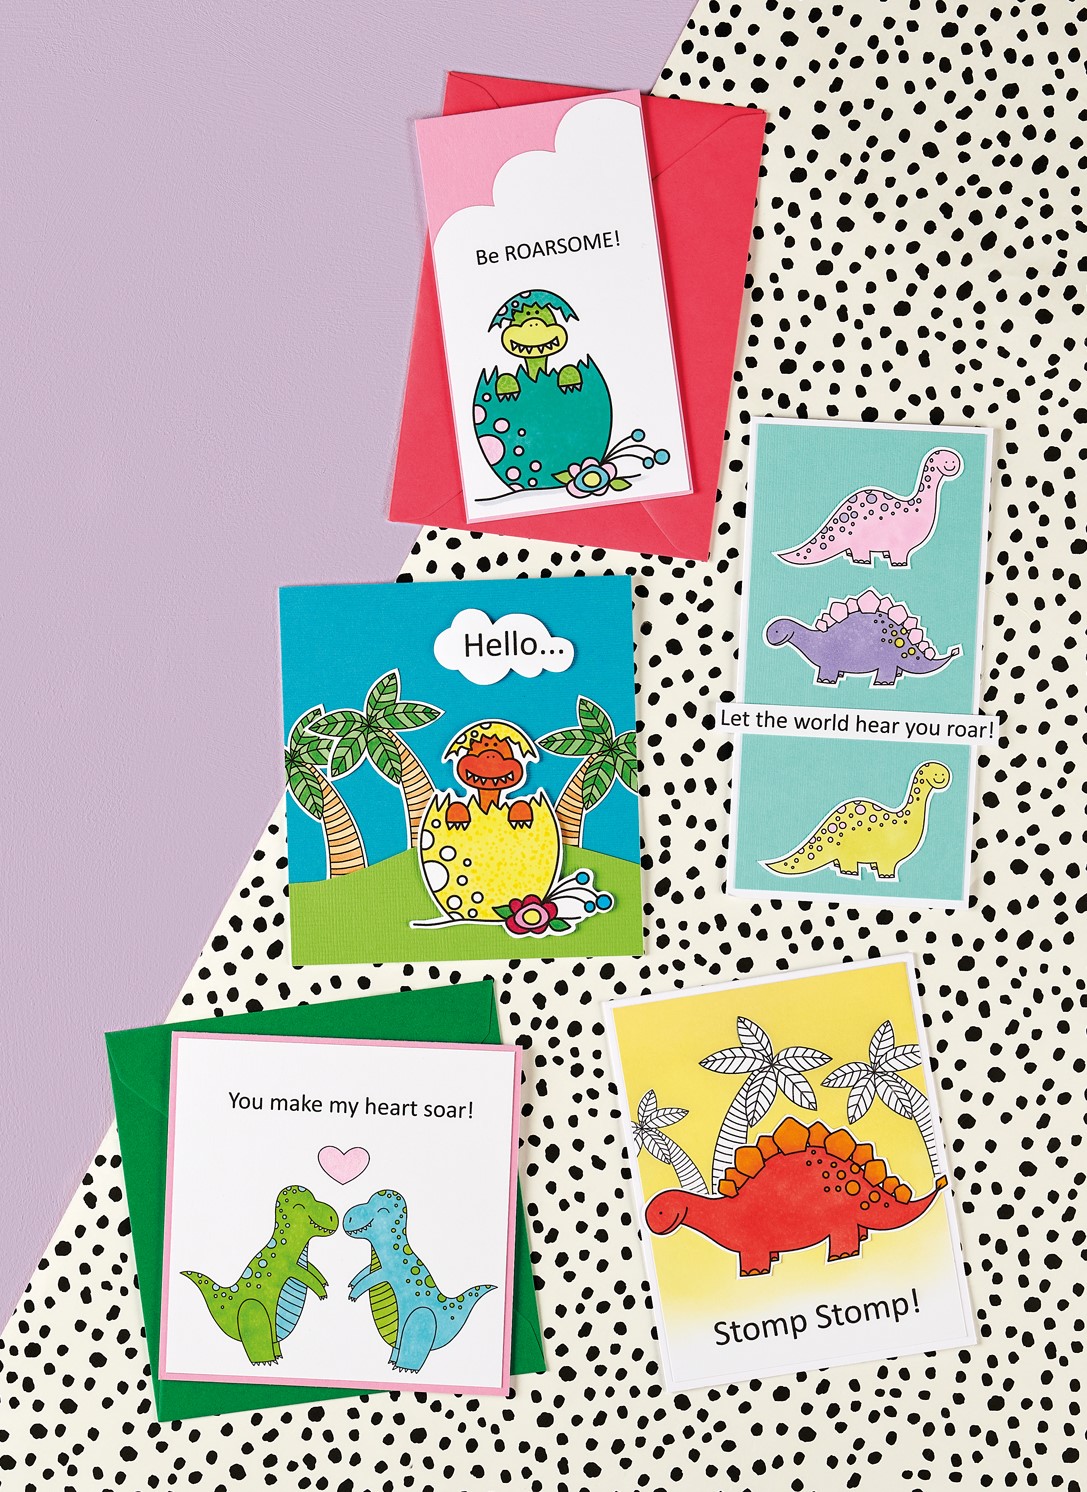
We love what Colette has done with her ‘Hello…’ card opposite. You can keep your sentiments as a simple strip, but why not experiment a little and cut them into a shape as Colette has done, snipping hers into a cloud? It’s a quick and easy way to add more interest to your cards. You can either use basic-shaped dies for speedy results or hand-cut if you’re feeling confident.
YOU WILL NEED:
Dinosaur digi stamps
Cardstock, various colours
Ink pads: Ranger Distress Oxide Squeezed Lemonade
Alcohol markers
Masking paper
Nuvo Aqua Shimmer Pen
Adhesives: 3D foam pads, glue
Roarsome!
1. In Microsoft Word or a similar editing programme on your computer, add a dinosaur motif with a sentiment above it so they fit at the lower end of an 8cm x 14.5cm panel. Resize to suit, then print and colour in.
2. Trim the panel to 7.5cm x 14cm and snip scallops from the top-right corner. Cover an 8cm x 14.5cm blank with pink card and mount the panel on top. Highlight with a shimmer pen.
Dino trio
1. In Microsoft Word or a similar editing programme, add two different dinosaurs and a sentiment. Copy one of the dinosaurs and resize so they fit widthways within an 8cm wide panel. Resize the sentiment to 9.5cm.
2. Print, colour and cut out the images. Create an 8.5cm x 17cm blank and mount teal cardstock on top. Arrange the dinosaurs vertically, setting the sentiment between the lower two.
Hello
1 In Microsoft Word or a similar editing program, add a tree, dinosaur and sentiment. Copy the tree so there are three, flipping two so they face the opposite direction. Resize the images to suit, then print. Colour in with alcohol markers and cut out.
2 Cover a 12.5cm x 13.5cm blank with teal card. Trim a hill shape from green and fix to the base. Add the trees, tucking the bottom of each behind the hill. Attach the dino, snip the sentiment into a cloud shape and fix above the trees. Highlight parts of the images with a shimmer pen.
Dino duo
1. In Microsoft Word or a similar editing programme on your computer, add a dinosaur, heart and sentiment. Copy the dinosaur so you have two in total and flip one. Arrange the dinosaurs, heart and sentiment so they sit within a 12cm square.
2. Print, colour in, then mount the panel onto a 12.5cm square blank covered with pink card. Add shimmer accents to the heart and dinosaur’s spots.
Ink blended background!
1 In Microsoft Word or a similar editing programme, add a dinosaur, tree and sentiment. Move the dinosaur to one side, copy and paste the tree twice and re-size. Flip two trees so they are facing in the opposite direction.
2 Arrange along with the sentiment so they fit within a 10.5cm x 13.5cm panel. The trees should sit across the centre of the panel, overlapping the sides and the sentiment should be at the bottom. Resize the dinosaur and print along with the trees and sentiment.
3. Trim into a 10.5cm x 13.5cm panel. Print the trees again onto masking paper and trim. Place the masks over the trees. Blend yellow distress oxide, fading towards the bottom. Remove the masks. Colour in and cut out the dinosaur and add to the panel. Mount onto an 11cm x 14cm blank.

To download our templates, simply click ‘Download Now!’ and it will open in your browser. Why not send us a picture of your project once you’re done? For your chance to be…
Home decor Home decorations Papercraft Papercrafter Party makes Templates

There’s nothing quite so relaxing, or quite so fun, as settling down with a good colouring page. It’s even better if that colouring page happens to include Wallace & Gromit. This duo…
Gather your friends, get the TV on, bring a pen, and play Coronation Bingo! Extra points for prizes.
HOW TO PLAY
1. Each player will need one scorecard and a pile of…
.png)
Featuring motifs full of whimsy and joy, this Clearly Besotted digi stamp set is perfectly suited to wish someone a happy day. Use your nine-piece printable pack as many…
Birthday crafting Card making Papercraft Stamping Techniques


