


Card making Papercrafter Techniques
Adding a decorative embellishment can really give your greetings and paper projects an extra touch of love. While there are loads of fantastic toppers, sparkles and gems on the market that provide some added glitz, texture or depth, there is nothing like creating your own, unique addition to your greetings. One easy way of doing this is by drawing or stamping onto some shrink plastic - just as our designer Tracey Daykin-Jones has done on her Congratulations greeting in our recent issue.
Congratulations Greeting Card
Making your own shrink plastic embellishments may look technical but it’s actually very easy, here’s our five-step guide.
• Draw or stamp your design onto white paper, then trace the image on clear shrink plastic using permanent marker or ink. You can always use an opaque shrink plastic and place your design straight on.
• You can colour the image with permanent makers using dots of colour to avoid streaking or by dabbing alcohol ink on with a cotton wool bud.
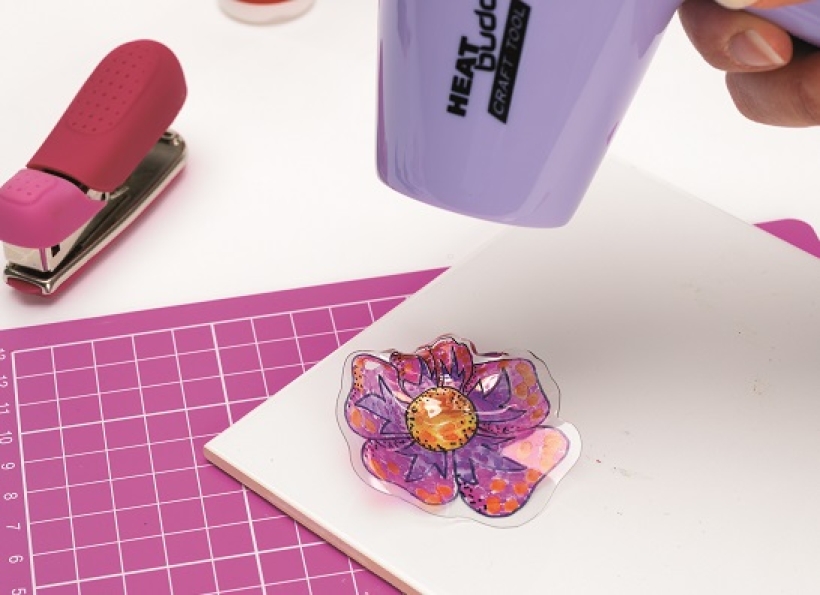
• Cut out the design, leaving a border around it and, if you wish to use the motif as a hanging charm, punch a small hole in the top. Now lie flat against a hard surface and use a heat gun to release hot air on to your shape, as it heats the charm will buckle.
• Heat until the charm flattens, then leave to cool.
• If you wish, you can use a jump ring to attach the charm to a greeting.

You will need:
Templates or SVG files
Stencil, Inkylicious Sunbeam 6”
Ink pad, Ranger Distress Oxide Salvaged Patina
Cardstock, various colours
Gems, clear
Faber Castell Polychromos coloured pencils
Pens: shimmer pen, black fineliner, white gel pen
Hampton Art Action…
Card making How to Papercraft Papercrafter Techniques Projects

YOU WILL NEED:
Craft essentials
FREE PaperCrafter patterned papers
Dies: circle, scalloped circle
METHOD
1 Create a 13cm x 17cm white blank then cover the front with orange card. Cut tennis racket paper, 12cm…
Card making Decoupage Die cutting How to Papercraft Papercrafter Card Making

You will need:
Templates
Coloured paper or thin cardstock, various colours
Wooden skewers or thin garden canes
Tools: scoring board, scoring tool, clips, small hole punch
Glue
Concertina Fold & Bind Method
1. Take a sheet of landscape…
Home decor Home decorations How to Papercraft Papercrafter Techniques Video tutorial Projects Make it Today

Stencils: Altenew Doily Frame, Watercolor Bouquet; My Favorite Things Basic Shapes Triangles
Stamps: Avery Elle Simple Sentiments, Simply Said Hugs
Die, Altenew Mega You
Ink pads: Ranger Distress…
Card making Die cutting How to Papercraft Papercrafter Techniques Card Making Die cutting Projects


